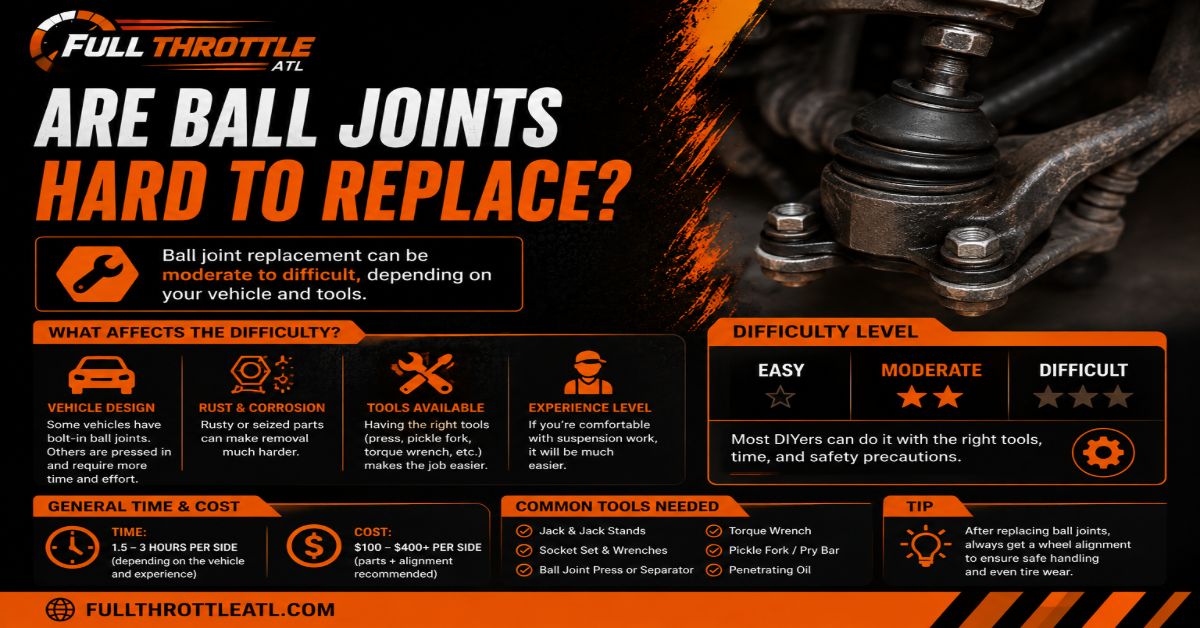
Replacing ball joints ranges from moderately difficult to extremely difficult depending entirely on your vehicle suspension design, regional rust conditions, and your access to specialized tools. While a seasoned DIYer with a hydraulic press can complete the job in 2 to 4 hours, a beginner dealing with rusted, factory-riveted components can easily spend 8 hours or fail entirely.
At a Glance
- DIY Time Investment requires 2 to 3 hours per side for standard installations, plus 1 to 2 extra hours for heavy rust.
- Professional labor time typically ranges from 1.5 to 3 hours per side based on mechanic book time.
- Average component lifespan spans between 70,000 and 150,000 miles depending on road conditions and driving habits.
- Safety tolerances dictate that most manufacturers specify a maximum allowable play of 0.020 to 0.050 inches before failure.
- Complete control arm replacement is mandatory on modern vehicles featuring integrated, non-replaceable joints.
How long does it take to replace ball joints?
The time required to replace ball joints depends directly on the suspension design and component rust levels, typically taking 2 to 3 hours per side for standard bolt-in or press-in configurations. If you encounter severe rust or factory-riveted components, expect to add 1 to 2 hours of extra labor per side. Professional mechanics using commercial lifts and pneumatic equipment generally log 1.5 to 3 hours per side according to standard book time.
For home mechanics working on jack stands, the job often stretches longer due to stubborn tapered studs and adapter fitment issues. Amateurs should set aside an entire weekend for a front suspension overhaul, ensuring adequate time for unexpected roadblocks like sheared bolts or trips to the auto parts store.
What is the average lifespan of a suspension ball joint?
High-quality front suspension ball joints typically last between 70,000 and 150,000 miles under normal driving conditions. Vehicles driven frequently on rough dirt roads, salted winter highways, or roads filled with deep potholes often experience premature failure as early as 40,000 miles.
Rubber grease boots protect the internal spherical bearing from moisture and road debris. Once a grease boot tears, road salt and grit quickly contaminate the joint, causing rapid metal wear. Most manufacturers specify a maximum allowable vertical play of 0.020 to 0.050 inches. Anything beyond this threshold means the joint is compromised and requires immediate replacement to ensure vehicle safety.
What tools are needed to replace a ball joint?
Replacing a ball joint requires a robust collection of automotive tools beyond a standard socket and wrench set. Essential equipment includes a heavy-duty floor jack, secure jack stands, a torque wrench, a ball joint press kit with vehicle-specific adapter cups, and a pickle fork or pneumatic air hammer to separate the tapered stud from the steering knuckle.
For vehicles with factory-riveted joints, you will need an angle grinder, an air chisel, or an oxy-acetylene torch to shear off the rivet heads. Safety glasses and penetrating fluid like PB Blaster are mandatory additions for dealing with rusted suspension components. Always verify whether your specific make and model requires specialty metric sockets or internal retaining ring pliers before starting the job.
How can you tell if a ball joint is failing?
Failing ball joints announce themselves through distinct clunking, popping, or snapping noises when driving over speed bumps, pulling into driveways, or turning the steering wheel. Other primary symptoms include a wandering steering wheel on the highway, uneven front tire wear characterized by edge feathering, and excessive vibration transmitted through the steering column.
To test for ball joint wear at home, safely lift the front of the vehicle with a floor jack under the control arm, grab the tire at the 12 o’clock and 6 o’clock positions, and rock it back and forth. If you feel loose play or hear a distinct knocking sound, the ball joint or wheel bearing is failing.
Can I drive with a bad ball joint?
You should never drive a vehicle with a known bad ball joint because total joint separation leads to catastrophic steering loss. A completely failed ball joint allows the steering knuckle and wheel assembly to detach from the suspension control arm.
When this happens, the vehicle corner drops instantly, the tire digs into the fender well, and the driver loses all directional control. This dangerous mechanical failure at highway speeds frequently causes rollover accidents or severe collisions. Schedule immediate repairs at the first sign of excessive play or heavy knocking.
Should I replace both front ball joints at the same time?
You should always replace front ball joints in pairs across the left and right sides of the vehicle. Suspension components experience identical mileage, wear cycles, and road impacts. If the driver-side ball joint has worn out and failed, the passenger-side joint is experiencing identical internal fatigue and is usually close behind.
Replacing both sides simultaneously ensures balanced handling, restores uniform steering response, and saves you from paying for a duplicate professional wheel alignment in the near future.
Do I need a wheel alignment after ball joint replacement?
A professional wheel alignment is mandatory immediately after replacing any suspension ball joint. Even when installing exact original equipment manufacturer parts, the new joint alters the precise geometric alignment between the steering knuckle and the control arm.
Failing to perform a wheel alignment results in rapid, uneven tire wear, a crooked steering wheel while driving straight, and erratic tracking on the highway. Protect your tire investment by scheduling an alignment on the same day as your suspension repair.
Why do ball joints get stuck in the steering knuckle?
Ball joint studs get stuck in the steering knuckle because years of road vibration, high clamping loads, and thermal expansion effectively cold-weld the tapered steel stud into the matching knuckle bore. Standard hand tools are rarely strong enough to break this metal-on-metal bond.
Overcoming this fusion requires a combination of high-impact shock and localized heat. Mechanics frequently use a pneumatic air hammer against a fork separator or apply propane torch heat to the knuckle collar, allowing the metal to expand slightly and release the tapered stud.
How do I deal with factory-riveted ball joints?
Many older trucks and SUVs feature heavy-duty steel rivets securing the factory ball joint to the control arm instead of standard bolts. Standard pressing tools cannot remove these factory rivets without prior destruction of the rivet heads.
You must grind the rivet heads flush with the control arm using an angle grinder, then use an air chisel or punch driven by a hammer to punch the remaining shaft out of the mounting holes. Replacement aftermarket ball joints always come supplied with high-grade hardened bolts and nuts to replace the original factory rivets during reassembly.
What is a captive control arm and can it be repaired?
A captive control arm features a permanently integrated ball joint that is forged, pressed, or cast directly into the control arm assembly during manufacturing. This design is common on modern European vehicles like BMW and Audi models, as well as many aluminum-component Subaru suspensions.
You cannot press out or replace the ball joint alone on a captive control arm. The entire control arm assembly must be unbolted and replaced as a single unit when the ball joint wears out.
What are the risks of using a generic ball joint press?
Using a generic rental ball joint press from a local auto parts store often creates severe installation complications due to adapter sizing mismatches. Generic adapter cups frequently do not match the angled or stepped control arm contours found on modern Honda and Toyota models.
Attempting to force a generic cup into an uneven surface causes the ball joint to press in at an angle, destroying the new component or cracking the control arm. You frequently need to purchase or fabricate vehicle-specific receiving adapters to press the joint straight.
Is it safe to hit an aluminum steering knuckle with a hammer?
Striking an aluminum steering knuckle with a steel hammer to free a stuck ball joint is extremely dangerous and can ruin the suspension. Modern aluminum steering knuckles are brittle compared to traditional cast iron components.
Heavy steel hammer blows can deform, crack, or structurally weaken the aluminum casting, leading to catastrophic steering knuckle failure while driving. Always use brass drifts, dead-blow mallets with caution, or professional mechanical pullers on aluminum suspension components.
How much does it cost to have a mechanic replace ball joints?
Professional ball joint replacement typically costs between $250 and $700 per side, depending heavily on the make and model of your vehicle. Labor charges generally account for $150 to $350 of that total, reflecting 1.5 to 3 hours of mechanic book time.
If your vehicle features captive control arms that require replacing the entire arm assembly, parts costs increase significantly, pushing total repair bills closer to $800 or $1,200 for a complete front-end axle service including alignment.
What happens if a ball joint breaks while driving?
When a ball joint breaks completely while driving, the vehicle front corner drops instantly as the suspension collapses onto the moving tire. The driver loses all steering control of that wheel, forcing the vehicle to veer violently toward the side of the failed joint.
Secondary damage frequently includes destruction of the fender, inner wheel liner, axle shaft, brake lines, and alloy wheel rim. Avoiding this catastrophic scenario requires replacing ball joints immediately upon detecting excessive play, popping noises, or steering wander.
The Bottom Line
Replacing ball joints is a demanding automotive repair that requires careful evaluation of your vehicle suspension design, available tools, and mechanical experience. While bolt-in designs are manageable for skilled DIYers, rusted rivets, captive control arms, and tapered stud fusion quickly escalate the project difficulty. Address failing components immediately with quality replacement parts and always finish the job with a professional wheel alignment to protect your vehicle handling and safety.