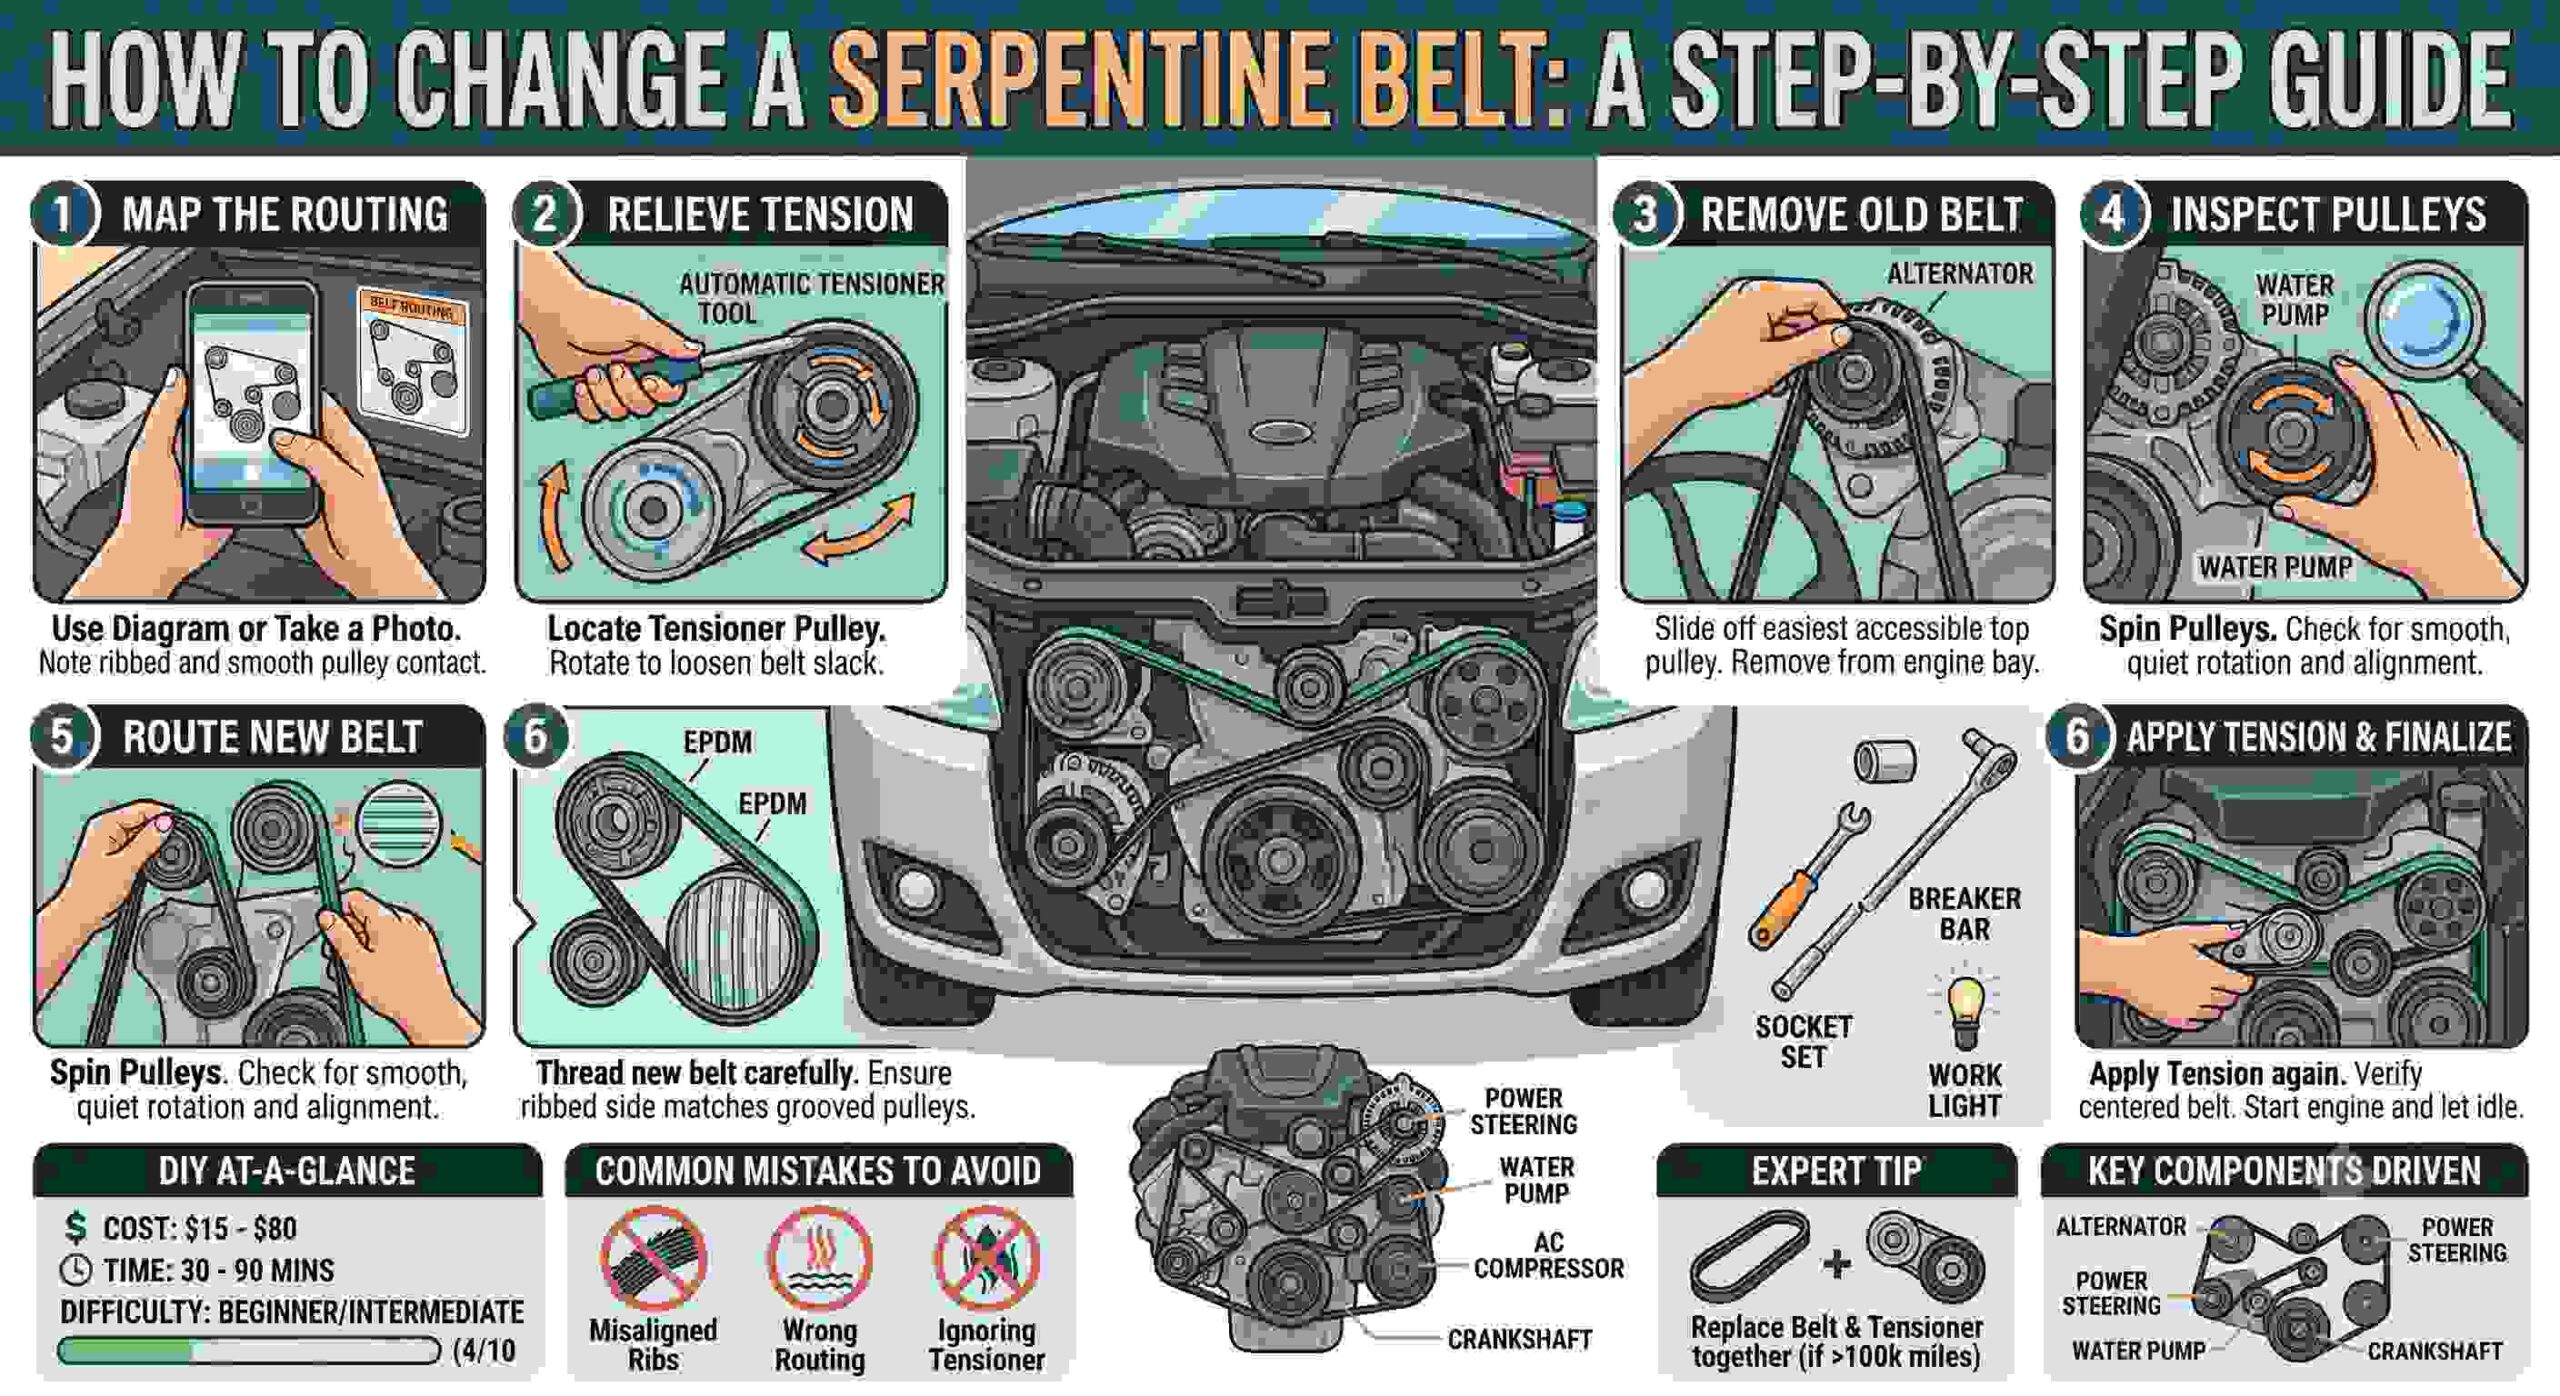
You change a serpentine belt by mapping the belt routing, rotating the tensioner pulley to relieve tension, and sliding the old belt off the engine accessories. After inspecting the pulleys for wear, you route the new belt along the original path and release the tensioner to secure it in place.
Key Facts / At a Glance
- Average Lifespan: Serpentine belts require replacement every 50,000 to 100,000 miles (80,000 to 160,000 kilometers).
- Cost Efficiency: DIY replacement costs between $15 and $80 for the belt alone, compared to $100 to $300 at a professional shop.
- Material Shift: Modern vehicles use EPDM rubber that wears down structurally like a tire tread, rather than visually cracking like older Neoprene belts.
- Catastrophic Risk: Incorrect belt routing can drive the water pump backward, causing immediate and severe engine overheating.
- System Synergy: Failing to replace a worn automatic tensioner will cause a brand-new belt to slip, squeal, and wear out prematurely.
What Tools Do You Need to Change a Serpentine Belt?
Gathering the correct tools before starting prevents the vehicle from being stranded with a disassembled engine bay. Modern engine bays offer minimal clearance, making specialized leverage tools highly beneficial over standard ratchets.
Before You Start
- Time Required: 30 to 90 minutes (highly dependent on engine layout).
- Difficulty: 4/10 (Beginner to Intermediate).
- Cost: $15 to $80 for the belt; $150 to $400 if replacing the tensioner assembly.
- Required Tools:
- New OEM-quality serpentine belt
- Serpentine belt tool or long-handled breaker bar (3/8-inch or 1/2-inch drive)
- Socket set (metric and standard)
- 10mm wrench (for battery terminal)
- Work light or flashlight
- Smartphone (for reference photos)
- Pro Tip: Most local auto parts stores lend serpentine belt tools for free with a refundable deposit.
Before You Start: Understanding Your Engine Bay
Before you begin removing components, you must assess the engine layout and the condition of the drive system. Vehicles with longitudinal engines (rear-wheel drive) typically provide ample clearance at the front of the block. Vehicles with transverse engines (front-wheel drive) often wedge the belt system against the passenger-side frame rail, requiring you to access the lower pulleys by removing the front wheel and splash shield.
How Do You Tell If You Need a New Belt?
You determine a belt needs replacement by inspecting its material condition and listening for specific noises. Pre-1990s Neoprene belts fail by cracking across the ribs; if you see three or more cracks in a single inch, the belt requires replacement. Modern EPDM (Ethylene Propylene Diene Monomer) belts rarely crack. Instead, they lose rubber material. You must use a plastic serpentine belt wear gauge—which drops into the belt grooves—to measure depth. If the gauge sits flush with the ribs, the belt has lost material and requires replacement.
How to Change a Serpentine Belt
Following the exact sequence of removal and installation guarantees the new belt maintains proper tension and drives the engine accessories in the correct rotational direction.
Step 1: Map the Belt Routing Path
Locate the factory belt routing diagram, typically found on a sticker affixed to the radiator shroud, the underside of the hood, or the front clip. If this sticker is missing or illegible, use your smartphone to take three well-lit photos of the current belt routing from different angles.
- Specifics: Note exactly which side of the belt touches which pulley. The ribbed side of the belt must contact grooved pulleys, while the smooth flat side of the belt contacts smooth pulleys (typically the idler and tensioner pulleys).
- Success Checkpoint: You possess a clear, readable reference of the exact path the belt takes around the alternator, power steering pump, water pump, AC compressor, and crankshaft.
- Common Mistake: Relying on memory. Modern single-belt systems feature complex “S” curves; guessing the route frequently leads to reversing a component’s spin.
Step 2: Disconnect the Negative Battery Cable
Use a 10mm wrench to loosen the nut on the negative (black) battery terminal and slide the cable off the post. Tuck the cable safely to the side so it cannot spring back and touch the terminal.
- Specifics: The serpentine belt loops directly around the alternator. The main alternator output wire remains live and connected straight to the battery.
- Success Checkpoint: The vehicle has no electrical power, rendering the engine bay safe for metal hand tools.
- Common Mistake: Leaving the battery connected and accidentally touching a metal socket wrench across the alternator’s positive terminal and the engine block, resulting in a dangerous electrical arc.
Step 3: Relieve Tension on the System
Locate the automatic tensioner assembly. Insert your serpentine belt tool or breaker bar into the square slot (usually 3/8-inch or 1/2-inch drive) or attach a socket to the center bolt head on the pulley arm. Apply steady pressure to rotate the arm against its internal spring.
- Specifics: Most tensioners require counterclockwise rotation to relieve tension, but some require clockwise rotation. Push gently first; the arm will yield in the correct direction.
- Success Checkpoint: The tensioner arm swings away from the belt, leaving the rubber completely slack.
- Common Mistake: Using a short, standard ratchet instead of a long breaker bar. Short ratchets fail to provide enough leverage against heavy-duty tensioner springs and can slip, causing hand injuries.
Step 4: Remove the Old Belt and Inspect Pulleys
While holding the tensioner open with one hand, use your other hand to slip the slackened belt off the most accessible top pulley (usually the alternator or power steering pump). Slowly release the tensioner arm back to its resting position. Pull the old belt out of the engine bay.
- Specifics: Spin every accessory pulley, idler pulley, and tensioner pulley by hand. They must spin smoothly and silently.
- Success Checkpoint: All pulleys rotate freely without wobbling, grinding, or producing a metallic “skating rink” noise.
- Common Mistake: Skipping the pulley inspection. Installing a new belt over a failing water pump or seized idler bearing will snap the new belt within days.
Step 5: Route the New Serpentine Belt
Thread the new belt down into the engine bay, routing it precisely according to your diagram or photos. Leave the easiest, most accessible top pulley for last.
- Specifics: Ensure the multi-grooved V-ribs line up perfectly with the corresponding grooves in the metal pulleys.
- Success Checkpoint: The belt is wrapped around all lower and side components, with only the final top pulley remaining unlooped.
- Common Mistake: Failing to clean spilled oil, coolant, or power steering fluid off the pulleys. Chemical contamination degrades EPDM rubber rapidly.
Step 6: Release the Tensioner and Verify Alignment
Rotate the tensioner arm again to create maximum slack. Slip the final section of the belt over the last pulley. Release the tensioner arm slowly, allowing it to apply pressure and grip the new belt.
- Specifics: Visually inspect every single pulley before starting the car. The belt must not overhang the edge of any pulley by even a single rib. Reconnect the negative battery cable. Start the engine and let it idle for 60 seconds.
- Success Checkpoint: The belt tracks perfectly straight with no squealing, chirping, or wobbling.
- Common Mistake: Leaving the socket or breaker bar attached to the tensioner when starting the engine, causing the tool to act as a dangerous projectile.
What Are the Most Common Installation Mistakes?
When you change a serpentine belt, minor oversights lead to immediate mechanical failures. If you experience issues post-installation, check for these specific failure modes:
- Misaligned Ribs: If the belt sits one groove off-center on the AC compressor or alternator, the metal lip of the pulley will slice through the rubber. This shreds the new belt longitudinally within minutes of starting the engine.
- Incorrect Routing: Misrouting the belt can cause the smooth side of the belt to drive a grooved accessory, causing slip. Worse, it can spin the water pump backward, halting coolant flow and overheating the engine before the temperature gauge can warn you.
- Ignoring Fluid Leaks: A squealing new belt often indicates that an active oil or coolant leak is dripping onto the rubber, causing it to lose friction against the pulleys. You must fix the leak, or the squeal will return.
Should You Replace the Tensioner at the Same Time?
You should replace the automatic tensioner assembly simultaneously if the vehicle has surpassed 100,000 miles. A serpentine belt relies entirely on the heavy-duty spring inside the tensioner to maintain correct pressure. Over a decade of driving, heat cycling degrades this internal spring.
Installing a high-grip new belt on a weak, worn-out tensioner creates a mismatch. The weak tensioner will bounce under engine load, causing the new belt to slip, glaze over, and squeal. Purchasing the belt and tensioner together as a “component kit” ensures the entire drive system operates at factory specification.
DIY vs. Professional Shop: Which Is Right for You?
Choosing whether to change a serpentine belt yourself depends largely on your engine bay’s physical constraints and your comfort with leverage tools.
| Feature | DIY Replacement | Professional Shop |
|---|---|---|
| Total Cost | Extremely low ($15–$80) | Moderate ($100–$300) |
| Time Investment | 1 to 2 hours of labor | 30 to 60 minutes of waiting |
| Tools Required | Serpentine bar, basic sockets | Commercial lifts, pneumatic tools |
| Risk Factor | High if routed incorrectly | Extremely low |
| Engine Bay Factor | Best for longitudinal (RWD) layouts | Best for tight transverse (FWD) layouts |
| Warranty | Part warranty only | Parts and labor warranty |
Quick Verdict: If you drive a rear-wheel-drive truck or SUV with vast space between the radiator and engine block, DIY replacement is highly economical. If you drive a compact front-wheel-drive sedan where the belt is buried against the frame rail, paying a professional shop $150 saves hours of deep frustration.
Frequently Asked Questions
What is the difference between a serpentine belt and a timing belt?
A serpentine belt lives on the outside of the engine block and drives peripheral accessories like the alternator and AC compressor. A timing belt lives inside the engine behind a cover; it synchronizes the engine’s internal pistons and valves. A snapped serpentine belt disables accessories, but a snapped timing belt destroys the engine.
Why does my new serpentine belt squeal when I start the car?
A new serpentine belt squeals because it lacks proper tension or lacks friction. This is almost always caused by a failing automatic tensioner that cannot hold the belt tight, or by oil and coolant residue left on the pulleys during installation.
Can I drive without a serpentine belt?
No, you cannot drive without a serpentine belt. While the vehicle may physically start on battery power alone, the disconnected water pump will cease circulating coolant. The engine will overheat and warp the cylinder head within minutes, resulting in catastrophic failure.
How do I know if my tensioner pulley is bad?
You know your tensioner pulley is bad if the tensioner arm visibly bounces or vibrates heavily while the engine is idling. Additionally, if spinning the pulley by hand produces a gritty feeling, resistance, or a metallic chirping noise, the internal bearing has failed.
Do I need a special tool to change a serpentine belt?
You do not strictly need a dedicated serpentine belt tool, but it is highly recommended. While a standard long-handled ratchet or breaker bar can relieve tension on some vehicles, dedicated tools feature ultra-thin profiles designed to fit into the tight clearances between the engine block and cooling fans.