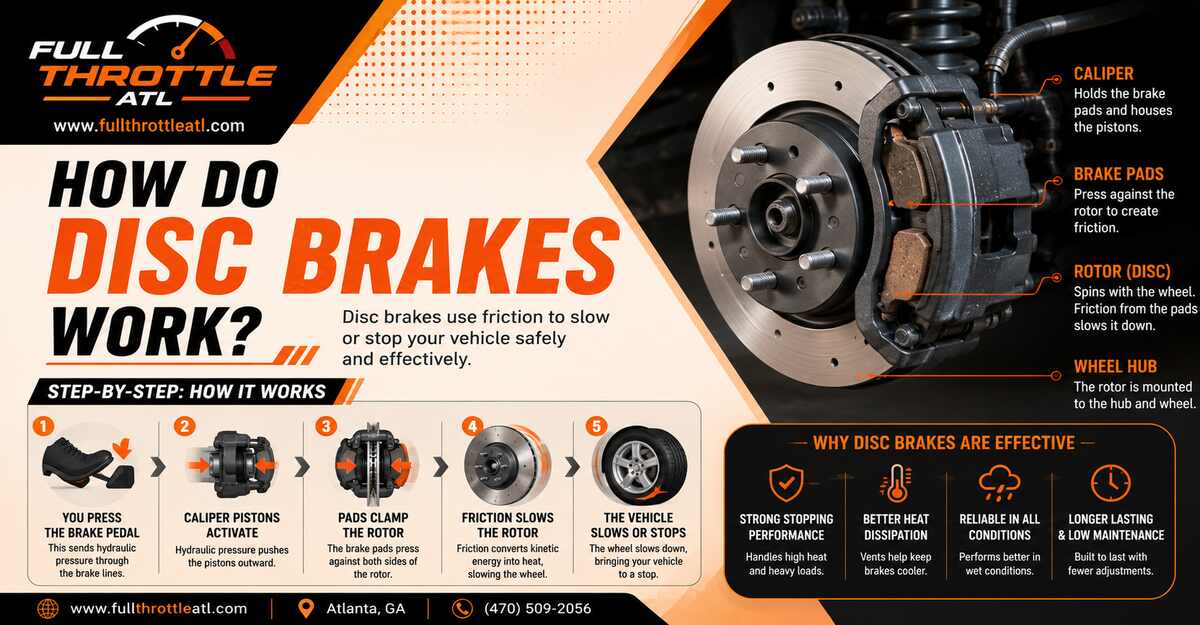
Disc brakes work by converting your vehicle’s kinetic energy into thermal energy through extreme friction. By following the six-step sequence below, you will trace how mechanical leverage transforms into hydraulic pressure to squeeze a spinning rotor, allowing you to accurately diagnose, troubleshoot, and service your braking system on the first attempt.
Before You Start
- Time Required: 10 minutes to inspect; 1 to 2 hours per axle to service.
- Difficulty: Intermediate (Requires strict adherence to torque specs).
- Cost Range: $100 to $250 per axle (DIY parts).
- Prerequisites: Vehicle safely elevated on 2-ton or 3-ton jack stands (never rely solely on a hydraulic jack), wheel chocks on the ground tires, and a cool vehicle.
- Tools & Materials:
- Brake Pads: 1 Set (4 pads per axle).
- Brake Rotors: 1 Pair (2 rotors per axle).
- Brake Fluid: 1 to 2 Pints (500–1000 mL) DOT 3, DOT 4, or DOT 5.1.
- Caliper Guide Pin Lubricant: 5–10 grams high-temperature silicone or ceramic brake grease.
- Brake Cleaner: 1 to 2 cans non-chlorinated solvent.
- Torque Wrench: Capable of 20 to 150 lb-ft.
- C-Clamp or Piston Compressor: Standard mechanical or ratcheting.
- Brake Bleeder Kit: 8mm, 10mm, or 11mm wrench and clear vinyl tubing.
- Wire Brush: For hub rust removal.
Phase 1: The Step-by-Step Mechanical Process
Step 1: Initiate Pedal Activation and Mechanical Leverage
Press the brake pedal to multiply your foot’s physical force through mechanical leverage and push the master cylinder rod.
Look under the dashboard where the pedal connects to a pushrod; this lever assembly typically multiplies your physical foot pressure by a ratio of 4:1 before it even reaches the engine bay. This mechanical action takes less than 0.1 seconds. You’ll know it worked when the pedal travels roughly one to two inches and meets firm, consistent resistance. A common mistake here is ignoring a pedal that sinks to the floor under steady pressure, which indicates a failing internal master cylinder seal rather than worn brake pads.
Step 2: Generate Hydraulic Pressure in the Master Cylinder
Locate the master cylinder in the engine bay to observe where the mechanical pushrod forces a piston to compress hydraulic brake fluid.
Because DOT 3, 4, and 5.1 brake fluids are incompressible, forcing a small piston into a closed system sends high pressure through the brake lines following Pascal’s Principle:
$$P = \frac{F_1}{A_1} = \frac{F_2}{A_2}$$
A small force ($F_1$) applied to the small master cylinder area ($A_1$) creates high pressure ($P$), yielding a massive clamping force ($F_2$) at the larger caliper pistons ($A_2$). This takes under 0.05 seconds. You’ll know it worked when the fluid level drops slightly in the translucent reservoir as the brake pads wear down over months of driving. Never mix DOT 5 (silicone-based) fluid with DOT 3, 4, or 5.1 (glycol-based) fluids; doing so instantly coagulates the fluid and destroys the entire hydraulic system.
Step 3: Extend the Caliper Pistons
Inspect the brake caliper at the wheel hub to identify how high-pressure fluid forces the internal caliper piston outward.
As fluid rushes into the caliper housing (under 0.05 seconds), it pushes the heavy steel or phenolic resin piston out of its bore toward the inner brake pad. You’ll know it worked when you remove the wheel and visually confirm the piston is firmly seated against the metal shim on the back of the inner brake pad. A critical mistake during inspection is pulling back the rubber dust boot surrounding the piston; if you tear this boot, moisture will enter the bore, rust the metal, and seize the piston permanently.
Step 4: Engage the Friction Material Against the Rotor
Verify whether your caliper body slides inward to pull the outer pad, or pushes opposing pistons to squeeze both pads simultaneously.
If you have a floating caliper (most standard vehicles), the piston pushes the inner pad against the rotor, causing the caliper body to slide backward on lubricated guide pins to pull the outer pad inward. If you have a fixed caliper (performance vehicles), opposing pistons extend simultaneously from both sides. This happens instantaneously upon contact. You’ll know it worked when both the inner and outer brake pads wear down at an equal, even rate over their lifespan. A frozen guide pin will cause the inner pad to wear down to the metal while the outer pad remains nearly new.
Step 5: Convert Kinetic Energy to Thermal Energy
Allow the friction material on the brake pads to grip the spinning cast-iron rotor to transform the vehicle’s forward momentum into extreme heat.
The pads clamp the rotor with up to 1,000 pounds of force, bringing the wheel hub and tires to a halt in typically 2 to 5 seconds depending on speed. During hard braking, the thermal energy generated can spike rotor temperatures above 400°F (204°C). You’ll know it worked when the vehicle decelerates linearly without the steering wheel pulling to the left or right. Do not spray cold water or brake cleaner on a hot rotor during this phase; the rapid thermal shock will instantly warp and crack the cast iron.
Step 6: Release the System and Retract the Seals
Release your foot from the brake pedal to drop hydraulic pressure and allow the caliper’s internal square-profile rubber seals to pull the pistons back.
A return spring on the brake pedal pulls the master cylinder pushrod back. At the caliper, the square-cut rubber piston seals-which deflected slightly outward during braking-snap back to their relaxed, rectangular shape. This microscopic movement pulls the piston away from the brake pad by a fraction of a millimeter in under 0.2 seconds, allowing the rotor to spin freely. You’ll know it worked when you can easily spin the elevated wheel by hand without heavy metallic dragging noises.
Common Mistakes and How to Fix Them
1. Hanging Calipers by the Rubber Hose
- The Failure: Letting a detached brake caliper dangle by its flexible rubber brake line tears the internal braided nylon cords. This causes a hidden structural collapse inside the hose that acts as a one-way valve, preventing fluid from returning and locking the brake on.
- The Fix: Always support a removed caliper using a heavy-duty mechanic’s wire hook, a bungee cord, or a zip-tie secured to the vehicle’s coil spring. If a hose has supported weight, replace the hose immediately and bleed the system.
2. Using Petroleum Grease on Rubber Components
- The Failure: Applying petroleum-based chassis grease or anti-seize to the caliper guide pins causes the rubber slider pin boots to swell up to twice their size, degrade, and lock the pins solid.
- The Fix: Use non-chlorinated brake cleaner to strip all old grease from the pins and the caliper bracket bores. Apply a thin, even coat of dedicated high-temperature silicone or ceramic brake grease.
3. Forgetting to Pump the Pedal After Reassembly
- The Failure: When installing new pads, you must push the caliper piston all the way back into its bore, leaving a physical 5mm gap between the pads and the rotor. If you put the car in gear and drive, the first three times you press the brake pedal, it will fall straight to the floor with zero stopping power.
- The Fix: Before starting the engine, sit in the driver’s seat and pump the brake pedal 4 to 5 times until it becomes completely stiff and difficult to press.
4. Installing Brake Pads Backward
- The Failure: Slotting the pad into the bracket with the steel backing plate facing the rotor instead of the friction material. This instantly grinds grooves into the rotor and cuts braking efficiency by 80%.
- The Fix: Visually verify that the friction material (the softer, chamfered composite block) is facing inward toward the shiny metal rotor surface on both sides of the caliper.
5. Skipping Hub Rust Removal (DTV Prevention)
- The Failure: Slapping a new, perfectly flat rotor onto a rusted wheel hub. A rust scale just 0.002 inches thick will cause the rotor to wobble slightly as it spins (lateral runout). Over 3,000 miles, the brake pads will shave off the high spots of the wobble, creating varying thicknesses in the metal (DTV).
- The Fix: Vigorously scrub the wheel hub face with a wire brush or abrasive wheel until bare metal is exposed before mounting the new rotor.
Variations in Braking Systems
- Vented vs. Solid Rotors: Front brakes handle up to 75% of a vehicle’s stopping force and utilize “vented” rotors (two iron discs separated by cooling vanes to dissipate heat). Rear brakes handle less load and typically use single, flat “solid” rotors.
- Electronic Parking Brakes (EPB): Modern vehicles often use an electric motor bolted to the rear caliper. You cannot use a manual C-clamp to push these pistons back; you must put the vehicle into “Service Mode” via the dashboard menu or an OBD2 scanner to electronically retract the piston before servicing.
- Friction Material Types: OEM commuter cars use Ceramic pads for low dust, low noise, and long life. Heavy-duty trucks use Semi-Metallic pads for higher heat resistance and towing capacity, though they are louder and wear rotors faster.
Troubleshooting Brake Failures (FAQ)
Why does my brake pedal feel spongy or soft?
Air bubbles have entered your hydraulic lines or your fluid is low. Because air is compressible (unlike fluid), the pressure of your foot shrinks the air bubbles rather than moving the caliper piston. Check the master cylinder and perform a complete system brake bleed.
Why are my brakes suddenly squealing or screeching?
Small metal tabs called wear indicators are designed to intentionally scrape against the iron rotor when your friction material drops below 3mm. If your pads are thick and new, the squeal is high-frequency harmonic vibration; fix it by applying ceramic grease to the back of the pad shims.
Why does my vehicle pull to one side when braking?
You have a seized caliper piston or frozen guide pins on one side. The functioning brake grabs tightly while the defective side fails to clamp, violently pulling your steering wheel toward the working side. The caliper must be rebuilt or replaced.
Why does the steering wheel vibrate and pulsate when I brake?
Your rotors have developed Disc Thickness Variation (DTV), commonly misnamed “warped rotors.” High and low spots on the uneven rotor surface are physically pushing the brake pads back and forth, sending hydraulic pulses all the way up to your brake pedal and steering rack. Rotors must be resurfaced or replaced.