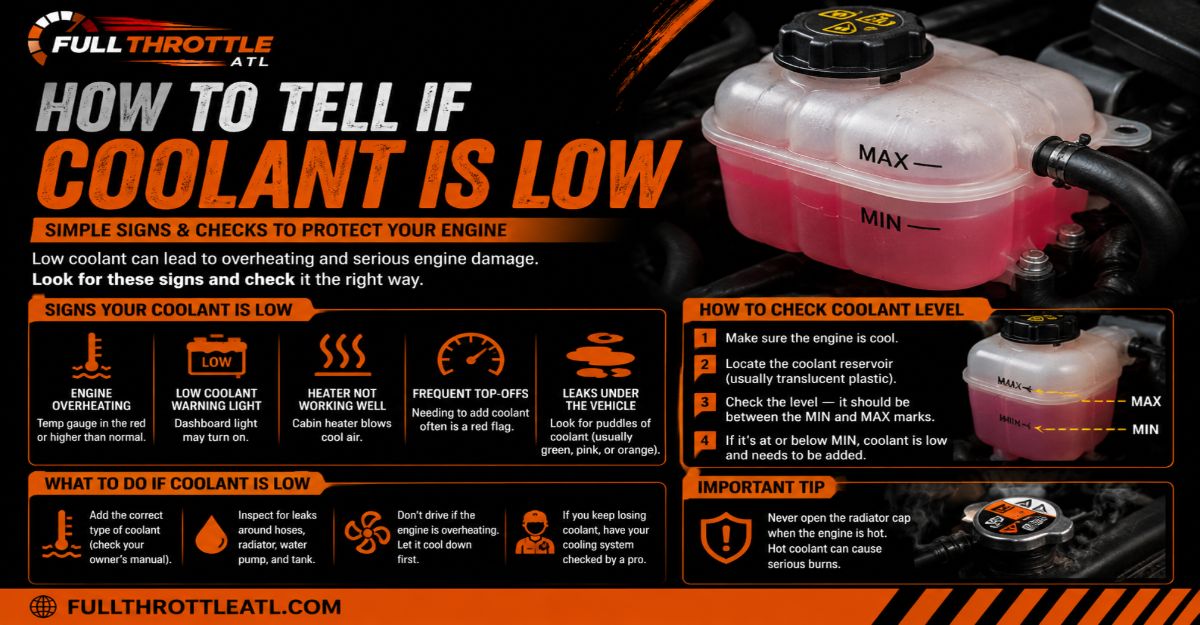
To tell if coolant is low, check for dashboard warning lights, cold cabin heat at idle, and the fluid level against the “COLD” markings on your translucent engine reservoir. This complete 5-step diagnostic process takes 35 minutes, requires basic light tools, and protects your engine from catastrophic overheating caused by low fluid levels.
🛑 Before You Start
- Time Required: 35–45 minutes (includes 30-minute engine cooling buffer).
- Difficulty Level: Beginner (no mechanical experience required).
- Estimated Cost: $0 (inspection) to $15–$25 (if topping off with premixed coolant).
- Tools Required: LED flashlight (or smartphone torch), clean microfiber cloth, heavy-duty mechanic gloves, safety glasses.
- Materials Required: Vehicle-specific 50/50 premixed engine coolant, clean automotive funnel.
- Prerequisites: Vehicle parked on a flat, level concrete surface; engine completely switched off.
Recognized Symptoms of Low Engine Coolant
Before opening the hood, your vehicle provides explicit physical and electronic signals when the cooling loop drops below operating volume.
Dashboard Temperature Gauge Spikes
Watch the engine temperature indicator on your instrument cluster. During healthy operation, the needle rests consistently at the midpoint (typically between 180°F and 205°F / 82°C and 96°C). If coolant drops, the needle will drift upward into the upper quarter or spike directly into the red zone.
Cold Air Blowing From Cabin Heater
Turn your cabin heater to maximum heat with the fan running. Engine coolant transfers heat to the HVAC heater core; when fluid levels drop, air pockets trap in the heater core, causing the vents to blow cold or tepid air while the vehicle idles.
Sweet Odor Outside or Inside Vehicle
Sniff near the front grille or inside the passenger cabin after driving. Engine coolant contains ethylene glycol or propylene glycol, which produces a distinctive, sickly-sweet syrup smell when heated or leaking onto hot engine components.
Step-by-Step Process: Checking and Correcting Low Coolant
Follow these steps in precise order to verify your coolant level without risking personal injury or mechanical damage.
+-------------------------------------------------------------------+
|  STEP 1: Identify In-Cabin & Operational Symptoms                |
+-------------------------------------------------------------------+
                                  |
                                  v
+-------------------------------------------------------------------+
|  STEP 2: Cool Engine & Stabilize Vehicle (30-Min Wait)            |
+-------------------------------------------------------------------+
                                  |
                                  v
+-------------------------------------------------------------------+
|  STEP 3: Inspect Expansion Tank / Overflow Reservoir Markings    |
+-------------------------------------------------------------------+
                                  |
                                  v
+-------------------------------------------------------------------+
|  STEP 4: Inspect Radiator Neck Directly (If Reservoir Is Empty)   |
+-------------------------------------------------------------------+
                                  |
                                  v
+-------------------------------------------------------------------+
|  STEP 5: Top Off Fluid with Exact Specification 50/50 Premix     |
+-------------------------------------------------------------------+
Step 1: Identify In-Cabin and Operational Symptoms
Scan your instrument cluster for the low coolant icon (a thermometer floating in liquid) or a check engine light while monitoring performance.
You’ll know it worked when you confirm whether the vehicle is actively displaying warning lights, blowing cold heat, or showing elevated temperature gauge readings.
Common Mistake: Ignoring a cold heater vent at idle. Beginners assume a bad blower motor, but cold heat on a hot engine is almost always an air lock caused by low fluid.
Step 2: Park on Level Ground and Cool the Engine
Park your vehicle on a flat surface, turn off the ignition, pull the hood release latch, and allow the vehicle to sit undisturbed for a minimum of 30 minutes.
Thermal expansion builds internal pressures up to 15–18 PSI, pushing coolant temperatures beyond 220°F (104°C). Touch the upper rubber radiator hose using a gloved hand; it must feel soft and cool to the touch before proceeding.
You’ll know it worked when the upper radiator hose squishes easily under thumb pressure and the metal radiator surfaces feel room-temperature.
Common Mistake: Opening the hood and immediately twisting off caps on a warm engine. Pressurized boiling fluid will instantly erupt, causing severe thermal chemical burns.
        HOT SYSTEM (DANGER)                   COLD SYSTEM (SAFE)
    +--------------------------+          +--------------------------+
    | Upper Hose: Hard/Stiff   |          | Upper Hose: Soft/Pliable |
    | Temp: >150°F (65°C)      |   ===>   | Temp: <100°F (38°C)      |
    | Pressure: 15-18 PSI      |          | Pressure: 0 PSI          |
    | Action: DO NOT OPEN      |          | Action: Safe to Inspect  |
    +--------------------------+          +--------------------------+
Step 3: Inspect the Expansion Tank Markings
Locate the translucent plastic tank connected by a rubber hose to the radiator, then illuminate the side of the tank using a flashlight.
Position your line of sight directly level with the molded horizontal indicators on the side of the plastic housing. Locate the “COLD FILL”, “MIN”, or “LOW” line, as well as the “MAX” or “HOT” line.
You’ll know it worked when you can clearly see the fluid meniscus resting between the minimum and maximum horizontal lines. If the fluid surface rests below the “MIN” or “COLD FILL” line, your coolant is low.
Common Mistake: Judging fluid levels while looking down into the tank from above. Parallax error will make the fluid level appear higher than it actually is; always view the tank straight on from the side.
Step 4: Inspect the Radiator Pressure Cap Directly
If the expansion tank is completely dry, wait until the radiator is cold, place a microfiber towel over the metal radiator cap, press down firmly, and rotate counterclockwise one-quarter turn to release residual pressure before removing it entirely.
Look directly down into the filler neck of the metal radiator. The fluid level should rest approximately 1 inch (25 mm) below the bottom of the cap seal neck.
You’ll know it worked when you see liquid covering the internal cooling fins inside the radiator neck. If you see bare metal fins, your system is dangerously low, regardless of what the plastic tank shows.
Common Mistake: Assuming a full plastic reservoir means a full radiator. A torn overflow hose or faulty radiator cap vacuum valve breaks suction, leaving the radiator empty while the reservoir stays full.
Step 5: Top Off with Exact Specification Premixed Fluid
Unscrew the reservoir cap, seat a clean funnel in the mouth, and pour 50/50 premixed coolant in precise 250 ml (1 cup) increments until the fluid level hits the “COLD FULL” or “MAX” mark.
Never fill above the “MAX” mark, as the fluid needs expansion space when the engine heats up. Reinstall the plastic cap tightly until it clicks or locks against its stop.
You’ll know it worked when the fluid level rests exactly at the “MAX / COLD FILL” line and the cap is firmly locked in place.
Common Mistake: Pouring concentrated coolant without diluting it 50/50 with distilled water. Pure coolant lacks heat-transfer efficiency and will freeze at higher temperatures than a balanced mixture.
Common Mistakes and How to Fix Them
| Mistake Made | Why It Harms the Engine | Recovery & Fix Procedure |
| Mixing Incompatible Coolant Types | Combining OAT (Organic Acid Technology) with IAT (Inorganic Acid Technology) creates a thick gel that clogs water pump impellers and radiator cores. | Perform a full cooling system flush using clean distilled water and chemical flush cleaner, then refill with 100% factory-specified fluid. |
| Using Tap or Mineral Water | Minerals (calcium, magnesium) inside tap water react to engine heat, forming hard scale deposits that block cooling passages and accelerate pump seal wear. | Drain the contaminated system immediately. Flush with two gallons of pure distilled water before topping off with proper 50/50 premix. |
| Overfilling Past the MAX Line | Thermal expansion forces excess fluid out through the pressure relief valve, spraying hot fluid over the engine bay and creating false leak signals. | Use a clean fluid turkey baster or siphon pump to draw excess fluid out of the reservoir until the level lowers to the “COLD FULL” line. |
| Inspecting Level on an Incline | Parking on a slope shifts fluid inside the reservoir, reading artificially low or high depending on vehicle orientation. | Relocate the vehicle to a verified flat, level surface and allow 15 minutes for fluid levels to equalize before re-checking. |
Process Variations
Variable 1: Pressurized Expansion Tank vs. Unpressurized Overflow Tank
- Pressurized Expansion Tank (Common on modern European and American vehicles): The plastic tank holds system pressure and features a heavy threaded pressure cap rated in PSI or Bar. Never open this cap when hot. Fill directly into this tank when cold; no radiator cap exists on the main core.
- Unpressurized Overflow Bottle (Common on Japanese and older vehicles): The plastic tank has a simple snap-on lid or light twist cap with an overflow tube pointing to the ground. System pressure is held separately by a metal radiator cap on the engine manifold or radiator core. Fill the plastic tank to the cold line, then double-check the cold radiator cap separately.
Variable 2: Concentrated Coolant vs. 50/50 Premixed Fluid
- Using 50/50 Premix: Ready to pour directly from the bottle. Requires no measuring or water addition.
- Using Concentrated Coolant: Must be mixed in an exact 1:1 ratio with distilled water in a separate clean container before pouring into the engine. Never use tap water, well water, or softened home water.
Cost and Time Expectations
| Task Scope | Typical DIY Cost | Professional Shop Cost | Time Required |
| Visual Fluid Level Inspection | $0 | $20 – $40 (Diagnostic fee) | 35 mins (30 min cool down) |
| Minor Fluid Top-Off (1 Quart) | $12 – $20 (Fluid bottle) | $35 – $60 | 40 mins total |
| Cooling System Pressure Test (Leak Detection) | $30 – $40 (Tool rental) | $90 – $150 | 1 hour |
| Full System Flush & Refill | $30 – $50 (Materials) | $150 – $250 | 1.5 to 2 hours |
Frequently Asked Questions
Can I drive my car if the coolant level is below the MIN line?
You can safely drive a short distance (under 5 miles) to a service station if the reservoir is low but not completely dry, provided the dashboard temperature gauge remains stable. If the reservoir is empty or the temperature gauge rises, stop driving immediately to avoid warping cylinder heads or blowing head gaskets.
What color should engine coolant be when checked?
Healthy coolant is clean, translucent, and brightly colored (typically fluorescent green, orange, pink, blue, or yellow depending on vehicle manufacturer). If the fluid appears dark brown, rusty, or milky like chocolate milk, the coolant is degraded or contaminated with engine oil and requires immediate flushing and repair.
Why is my coolant low if there are no visible leaks under the car?
Coolant can decrease without ground puddles due to slow external pinhole leaks that evaporate on hot exhaust components, a failing radiator cap venting steam while driving, or internal engine leaks (such as a blown head gasket burning coolant in the combustion chamber or leaking into oil passages).
Is it normal for engine coolant levels to drop over time?
Engine cooling systems are sealed units, meaning coolant does not burn away during normal operation. A microscopic drop over several years due to minor hose permeation can happen, but losing more than a few ounces over a few months indicates an active internal or external system leak that needs repair.