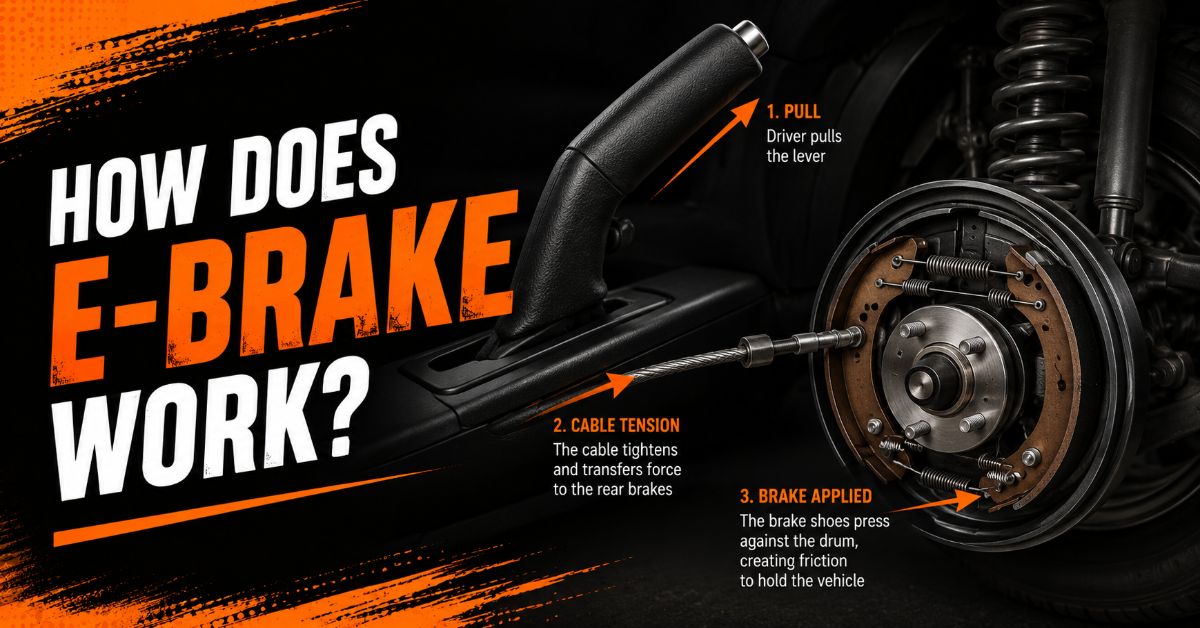
An emergency brake (e-brake), or parking brake, bypasses your primary hydraulic braking system to mechanically or electromechanically lock the rear wheels in place using steel cables or electric motors. Servicing or adjusting a standard cable-driven e-brake involves a 6-step process requiring roughly 45 to 60 minutes, basic hand tools, and a floor jack. The single most critical factor for success is adjusting the wheel-end friction components (star wheel adjuster) before removing slack from the cabin cable.
Before You Start: Adjustment & Service Specs
- Total Time Required: 45–60 minutes
- Difficulty Level: Intermediate (Beginner-accessible with proper safety gear)
- Estimated Cost: $0 (adjustment only) to $35 (if replacing cables/cleaner)
- Tools Required: 1 heavy-duty floor jack, 2 rated jack stands, 2 wheel chocks, 1 metric socket set (10mm–15mm), 1 open-end wrench set, 1 brake spoon or flathead screwdriver, aerosol brake cleaner.
- Safety Gear: Safety glasses, mechanics gloves.
- Prerequisite Conditions: Vehicle parked on a firm, level concrete surface; transmission placed in 1st gear (manual) or Park (automatic).
How the E-Brake Works: System Architecture & Physics
The primary service brakes rely on hydraulic fluid pressure generated by your foot pressing the master cylinder. In contrast, the e-brake operates as an isolated, redundant mechanical backup and parking hold.
[Actuation] (Lever / Pedal / Switch)
     │
     ▼
[Primary Cable Tensioning]
     │
     ▼
[Equalizer Bar Distribution]
   ├───► Rear Left Cable  ───► Wheel Mechanism (Drum / Disc / DIH)
   └───► Rear Right Cable ───► Wheel Mechanism (Drum / Disc / DIH)
1. Actuation
When you pull a hand lever, press a foot pedal, or press an Electronic Parking Brake (EPB) switch, you initiate force transfer. In manual systems, this motion leverages a mechanical pivot that pulls a primary steel cable.
2. Force Distribution via the Equalizer
The primary cable connects under the vehicle floor to a U-shaped metal bracket called the stabilizer equalizer bar. The equalizer balances mechanical tension equally between two secondary cables running separately to the left and right rear wheels, compensating for minor cable stretch variations.
3. Wheel-End Engagement Mechanics
Depending on your vehicle’s rear brake design, force is converted into friction through one of three mechanical mechanisms:
- Drum Brake Systems: The secondary cable pulls an internal mechanical lever attached to one of the brake shoes. This lever acts as a pivot, expanding both primary and secondary brake shoes outward against the inner wall of the spinning steel drum.
- Disc Brake Systems (Integrated Caliper Screw): The cable attaches to an external lever on the rear caliper. Rotating this lever turns a helical actuator screw inside the caliper piston, physically driving the piston forward to clamp the inner and outer brake pads against the rotor.
- Drum-in-Hat (DIH) Systems: Common on modern rear-disc vehicles, the disc rotor contains a small miniature brake drum inside its center hat. The cable pulls an internal expansion lever that presses dedicated park-brake shoes outward against the interior hat wall, leaving the main hydraulic caliper untouched.
- Electronic Parking Brakes (EPB): A cabin switch sends a signal to an Electronic Control Unit (ECU). Servo motors mounted directly on the rear brake calipers drive a reduction gear unit, driving the caliper piston forward electromechanically without steel cables.
How to Adjust a Mechanical E-Brake Cable: Step-by-Step Guide
Follow these steps to eliminate excessive lever travel, resolve soft hold performance, and re-establish proper cable tension.
Step 1: Secure the Vehicle
Position the vehicle on a level concrete surface and lock the front wheels in place to prevent rolling. Place wheel chocks securely against both the front and back edges of both front tires. Break the lug nuts loose on both rear wheels using a breaker bar and socket by turning them 180 degrees counterclockwise, but do not remove them from the studs yet.
Success Checkpoint: You’ll know it worked when the front tires are completely immobilised by chocks and all rear lug nuts are hand-turnable without the wheel spinning on the ground.
Common Mistake: Forgetting to chock the front wheels. Because lifting the rear axle disables the parking brake, the vehicle will roll freely on its front tires if unchocked, risking a vehicle drop.
Step 2: Lift and Support the Rear Axle
Raise the rear of the vehicle using a floor jack placed under the manufacturer-designated central lift point or differential housing. Position two jack stands directly under the rear pinch welds or axle tubes, then slowly lower the floor jack until the vehicle’s weight rests fully on the stands. Finish unthreading the lug nuts and remove both rear wheel assemblies completely.
Success Checkpoint: You’ll know it worked when both rear tires are off the ground, the vehicle is rock-solid on the stands with zero wobbling, and both wheel hubs spin freely by hand.
Step 3: Inspect the Cables and Equalizer Assembly
Crawl beneath the center of the vehicle and inspect the primary cable, equalizer bracket, and secondary wheel cables. Spray the equalizer pivot point and exposed cable ends liberally with aerosol brake cleaner to wash away rust scale and road grit. Check for frayed steel strands, split rubber dust boots, or heavy orange corrosion. Have an assistant pull the cabin lever up 2 clicks while you watch the equalizer to confirm both left and right cables pull evenly.
Success Checkpoint: You’ll know it worked when the equalizer moves smoothly in a straight line without binding or tilting severely toward one side.
Common Mistake: Tightening rusted or seized cables. If a cable is frozen inside its sheath, tightening the adjustment nut will snap the wire or permanently drag the brake shoe. Apply penetrating oil or replace seized cables before proceeding.
Step 4: Calibrate the Rear Brake Shoes or Caliper Stop Levers
For Drum or Drum-in-Hat (DIH) systems, locate the access slot on the backing plate or the outer face of the rotor hat (remove the rubber plug). Insert a flathead screwdriver or brake spoon tool into the slot to engage the teeth of the star wheel adjuster. Rotate the star wheel downward/upward until the brake shoes drag firmly against the drum, then back off the star wheel 2 to 3 notches until the hub spins freely with only light friction contact.
For Integrated Disc Systems, verify that the caliper parking lever rests fully back against its metal stop pin on the caliper body when the cabin lever is completely down.
Success Checkpoint: You’ll know it worked when you hear a very faint, light brushing sound as you rotate the wheel hub by hand, but zero mechanical resistance or binding stops the hub from turning.
Common Mistake: Adjusting the cabin cable slack before setting the star wheel at the wheels. Cabin adjustments only pull cable slack; they cannot compensate for out-of-spec shoe clearance at the wheel hubs.
Step 5: Fine-Tune Cabin Cable Tension
Move into the vehicle cabin and locate the cable adjustment nut, situated either under the leather shift/lever boot, inside the rear of the center console storage bin, or directly above the foot pedal assembly. Lower the e-brake lever completely. Using a deep socket, turn the adjustment nut clockwise to remove excess slack from the primary cable. Pull the lever up periodically to count the engagement clicks until full resistance is achieved between 5 and 8 clicks.
Success Checkpoint: You’ll know it worked when the hand lever locks firmly at 5 to 8 clicks under medium hand pull, and the rear hubs turn completely free by hand when the lever is fully released down.
Step 6: Lower the Vehicle and Perform Functional Testing
Reinstall both rear wheels and thread the lug nuts until snug against the wheel face. Jack up the rear axle slightly to clear the jack stands, slide the stands out, and carefully lower the vehicle to the floor. Use a calibrated torque wrench to tighten all wheel lug nuts in a star pattern to your vehicle’s factory torque specification (typically 80–100 lb-ft).
Start the engine, drive to a gentle driveway or road incline, stop, apply the e-brake lever to its 6th click, and shift the transmission into Neutral.
Success Checkpoint: You’ll know it worked when the vehicle stays completely stationary on a 10% incline in Neutral, and rolls freely without hot brake smells or drag noise when the lever is dropped.
Common Mistakes and How to Fix Them
- Error: Cable Over-Tightening (Brake Drag)
- Symptom: Rear wheels smell hot, smoke, or feel sluggish while driving with the lever disengaged.
- Recovery: Jack the vehicle immediately, support on stands, loosen the cabin adjustment nut counterclockwise by 3–4 full turns, and back off the star wheel adjusters 2 notches until hubs rotate without resistance.
- Error: Adjusting Slack with Shoes Worn Out
- Symptom: Lever feels tight at 6 clicks, but vehicle still slips backward on hills.
- Recovery: You have tightened cable stretch over worn-out friction material. Remove drums/rotors, measure shoe lining thickness. If lining is under 2mm (1/16 in), replace friction shoes before setting cable tension.
- Error: Seized Caliper Return Lever
- Symptom: E-brake lever goes limp on release; one wheel remains partially locked.
- Recovery: Spray the caliper-mounted return spring and pivot pin with high-grade penetrating fluid. Tap the lever arm gently back to its stop pin using a brass punch and hammer, then exercise the lever repeatedly.
- Error: Attempting Manual Adjustment on EPB Systems
- Symptom: Actuator motor damage or dashboard fault lights.
- Recovery: Electronic parking brakes cannot be mechanically adjusted by turning screws. Re-engage the system using an OBD-II diagnostic tool set to “EPB Service Mode / Retract Actuators.”
Variations: System-Specific Adaptations
| System Type | Primary Mechanical Difference | Adjustment Focus |
| Standard Drum Brake | Single internal cable pulls shoe lever inside full-face drum. | Access star wheel via backing plate slot; back off 2–3 clicks from lock. |
| Integrated Disc Caliper | Cable rotates lever driving internal piston screw. | Ensure caliper lever reaches stop pin when released; adjust cabin nut only. |
| Drum-in-Hat (DIH) | Dual system: main caliper for service, inner drum for e-brake. | Rotate rotor face hole to 6 o’clock position to access inner star wheel. |
| Electronic Parking Brake (EPB) | Direct motor-driven piston push; no mechanical cables. | No manual cable adjustment. Requires scan tool to retract motors during pad replacement. |
Frequently Asked Questions
Can an e-brake be used to stop a vehicle while driving in an emergency?
Yes. If your main hydraulic service brakes fail completely, pulling the mechanical e-brake lever gradually will apply friction directly to the rear wheels. Apply steady, measured force to avoid locking the rear tires completely, which can induce an uncontrollable tail-skid or spinout.
Why does my e-brake lever pull all the way up with zero resistance?
This indicates either a snapped primary/secondary steel cable, a disconnected equalizer linkage, or severely unadjusted/worn rear brake shoes. Inspect the cable path under the body to locate the break point.
How many clicks should an e-brake take to lock?
A properly tensioned mechanical hand lever should click 5 to 8 times under normal pulling force before reaching maximum hold. Fewer than 5 clicks risks brake drag; more than 8 clicks indicates excessive cable slack or worn shoes.
Will driving with the e-brake on damage my car?
Yes. Driving with the parking brake engaged creates intense friction between the shoes/pads and drums/rotors. This quickly generates extreme heat, glazing the friction linings, warping metal rotors, and prematurely boiling surrounding wheel bearing grease.
How do I release a frozen e-brake in winter weather?
Moisture trapped inside the cable sheaths can freeze solid in sub-zero temperatures. Turn on the vehicle to warm the undercarriage, gently tap the rear drum or caliper bracket with a rubber mallet, or spray isopropyl alcohol onto the exposed cable pivot points to melt ice buildup.