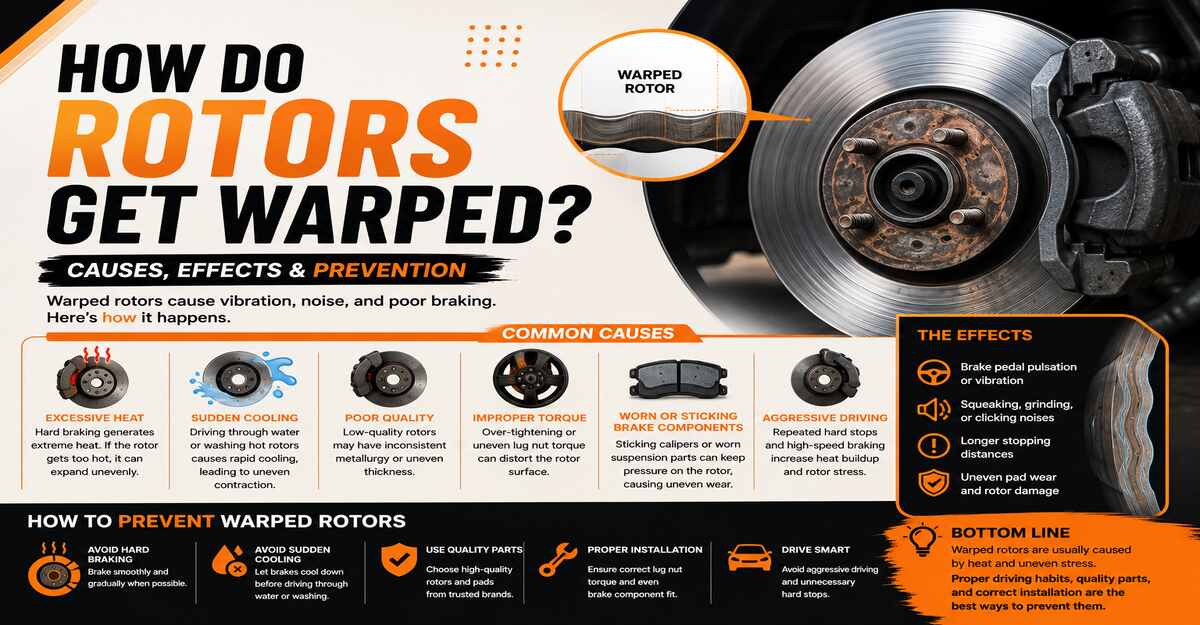
Rotors do not physically bend; they suffer from Disc Thickness Variation (DTV) caused by uneven friction material transfer. This guide explains exactly how do rotors get warped across four degradation stages, followed by precise steps to measure, diagnose, and correct the microscopic high spots causing your steering wheel pulsation. Proper diagnosis takes one hour.
Before You Start
- Time Required: 1 to 1.5 hours per axle.
- Difficulty: Intermediate (requires precision measurement skills).
- Estimated Cost: $40–$150 (depending on measurement tools needed).
- Tools and Materials:
- Magnetic-base dial indicator (0.001-inch resolution)
- Outside micrometer (0–1 inch range with 0.0001-inch resolution)
- 1/2-inch drive click-type torque wrench (calibrated)
- Power drill with a 3-inch wire cup brush attachment
- 3 conical lug nut washers
- Brake cleaner and microfiber towels
- Prerequisites: Vehicle safely raised on jack stands with wheels and brake calipers removed.
Phase 1: Diagnosing Rotor Degradation
Step 1: Measure Lateral Runout from Installation
Mount a magnetic-base dial indicator to the steering knuckle to measure initial mechanical wobble caused by poor installation.
Secure the rotor tight to the hub using three lug nuts and conical washers. Position the dial indicator’s needle exactly 10mm (0.4 inches) inward from the rotor’s outer edge, perpendicular to the friction surface. Zero the dial face, then rotate the cast iron rotor slowly by hand a full 360 degrees, watching the needle sweep.
You’ll know it worked when you have a definitive total runout measurement; a variance exceeding 0.05 mm (0.002 inches) proves the rotor was stressed by uneven torque or a dirty hub.
Common mistake: Measuring the rotor while it hangs loose on the wheel studs. Without the lug nuts holding it flush against the hub exactly as the wheel would, your runout measurement will be artificially massive and entirely useless.
Step 2: Inspect for Severe Thermal Loading
Examine the cast iron rotor face under bright light for dark blue heat checking or microscopic surface cracks.
This visual damage occurs when a 1,500–2,500 kg vehicle converts kinetic energy into intense thermal energy-typically during 10 to 30 seconds of continuous hard braking down a mountain. Temperatures rapidly spike from a normal operating range of 150°C (300°F) to over 650°C (1200°F). If you see distinct blue or black banding, the rotor’s metallurgy has begun converting soft cast iron into brittle cementite.
You’ll know it worked when you successfully identify whether the rotor has breached its thermal threshold, dictating if it can be saved or must be scrapped.
Common mistake: Confusing normal silver-grey pad friction tracks with thermal overload. True thermal damage always presents with a blueish temper-color or distinct, raised dark patches.
Step 3: Identify Localized Material Transfer
Inspect the rotor face for a distinct, dark outline in the exact shape of your brake pad.
This transfer happens when you bring blazing hot brakes to a dead stop and hold your foot firmly on the pedal for 1 to 5 minutes. The clamped pad acts as a heat sink, prevents the rotor section directly beneath it from cooling, and melts a permanent layer of friction material onto that single spot of the rotor.
You’ll know it worked when you find the “ghost” imprint of a brake pad permanently etched into the metal, definitively proving the rotor is not bent, but rather contaminated.
Common mistake: Assuming a car wash caused the warp. While spraying cold water on 650°C rotors causes sudden thermal shock and cracking, the steering wheel pulsation is almost always caused by this stationary material transfer.
Step 4: Measure Disc Thickness Variation (DTV)
Use an outside micrometer to measure the physical thickness of the rotor at eight equally spaced intervals around its circumference.
Set the micrometer exactly 10mm in from the outer edge for every measurement. Over 2 to 4 weeks of driving, the high spot of transferred pad material continually rubs the pads even when you aren’t braking. This localized friction wears the surrounding bare iron unevenly. Record all eight measurements and subtract the smallest number from the largest.
You’ll know it worked when you calculate the total variance; if the thickness varies by more than 0.015 mm (0.0006 inches), the rotor has DTV and is the root cause of your pedal pulsation.
Common mistake: Using standard sliding calipers to check DTV. Calipers only measure down to 0.01 inches; they lack the microscopic resolution required to detect a 0.0006-inch variance.
Phase 2: Correcting and Preventing DTV
Step 5: Clean the Wheel Hub to Bare Metal
Strip the vehicle’s wheel hub face using a power drill equipped with a 3-inch wire cup brush.
Run the brush at medium speed across the flat face of the hub and around the base of the wheel studs to obliterate all rust, scale, and old anti-seize. Wipe the surface down with brake cleaner and a microfiber towel. Repeat this process on the inside mounting “hat” of the brake rotor.
You’ll know it worked when the hub face reflects light uniformly and sitting the rotor on the hub results in zero rocking or clicking when pressed by hand.
Common mistake: Applying thick grease or anti-seize between the rotor and the hub. This creates a hydraulic, uneven layer that immediately induces lateral runout when the wheel is tightened.
Step 6: Torque Lug Nuts in a Star Pattern
Thread all lug nuts onto the studs by hand to ensure they do not cross-thread, then lock them down using a calibrated click-type torque wrench.
Set the wrench strictly to your vehicle’s factory specification (usually between 80 and 100 ft-lbs). Tighten the nuts in a star (crisscross) pattern: tighten one nut, skip the adjacent one, and tighten the one across from it. Never tighten them in a circle.
You’ll know it worked when every single lug nut clicks the torque wrench at the exact same setting, ensuring the rotor is clamped perfectly flat against the hub.
Common mistake: Zipping lug nuts on blindly with an air or electric impact gun. Driving one nut to 110 ft-lbs while the others sit at 80 ft-lbs physically distorts the rotor hat, restarting the entire degradation process.
Step 7: Perform a Corrective Bedding-In Cycle
Drive the vehicle to an empty, flat stretch of road to scrub off uneven pad deposits through controlled friction.
Accelerate to 60 mph, then apply firm, aggressive brake pressure to slow the car down to 10 mph. Do not come to a complete stop. Immediately accelerate back to 60 mph and repeat this aggressive slowdown 5 to 6 times in quick succession until you smell the brakes getting hot. Once complete, drive for 10 minutes at highway speeds without touching the brakes to let the rotors cool evenly.
You’ll know it worked when the steering wheel pulsation noticeably diminishes or disappears entirely, leaving a uniform, dull-grey friction layer evenly spread across the rotor face.
Common mistake: Coming to a dead stop at a traffic light in the middle of the bedding process. This instantly cements a new layer of material to the hot rotor, ruining the procedure.
Common Mistakes and How to Fix Them
- Failure Mode: You replace the rotors, but the pulsation returns in exactly three weeks.
- The Fix: You skipped measuring hub runout. Remove the rotor and measure the bare hub with your dial indicator. If the hub itself has more than 0.001 inches of runout, a new rotor will just mimic the warped hub. Replace the wheel bearing/hub assembly.
- Failure Mode: The bedding-in process makes the vibration worse.
- The Fix: The localized heat has already turned the iron into cementite (hard spots). Bedding cannot scrub off hardened steel. You must replace both the rotors and the pads, as the pads are now unevenly worn to match the bad rotor.
- Failure Mode: Caliper slide pins are seized.
- The Fix: If one slide pin is rusted solid, the pad drags on the rotor indefinitely, causing permanent thermal loading. Remove the pins, clean the bores with a wire bore brush, and relubricate with high-temp silicone brake grease.
Variations for Different Braking Systems
- Organic vs. Ceramic Pads: Organic brake pads have a much lower melting threshold and will transfer material to the rotor significantly faster than ceramic pads during a hot stop. If you live in a mountainous region, switch to ceramic or semi-metallic pads to raise your thermal threshold.
- Fixed vs. Floating Calipers: Fixed multi-piston calipers (common on sports cars) apply pressure evenly to both sides of the rotor. Floating single-piston calipers pull the outer pad inward. If the floating bracket is slightly bent, it will apply pad pressure at an angle, accelerating DTV entirely independent of your torque wrench settings.
Time and Cost to Diagnose and Fix Rotors
- Diagnostic Audit: Taking the wheels off and running the micrometer/dial indicator sequence takes roughly 30 to 45 minutes per axle.
- Machining (Resurfacing): If DTV is present but the rotor is thick enough to save, a shop will charge $15 to $25 per rotor to cut them on a brake lathe.
- Replacement: If the rotors are below the minimum thickness stamped on the rotor hat, new cast iron rotors cost between $40 and $120 each.
Frequently Asked Questions
Do drilled and slotted rotors prevent warping? No. Slotted rotors wipe the pad surface clean of gasses and dust, but they do not increase the thermal mass of the rotor. If you hold the brakes at a dead stop after a 650°C heat spike, they will suffer material transfer exactly like a blank rotor.
Can hitting a puddle while braking warp my rotors? Sudden thermal shock from cold water on 650°C iron causes the metal to contract violently. While this usually results in microscopic surface cracking rather than bending, severe cracking will eventually cause the rotor to structurally fail.
How do I safely brake on long mountain descents? Shift your transmission into a lower gear to utilize engine braking. If you must use the brakes, apply them firmly to scrub 15 mph off your speed, then release them completely to allow airflow to cool the cast iron before braking again.
Is it safe to drive with Disc Thickness Variation? In mild cases, it is an annoyance rather than a hazard. However, severe DTV increases your stopping distance, severely vibrates suspension components leading to premature ball joint wear, and can trigger the ABS system erratically.
Understanding how do rotors get warped allows you to stop treating the symptom and start preventing the cause. By cleaning your hubs, using a torque wrench, and managing your heat cycles at dead stops, you eliminate the mechanical and thermal stress that creates Disc Thickness Variation.