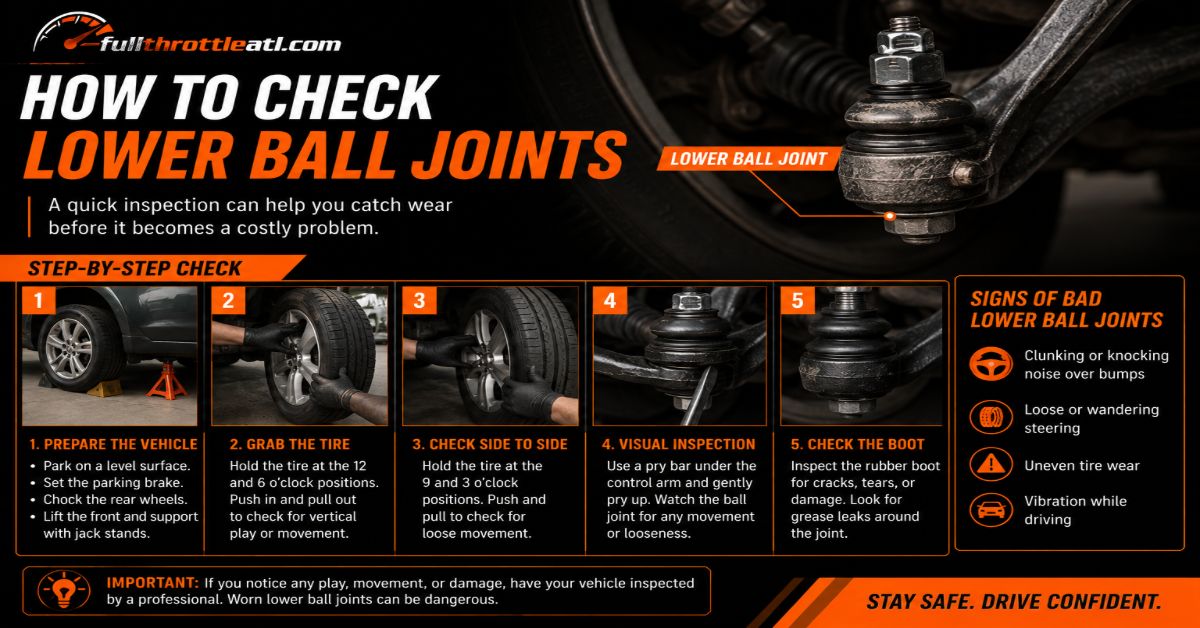
Accurately checking lower ball joints requires safely lifting the vehicle, relieving suspension tension according to your specific geometry, and measuring physical deflection using mechanical testing. This comprehensive guide covers vehicle preparation, suspension loading techniques, visual checks, manual rock tests, and dial indicator measurements. Completing this entire 6-step inspection takes approximately 30 to 45 minutes per side, and proper vehicle support is the single factor that most determines testing accuracy and your personal safety.
Before You Start
- Time Required: 30 to 45 minutes per side
- Difficulty Level: Intermediate
- Estimated Cost: $0 (if you own tools) to $50 (if purchasing a dial indicator kit)
- Tools & Materials Checklist:
- Hydraulic Floor Jack: 1 unit (Rated for 2 to 3 tons minimum)
- Heavy-Duty Jack Stands: 2 units (Rated for 2 to 3 tons minimum)
- Wheel Chocks: 2 units
- Heavy-Duty Pry Bar: 1 unit (24 to 36 inches in length)
- Dial Indicator with Magnetic Base: 1 kit (0.001-inch increments)
- Flashlight or Work Light: 1 unit (Minimum 500 lumens)
- Safety Glasses and Mechanics Gloves: 1 pair each
- Prerequisite Conditions: Vehicle must be on a completely flat, level concrete surface with the parking brake fully engaged.
Step 1: Vehicle Prep and Safety Staging
Park the vehicle on a flat concrete surface, engage the parking brake firmly, place wheel chocks behind both rear tires, and put on your safety glasses and mechanics gloves.
- Position your vehicle on flat, level concrete and shift the transmission into Park (or Reverse for manual transmissions).
- Pull the parking brake lever or push the electronic parking brake switch firmly.
- Wedge two heavy-duty wheel chocks tightly behind both rear tires to prevent any rolling movement.
- Put on your safety glasses and mechanics gloves before handling any garage equipment.
- Success Check: You will know this step worked when the vehicle is completely immobile and your personal protective gear is securely fitted.
- Common Mistake: Parking on an asphalt driveway on a hot day can cause jack stands to sink. Always use a flat concrete surface.
Step 2: Elevating and Relieving Suspension Tension
Lift the vehicle using the correct jacking point based on your suspension design to properly load or unload the lower ball joint.
- Identify your suspension type: Short-Long Arm (SLA) with lower coil springs or MacPherson Strut.
- For SLA suspensions with lower coil springs, place the hydraulic floor jack directly under the lower control arm and lift until the tire is 2 to 3 inches off the ground, then place a jack stand under the frame.
- For MacPherson Strut suspensions, place the hydraulic floor jack under the factory frame lift point and lift until the wheel hangs completely free with the strut fully extended, then place jack stands under the frame.
- Success Check: You will know this step worked when the vehicle is stable on the jack stands and the correct amount of tension is placed on or removed from the lower ball joint based on your specific suspension geometry.
- Common Mistake: Lifting a load-carrying lower ball joint suspension by the frame leaves the control arm hanging, which pulls the ball joint tight and masks severe wear.
Step 3: Performing the Visual Boot Integrity Check
Inspect the rubber grease boot surrounding the lower ball joint for tears, cracks, or active grease leaks using a high-output work light.
- Position your 500-lumen LED work light directly behind the wheel steering knuckle to illuminate the lower ball joint area.
- Inspect the rubber grease boot from top to bottom, looking closely for dry rot, cuts, punctures, or extruded grease.
- Feel around the bottom of the boot with a gloved finger to check for wetness or gritty contamination.
- Success Check: You will know this step worked when you have visually confirmed the boot is either intact and pliable or torn and contaminated.
- Common Mistake: Assuming a torn boot is fine if the joint still feels tight. Once the boot tears, moisture and road grit destroy the internal bearing surfaces rapidly.
Step 4: Executing the 12-and-6 Axial Rock Test
Grasp the tire firmly at the 12 o’clock and 6 o’clock positions and rock it back and forth to feel for internal play.
- Stand facing the side of the vehicle and place your hands firmly on the tire at the 12 o’clock (top) and 6 o’clock (bottom) positions.
- Push in firmly with your top hand while pulling out with your bottom hand, then alternate rapidly in a push-pull rocking motion.
- Focus your attention entirely on the lower control arm connection point, feeling for any clicking, popping, or loose shifting play.
- Success Check: You will know this step worked when you can distinctly isolate whether movement is originating from the ball joint or the wheel bearing.
- Common Mistake: Confusing wheel bearing play with ball joint play. If you feel movement when rocking at the 9 o’clock and 3 o’clock positions as well, the wheel bearing or outer tie rod is likely worn, not just the ball joint.
Step 5: Executing the Vertical Leverage Pry Bar Test
Lever the tire vertically using a heavy-duty pry bar to expose vertical separation between the steering knuckle and the lower control arm.
- Slide your 24 to 36 inch heavy-duty pry bar underneath the bottom tread of the tire.
- Use a wooden block on the concrete floor as a fulcrum and lever the tire upward gently while staring directly at the lower ball joint stud housing.
- Alternatively, place the tip of the pry bar directly between the lower control arm and the steering knuckle, and pry upward with moderate pressure.
- Watch for any independent vertical gap or slop opening up between the ball joint stud and its socket housing.
- Success Check: You will know this step worked when you can visually verify whether the steering knuckle moves independently from the lower control arm.
- Common Mistake: Prying with excessive force. Apply steady, moderate leverage; excessive force can lift the entire vehicle off the jack stands.
Step 6: Measuring Deflection with a Dial Indicator
Measure the exact vertical and horizontal play of the lower ball joint using a precision dial indicator.
- Attach the magnetic base of your dial indicator securely to a clean, flat section of the lower control arm.
- Position the indicator plunger tip vertically against the bottom of the steering knuckle directly adjacent to the ball joint stud.
- Compress the plunger tip slightly by roughly 0.050 inches to preload the gauge, then rotate the bezel to zero out the dial face.
- Insert your pry bar under the tire, lift upward gently, and read the maximum numerical deflection displayed on the dial gauge.
- Reposition the dial indicator horizontally against the side of the steering knuckle and push-pull the tire horizontally to measure radial play.
- Success Check: You will know this step worked when you have recorded an exact numerical measurement of play in thousandths of an inch.
- Common Mistake: Clamping the magnetic base to a painted, dirty, or curved surface, which allows the base to shift and creates false, erratic high readings on the dial.
Common Mistakes and How to Fix Them
- Lifting the Vehicle Incorrectly: Lifting by the frame on a load-carrying coil-spring-on-arm suspension keeps the spring compressed against the ball joint, masking loose wear. Fix: Lower the vehicle, consult your manual, and place the floor jack directly under the lower control arm before lifting.
- Misinterpreting Wheel Bearing Play: Feeling movement during the rock test and instantly condemning the ball joint without checking side-to-side play. Fix: Always perform a secondary check at 9 and 3 o’clock; if play exists there too, inspect the wheel bearing.
- Ignoring Grease Zerk Wear Indicators: Some heavy-duty aftermarket ball joints feature a threaded grease zerk that doubles as a physical height gauge. Fix: Check if the shoulder of the zerk housing is flush or recessed into the joint cover while resting on its wheels; if it is, the internal bearing has collapsed.
- Unstable Dial Indicator Mounting: Getting erratic jumping numbers on the gauge face during lifting. Fix: Clean all rust, dirt, and paint off the mounting spot with a wire brush, and ensure all articulating arms on the magnetic base are locked down tightly.
Variations in the Inspection Process
- Vehicles with Integrated Steering Knuckles: On certain modern aluminum or cast-iron suspension setups, the lower ball joint cannot be separated easily from the steering knuckle. For these vehicles, rely primarily on the dial indicator vertical play test rather than visual prying, as minor movement in sealed composite joints can be deceptive.
- Trucks and Heavy SUVs with Torsion Bars: Torsion bar front suspensions store massive amounts of spring energy in the middle of the frame. When checking these, you must ensure the jack supports the lower control arm precisely at the specified factory lift point, otherwise the torsion bar will bind the control arm and prevent accurate pry bar testing.
How Long Does It Take and What Does It Cost
Checking lower ball joints takes roughly 30 to 45 minutes per side for an intermediate DIYer working systematically through all six steps.
- Professional Shop Cost: A suspension inspection typically costs between $100 and $200 in labor fees at a standard mechanic shop.
- DIY Tool Cost: If you already own basic floor jacks and jack stands, purchasing a diagnostic dial indicator kit with a magnetic base costs between $30 and $60.
Frequently Asked Questions
Can I drive with a bad lower ball joint?
Driving with a worn lower ball joint is dangerous. If the joint separates completely while driving, the steering knuckle will detach from the control arm, causing the wheel to tuck under the vehicle, resulting in an immediate and catastrophic loss of vehicle control.
What are the common symptoms of a failing lower ball joint?
Common symptoms include a dull clunking or popping noise when driving over bumps or turning the steering wheel at low speeds, uneven front tire wear on the inner or outer edges, and a wandering steering feel that requires constant minor corrections on the highway.
How do I know if my lower ball joint is greaseable or sealed?
Look closely at the bottom or top housing of the ball joint. If you see a small metal threaded nipple or fitting where a grease gun attaches, it is a greaseable joint. If the housing is entirely smooth with no fitting, it is a sealed, maintenance-free lifetime unit.
Do I need an alignment after replacing a lower ball joint?
Yes, replacing a lower ball joint alters the geometric positioning of the steering knuckle and control arm. You must get a professional four-wheel alignment immediately after installation to prevent rapid tire wear and steering pull.