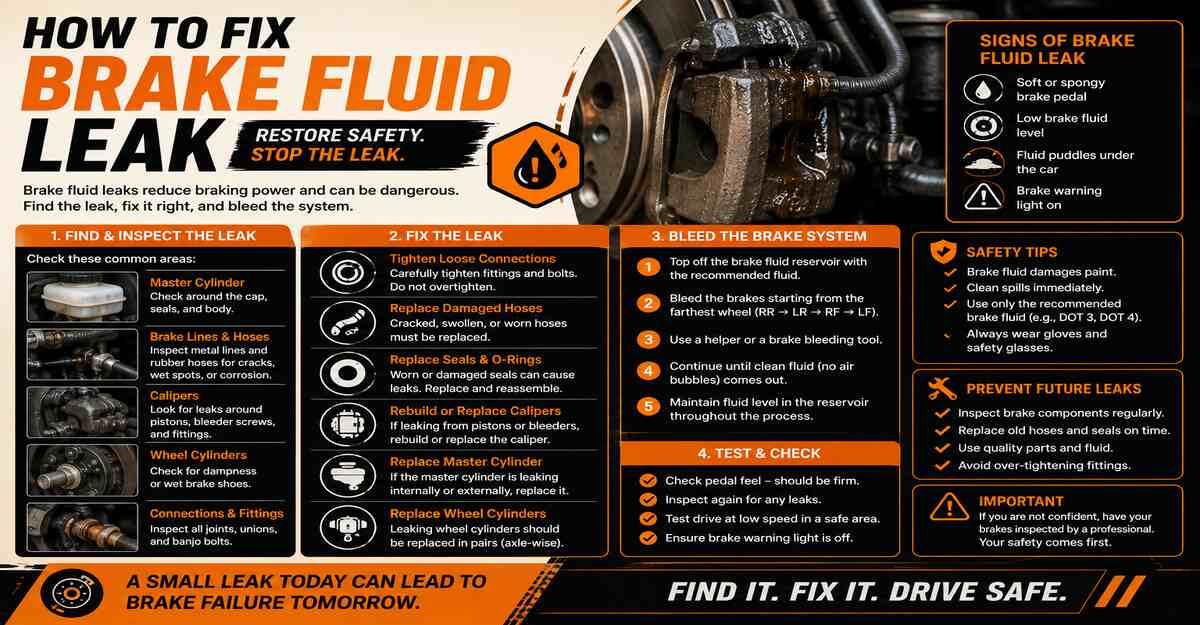
Fixing a brake fluid leak involves pinpointing the compromised hydraulic component, replacing the failing part, and meticulously bleeding air from the system. You can complete these six steps in 1.5 to 3.5 hours. Success depends entirely on preventing the master cylinder reservoir from running dry while purging the brake lines.
Before You Start
- Time Required: 1.5 to 3.5 hours
- Difficulty: Intermediate to Advanced
- Cost Range: $30 to $150 (depending on the replaced component)
- Prerequisite Skills: Familiarity with jacking a vehicle safely and basic torque wrench operation.
- Tools and Materials Checklist:
- 1 to 2 quarts of vehicle-specific brake fluid (DOT 3, DOT 4, or DOT 5.1-check reservoir cap)
- New replacement component (brake line, hose, caliper, or cylinder)
- 8mm to 12mm flare nut wrenches (line wrenches)
- 3/8-inch drive socket set, ratchet, and torque wrench
- Brake bleeder kit or 1/4-inch inside-diameter clear vinyl tubing and an empty plastic bottle
- Hydraulic floor jack and 2 to 4 weight-rated jack stands
- 1 to 2 cans of non-chlorinated brake parts cleaner
- Fluid catch pan and shop rags
- Safety glasses and heavy-duty nitrile gloves
Step 1: Elevate and Secure the Vehicle
Park on a flat, concrete surface, engage the parking brake, and loosen all wheel lug nuts one-quarter turn. Jack up the vehicle using factory lift points, lower it onto appropriately rated jack stands, and remove the wheels to expose the braking components.
You’ll know it worked when the vehicle is entirely stable on the stands; pushing firmly on the bumper should produce zero shifting or wobbling.
The most common mistake at this stage is relying solely on a hydraulic jack to hold the vehicle. Hydraulic seals fail without warning; never put your body under a vehicle not supported by mechanical jack stands.
Step 2: Clean and Locate the Leak Source
Wipe down the master cylinder, metal brake lines along the chassis, and rubber hoses at the wheel wells with shop rags, then spray them heavily with brake cleaner. Have an assistant press the brake pedal firmly while you use a flashlight to inspect the cleaned areas for fresh dripping or seepage.
You’ll know it worked when you locate the exact point where fluid actively breaches the system, rather than just finding old, residual wetness.
The most common mistake is misidentifying a leaking shock absorber or axle seal as a brake fluid leak. Brake fluid feels lighter than engine oil and smells distinctly like fish oil or castor oil; verify the fluid type before replacing parts.
Step 3: Remove the Failing Component
Place a fluid catch pan directly beneath the work area and use a flare nut wrench to break the old brake line fittings loose. Unbolt the component (caliper, hose bracket, or cylinder) using a standard socket set, capturing any draining fluid in the pan.
You’ll know it worked when the broken part is completely detached from the vehicle and the open metal brake lines are temporarily capped or elevated to slow fluid loss.
The most common mistake is using a standard open-ended wrench on brake line fittings. The soft brass fittings require the five-point contact of a flare nut wrench; an open-ended wrench will instantly round off the nut, turning a 10-minute removal into a multi-hour ordeal involving locking pliers and a torch.
Step 4: Install the Replacement Component
Thread the new brake line fitting or hose into place purely by hand for the first three full rotations before applying any tools. Torque line fittings to 10 to 15 lb-ft (14 to 20 Nm) using your flare nut wrench, and torque caliper mounting bolts to your vehicle’s exact specification, typically 25 to 50 lb-ft (34 to 68 Nm).
You’ll know it worked when the fittings are fully seated, the threads are unmarred, and the component is rigidly attached to its mounting bracket.
The most common mistake here is cross-threading the soft brass fittings by immediately using a wrench. If you feel resistance during the first hand-turned rotations, back it out and realign; forcing it will destroy the internal threads of the caliper or master cylinder.
Step 5: Bleed the Brake System
Clean the master cylinder cap before opening it, fill the reservoir to the “MAX” line, and attach a clear 1/4-inch tube to the bleeder valve of the furthest wheel (usually Rear Right). Have an assistant pump the brake pedal three times and hold it down; open the bleeder valve a half-turn until fluid flows, close the valve, and instruct the assistant to release the pedal, repeating this until no bubbles exit the tube.
You’ll know it worked when the fluid flowing through the clear vinyl tubing is entirely solid, with absolutely zero microscopic air bubbles visible.
The most common mistake is letting the master cylinder reservoir run dry during this process. If the fluid level drops below the intake port, the pump sucks air into all four brake lines simultaneously, forcing you to restart the entire bleeding process from the beginning.
Step 6: Perform Static Pressure and Drive Tests
Reinstall the wheels, lower the vehicle to the ground, and torque the lug nuts to 80 to 100 lb-ft (108 to 135 Nm). Start the engine and hold heavy, continuous pressure on the brake pedal for 60 seconds; check all new connection points for moisture before performing a low-speed test drive in an empty parking lot.
You’ll know it worked when the brake pedal feels instantly firm upon pressing and does not slowly sink toward the floorboard under continuous foot pressure.
The most common mistake is skipping the static pressure test and discovering a high-pressure leak while approaching a stop sign at 30 mph. Always verify system integrity under load while the vehicle is parked.
Common Mistakes and How to Fix Them
| Failure Mode | Root Cause | Recovery Action |
| Spongy or soft brake pedal | Air is still trapped in the lines or the ABS module. | Bleed all four wheels again. If the pedal remains soft, use a scan tool to cycle the ABS pump and re-bleed. |
| New leak at the line fitting | The fitting is cross-threaded or under-torqued. | Back the fitting out. If threads are stripped, you must replace the line and potentially the receiving component. If intact, re-seat carefully and torque to 15 lb-ft. |
| Pedal sinks slowly to the floor | Internal failure of the master cylinder bypass seals. | The master cylinder is failing internally and must be completely replaced and bench-bled. |
| Brake fluid ruins vehicle paint | Fluid dripped onto the fender or bumper. | Immediately flush the area with copious amounts of soapy water. Do not wipe it dry first, as this smears the corrosive fluid. |
Process Variations
Working with Rusted Brake Lines
If your vehicle has severe undercarriage rust, attempting to unscrew a brake line fitting will likely snap the steel line itself. Spray fittings heavily with penetrating oil 24 hours before starting. If the line snaps, you must replace the entire length of the rigid steel tubing up to the next junction block. You will need a dedicated tubing bender to shape the new line; bending it by hand will kink it and restrict hydraulic pressure.
Vehicles with Advanced ABS Modules
On modern vehicles, air introduced upstream of the Anti-lock Braking System (ABS) module cannot be removed via traditional manual bleeding. The internal valves remain closed. You must plug a bi-directional OBD2 scan tool into the vehicle’s diagnostic port and initiate an “Automated ABS Bleed” procedure, which cycles the internal pump to force trapped air into the main brake lines where it can be bled normally.
Replacing the Master Cylinder
If the leak originates at the master cylinder, you cannot simply bolt a new one on. It must be “bench bled” in a vise before installation. Attach a looping bleeder kit routing fluid from the output ports back into the reservoir. Use a wooden dowel to push the cylinder piston in slow, 1-inch strokes until no bubbles emerge in the looping tubes.
How Long Does It Take and What Does It Cost?
- Replacing a rubber brake hose: 1 to 1.5 hours. Parts cost $20 to $40.
- Replacing a brake caliper: 1.5 to 2 hours. Parts cost $50 to $120.
- Replacing a rigid metal brake line: 2.5 to 3.5 hours (due to routing and bending). Line stock and fittings cost $30.
- Professional Shop Alternative: Having a mechanic fix a brake fluid leak typically costs $200 to $450 in labor, plus the cost of parts and shop fluids.
Frequently Asked Questions
Can I drive with a small brake fluid leak?
No. Because the braking system relies on closed hydraulic pressure, a leak prevents the system from multiplying your foot’s force. Even a minor drip can introduce air or lead to sudden, catastrophic loss of all braking power while driving.
What happens if I mix different types of brake fluid?
DOT 3, DOT 4, and DOT 5.1 are glycol-based and can technically mix, though doing so lowers the boiling point to the lowest fluid’s rating. However, DOT 5 is silicone-based. Mixing DOT 5 with any glycol fluid creates a thick sludge that destroys internal rubber seals immediately.
How do I dispose of old brake fluid?
Brake fluid is highly toxic and flammable. Pour the bled fluid into a sealed, heavy-duty plastic jug (like an empty oil container) and take it to an auto parts store or municipal hazardous waste facility. Never pour it down a drain or onto the ground.
Do I have to bleed all four wheels if I only replaced one hose?
If you kept the master cylinder full and capped the broken line immediately, you often only need to bleed the specific caliper you worked on. However, if the fluid reservoir ever dropped below the “MIN” line, air entered the central manifold, requiring a full four-wheel bleed.
Why do I need to clean the master cylinder cap before opening it?
The clearances inside a master cylinder and ABS pump are microscopic. A single grain of sand or flake of rust falling from a dirty cap into the reservoir can score the internal cylinder bore, creating an internal pressure leak that destroys the new component.
Learning how to fix brake fluid leak issues requires patience, cleanliness, and strict adherence to torque specs, but it ensures your vehicle remains safe and reliable on the road.