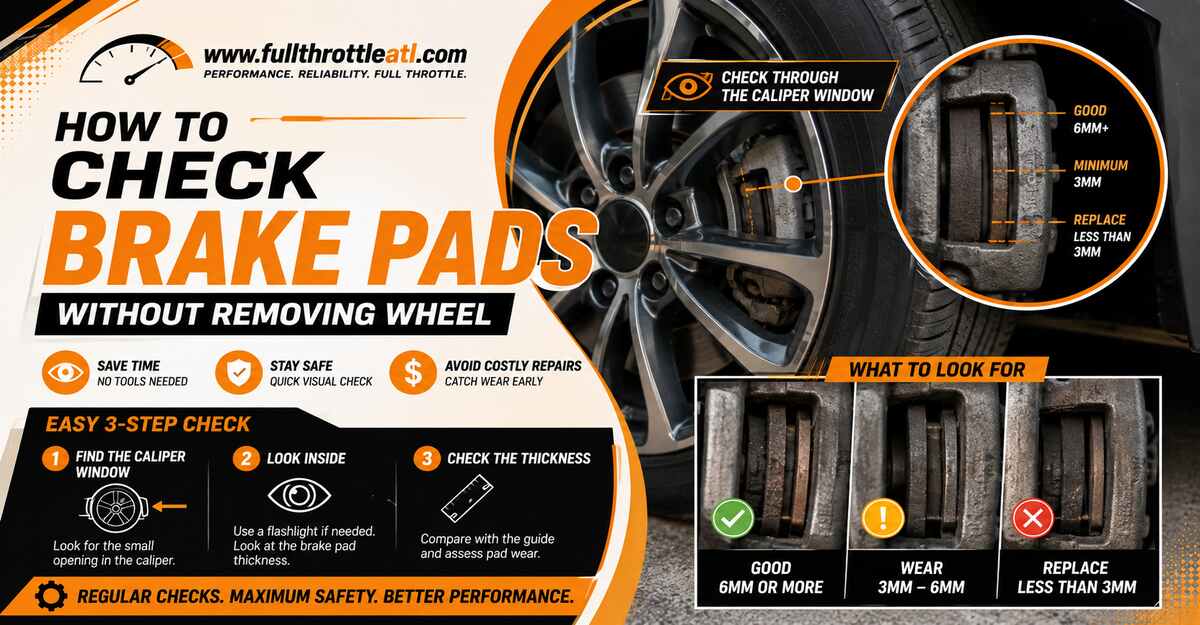
Checking your brake pads without removing the wheel saves you from jacking up the car, requiring only a flashlight and a clear visual line of sight. By completing these six steps to measure the friction material against safety limits, you will know exactly when a replacement is due in under 15 minutes. Lighting angles determine your success.
Before You Start
- Total Time Required: 10 to 15 minutes
- Difficulty Level: 2/10 (Beginner)
- Cost Range: $0 to $15
- Prerequisites: A completely flat, level paved surface. The vehicle must be parked with the engine off for at least 1 hour (rotors operate above 200°C and will burn you).
- Tools & Materials Checklist:
- Brake Pad Thickness Gauge Tool (1 set, standard color-coded mm/inch blades)
- Flashlight or LED Headlamp (1 unit, minimum 200 lumens)
- Smartphone or Telescoping Inspection Mirror (1 unit)
- Wheel Chocks (2 units)
The 6-Step Brake Pad Inspection Process
Step 1: Secure the Vehicle and Let Brakes Cool
Park your vehicle on a flat surface, engage the parking brake, and wait at least one hour if the car was recently driven. Place the transmission in Park (for automatics) or 1st Gear (for manuals), and wedge two wheel chocks behind the rear tires to prevent rolling.
- You’ll know it worked when: The brake rotor (the shiny metal disc behind the wheel) is completely cool to the bare touch.
- Common Mistake: Attempting this check immediately after a commute. Calipers and rotors retain severe heat and will burn your hands when slipping a gauge through the spokes.
Step 2: Angle the Front Wheels for Better Access
Turn your steering wheel to angle the front brake calipers outward, directly facing you. If you are checking the driver’s side front wheel, start the engine, turn the steering wheel completely to the left (full lock), and turn the engine off again. Reverse this for the passenger side.
- You’ll know it worked when: The caliper assembly is positioned in the wide gap between the wheel spokes, rather than tucked behind the barrel of the wheel.
- Common Mistake: Leaving the engine running during the inspection, which poses a severe safety hazard if a helper accidentally shifts the transmission.
Step 3: Illuminate the Caliper Inspection Window
Shine your flashlight at a 45-degree angle through the wheel spokes, aiming at the top or side of the brake caliper. Do not shine the light directly perpendicular to the rotor; the shiny metal will reflect the beam back into your eyes and wash out the shadows you need to see the pad depth.
- You’ll know it worked when: You can clearly see the caliper clamping over the rotor, with dark shadows highlighting the gaps between the metal components.
- Common Mistake: Relying on ambient garage lighting or a weak, diffused smartphone flashlight, which lacks the focused beam required to penetrate the dark wheel barrel.
Step 4: Differentiate the Friction Material from the Backing Plate
Visually locate the solid metal backing plate (typically 5mm thick, often painted or rusty) and identify the softer, dark-grey friction material sandwiched between that plate and the shiny rotor. You are only assessing the dark-grey friction material.
- You’ll know it worked when: You can clearly trace the distinct seam where the wearable friction material is glued/riveted to the steel backing plate.
- Common Mistake: Measuring the entire assembly. Counting the backing plate in your measurement will falsely suggest you have 8mm of pad left when you actually have 3mm of dangerous, bare material.
Step 5: Measure the Pad Thickness
Insert your brake pad thickness gauge through the wheel spokes and match a blade to the thickness of the friction material. Place the flat edge of the gauge against the rotor face and slide it toward the pad until it touches. Green blades (8mm+) mean excellent condition, yellow (4–7mm) means fair, and red (3mm or less) requires immediate replacement.
- You’ll know it worked when: The chosen gauge blade perfectly spans the gap from the rotor face to the backing plate seam without overlapping.
- Common Mistake: Resting the gauge against the raised rust lip on the outer edge of the brake rotor. This pushes the gauge away from the pad face, making the pad look thinner than it actually is. Slide the gauge past the outer 2mm of the rotor.
Step 6: Inspect the Inner Pad Using a Smartphone
Slide your smartphone camera or a telescoping inspection mirror behind the wheel and brake caliper to visually verify the thickness of the inner brake pad. The outer pad you just measured can look brand new even if the inner pad is completely worn down to the metal.
- You’ll know it worked when: You capture a clear image or video showing the inner pad making flat contact with the inboard side of the brake rotor.
- Common Mistake: Taking a still photo with the flash on, which flattens the image and ruins depth perception. Instead, record a 4K video with the flash toggled on, slowly moving the phone side-to-side to create perspective.
Common Mistakes and How to Fix Them
Mistake 1: The Gauge Won’t Fit Through Custom Spokes
Many modern alloy wheels feature tightly clustered spokes that block physical access to the caliper window. How to fix it: Do not force the gauge. Instead, use a thin piece of pliable mechanics wire. Insert the wire through the spoke gap until it hits the rotor face against the pad edge. Pinch the wire with your fingernail exactly where the backing plate begins, pull the wire out, and measure that length with a standard tape measure.
Mistake 2: Finding Uneven Wear Between the Inner and Outer Pad
You might discover the outer pad measures a healthy 8mm, but your smartphone video reveals the inner pad is down to 3mm. How to fix it: This indicates a mechanical failure, usually sticking caliper slide pins or a seized caliper piston. A simple pad swap will not fix this; the braking system requires a teardown, thorough cleaning and lubrication of the guide pins, or a complete caliper replacement.
Mistake 3: Misidentifying the Anti-Rattle Clip
Brake calipers utilize thin, shiny metal clips to hold the pads tightly in the bracket. Beginners often mistake the edge of this clip for the backing plate, throwing off their visual estimation. How to fix it: Look past the shiny hardware. The friction material is always the absolute innermost layer making direct, flat contact with the smooth, swept face of the brake rotor.
Process Variations for Different Wheel Types
Steel Wheels with Plastic Hubcaps
If your vehicle uses basic steel wheels covered by plastic hubcaps, the viewing windows are typically blocked entirely. You must pop the plastic hubcap off using a flathead screwdriver or dedicated pry tool. Once the hubcap is removed, the circular cutouts in the steel wheel usually provide enough line-of-sight to use the mechanics wire measuring method.
Checking Rear Drum Brakes
This guide applies strictly to disc brakes. If your rear wheels have drum brakes (a solid metal cylinder rather than a clamped rotor), you cannot check the friction material without removing the wheel and pulling the drum casing off entirely. Look for a rubber inspection plug on the backing plate behind the wheel, though this still requires getting under the vehicle.
How Long Does It Take and What Does It Cost?
Checking your brake pads visually through the wheel takes exactly 10 to 15 minutes for all four wheels once you understand what to look for. The process costs absolutely $0 if you use the smartphone estimation method. If you want precise measurements, a color-coded brake pad thickness gauge set costs between $8 and $15 at any auto parts store, while a telescoping inspection mirror costs around $5 to $10.
Frequently Asked Questions
Do front and rear brake pads wear at the same rate?
No, front brake pads wear out significantly faster than rear pads. During braking, weight transfers to the front of the vehicle, forcing the front brakes to handle 60% to 70% of the stopping power. Expect to replace front pads twice as often as the rears.
How many miles should standard brake pads last?
Standard brake pads last between 30,000 and 70,000 miles. Longevity depends heavily on your driving environment and pad material. Ceramic pads driven mostly on highways will last toward the upper limit, while semi-metallic pads subjected to heavy stop-and-go city traffic will wear out closer to 30,000 miles.
What does a squeaking noise mean if my pads look thick?
If your pads measure well over 4mm but squeak during light braking, the pads may be glazed from overheating, or debris is trapped between the pad and rotor. It can also indicate that the anti-squeal shims behind the backing plate lack high-temp brake grease.
Is a 4mm brake pad thick enough for a road trip?
A 4mm pad is borderline. While it is technically above the 3mm legal and safe minimum, it will wear down quickly under heavy loads or mountain driving. It is safe for roughly 1,000 miles of highway driving, but you should schedule a replacement immediately upon your return.