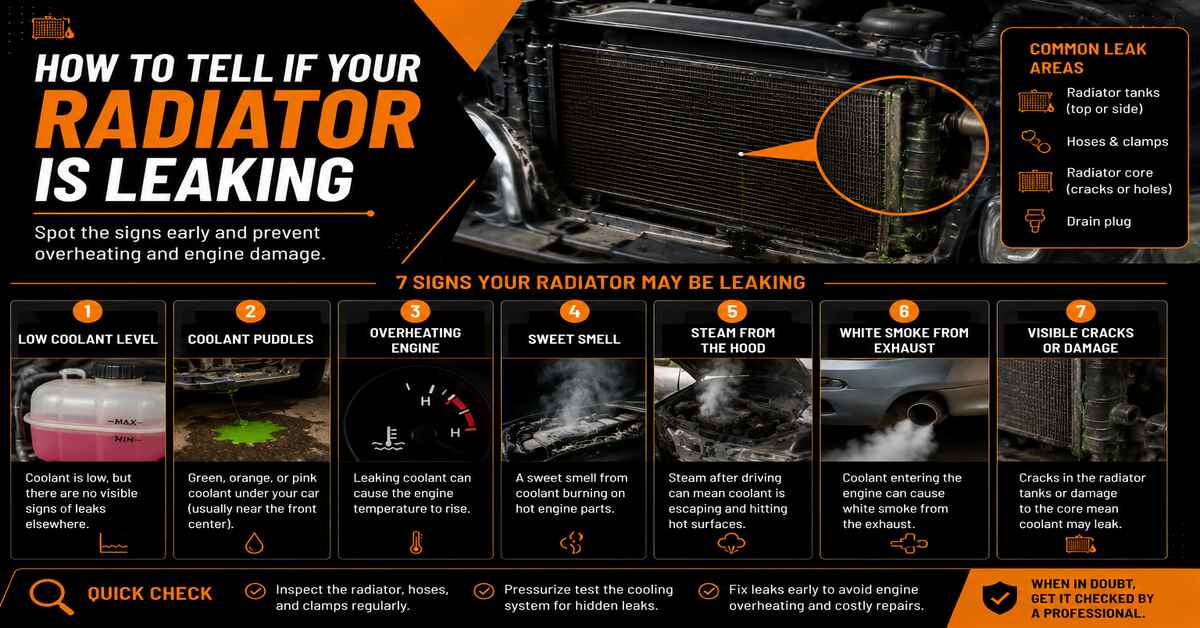
Diagnosing a leaking radiator involves a methodical 4-step process-cooling, visual inspection, pressure testing, and UV dye detection-taking 45 to 75 minutes. Success depends entirely on allowing the engine to cool completely and strictly matching your vehicle’s factory pressure cap specifications to prevent permanent engine damage.
Before You Start
- Time Required: 45 to 75 minutes
- Difficulty Level: Beginner to Intermediate
- Estimated Cost: $30 to $90 (if purchasing a pressure tester kit and UV dye)
- Prerequisites: Engine must be completely cold (driven within the last 3 to 4 hours or sitting overnight).
Tools and Materials Checklist
- Automotive Coolant: 1 gallon (pre-diluted 50/50 or concentrated matched strictly to your vehicle specification-HOAT, OAT, or IAT)
- Radiator Pressure Tester Kit: 1 kit complete with matching filler-neck adapter
- UV Leak Detection Dye: 1 single-dose bottle (approx. 1 oz)
- UV Flashlight & Yellow Glasses: 1 set
- Distilled Water: 1 gallon
- Work Light / Flashlight: 100+ lumens
- Safety Gear: Safety glasses and nitrile gloves (1 set)
- Cardboard Sheet: 1 large piece (approx. 3 feet by 3 feet)
- Shop Rags: 5 to 6 clean shop towels
Step 1: Cool the Engine Completely
- Park the vehicle on a flat, level surface, engage the parking brake, turn off the ignition, and pop the hood latch.
- Let the vehicle sit untouched for 30 to 45 minutes until the engine bay ambient heat dissipates. Reach down and firmly squeeze the upper radiator hose to verify it is completely cold to the touch before moving forward.
- You’ll know it worked when the upper and lower radiator hoses are entirely cold and room temperature, and the coolant expansion tank fluid level is stable.
- Common Mistake: Opening the cooling system while warm. Even after 30 minutes, residual pressure can remain, causing pressurized, boiling coolant to erupt and cause severe third-degree burns.
Step 2: Conduct a Visual and Physical Inspection
- Place the large 3′ x 3′ cardboard sheet directly underneath the front engine bay area, positioning it below the radiator core.
- Examine the front bumper area, the lower splash guards, and the cardboard surface for puddles or drops of brightly colored fluid (bright green, orange, pink, or yellow). Shine your 100+ lumen work light across the aluminum radiator fins, the plastic side tanks, and all rubber hose connection points looking for crusty white, green, or pink residue trails.
- You’ll know it worked when you have mapped every visible damp spot, crusty stain, or active drop to a specific component (e.g., hose clamp, seam of the plastic tank, or center core fins).
- Common Mistake: Confusing normal summer air conditioning condensation-which is clear and odorless water dripping from the evaporator drain-with a coolant leak. Coolant is slippery and distinctly sweet-smelling.
Step 3: Perform a Manual System Pressure Test
- Wrap a clean shop towel completely over the radiator cap, press down firmly, and slowly twist counter-clockwise one notch to release any hidden residual pressure, then remove the cap entirely. Select the correct threaded or bayonet adapter from your pressure tester kit and screw it securely onto the radiator filler neck. Attach the hand pump quick-disconnect fitting to the adapter.
- Pump the hand pump handle slowly until the analog or digital gauge needle reaches the exact PSI number stamped on your factory radiator cap (typically between 13 PSI and 16 PSI). Do not exceed this rated limit. Stop pumping immediately, and watch the gauge needle continuously for 10 full minutes.
- You’ll know it worked when the pressure gauge needle holds completely steady without dropping for 10 minutes, or you instantly spot the exact location of escaping fluid or hear a hissing sound of air bleeding out.
- Common Mistake: Over-pressurizing the system past the factory cap rating. Pumping past 16–20 PSI can instantly rupture fragile aged plastic radiator end tanks, blow out internal heater cores, or distort engine gaskets.
Step 4: Run a UV Leak Detection Dye Test (For Slow or Hidden Leaks)
- Pour one single 1-oz bottle of UV leak detection dye directly into the radiator filler neck or the coolant overflow reservoir, and top off the system with a 50/50 mix of coolant and distilled water if the level is low. Reinstall the radiator cap securely, and drive the vehicle normally for 1 to 2 days so the thermostat cycles open and the dye mixes completely through the entire cooling network.
- Park the car inside a completely dark garage or wait until nightfall, put on your yellow UV glasses, and turn on your UV flashlight. Scan every square inch of the radiator core, hose joints, water pump weep hole, and thermostat housing.
- You’ll know it worked when microscopic cracks or weeping seals illuminate in a brilliant neon-green or yellow glow under the UV light, revealing the exact source of fluid loss.
- Common Mistake: Scanning immediately after adding dye without driving. The dye requires thermal cycling (reaching operating temperature and cooling down completely) to circulate through microscopic fractures.
Common Mistakes and How to Fix Them
- The Pressure Drops Rapidly But Zero External Fluid Appears: If the gauge needle falls steadily during Step 3 but your cardboard and engine bay are bone dry, you have an internal leak. Remove your engine oil dipstick; if the oil looks like milky brown coffee, coolant is leaking past a blown head gasket into your crankcase. Alternatively, check the passenger-side floor carpet for dampness and a sweet smell, indicating a ruptured heater core.
- The Pressure Tester Gauge Refuses to Hold Any Pressure Instantly: If the needle drops back to zero the moment you stop pumping, check for a faulty rubber O-ring seal on your tester adapter or a wide-open tear in a major radiator hose. Wipe the radiator filler neck seating rim clean with a shop towel to eliminate debris, lightly moisten the adapter O-ring with clean coolant, and re-test.
- The UV Dye Fails to Highlight Any Leaks: If the system lost pressure during testing or your coolant level keeps dropping, but the UV light shows nothing, the leak may be located inside the inaccessible core of the vehicle’s cabin heater box or beneath the intake manifold. Pressure test the system cold while listening closely inside the vehicle cabin.
Variations: How the Process Adapts
- Vehicles Without a Direct Radiator Cap (Sealed Surge Tanks): Many modern European and Asian vehicles utilize a pressurized plastic coolant expansion tank instead of a traditional radiator cap. In this variation, attach the pressure tester adapter directly to the surge tank filler opening, use the adapter specified for plastic reservoirs, and apply test pressure matching the surge tank cap rating (often 15 to 20 PSI).
- Testing Microscopic Seeps on Plastic-to-Aluminum Crimp Seals: If a radiator leaks only when the engine reaches maximum operating temperature and expands, standard cold pressure testing may fail. In this case, perform the pressure test immediately after shutting down a fully warmed-up engine while components are thermally expanded.
How Long Does It Take and What Does It Cost
- Time Investment: Expect 45 to 75 minutes for a standard visual and pressure diagnostic test. Adding a UV dye test requires a 15-minute initial setup followed by 1 to 2 days of normal driving before final visual verification.
- Financial Cost: Renting or purchasing a basic radiator pressure test kit costs between $30 and $90. A bottle of UV leak detection dye and a UV flashlight kit runs approximately $15 to $25. Professional shop diagnostic fees typically range from $100 to $150 if you choose not to DIY.
Frequently Asked Questions
Can I drive with a leaking radiator if I keep topping it off?
Driving with a known radiator leak is extremely risky. Coolant loss causes rapid engine overheating, warped cylinder heads, and catastrophic engine failure. Even minor leaks can blow out suddenly under highway loads, resulting in total loss of coolant within minutes and severe engine damage.
What is the white smoke coming from my engine bay?
Sweet-smelling white smoke or vapor rising from under the hood indicates that hot coolant is actively spraying or dripping onto hot exhaust manifold components or the catalytic converter. Stop driving immediately, turn off the engine, and allow it to cool down completely before inspecting.
Can stop-leak additives permanently fix a radiator leak?
Pour-in stop-leak additives can provide a temporary emergency fix for small pinhole leaks in the radiator core. However, they are not permanent repairs. They can clog narrow cooling passages inside your radiator, heater core, and thermostat, leading to restricted coolant flow and chronic overheating issues.
How do I safely dispose of old automotive coolant?
Automotive coolant contains toxic ethylene glycol, which has a sweet taste that attracts pets and wildlife. Drain any flushed coolant into a sealed, leak-proof plastic container, and take it to your local auto parts store, hazardous waste disposal site, or municipal recycling center. Never pour coolant onto the ground or down storm drains