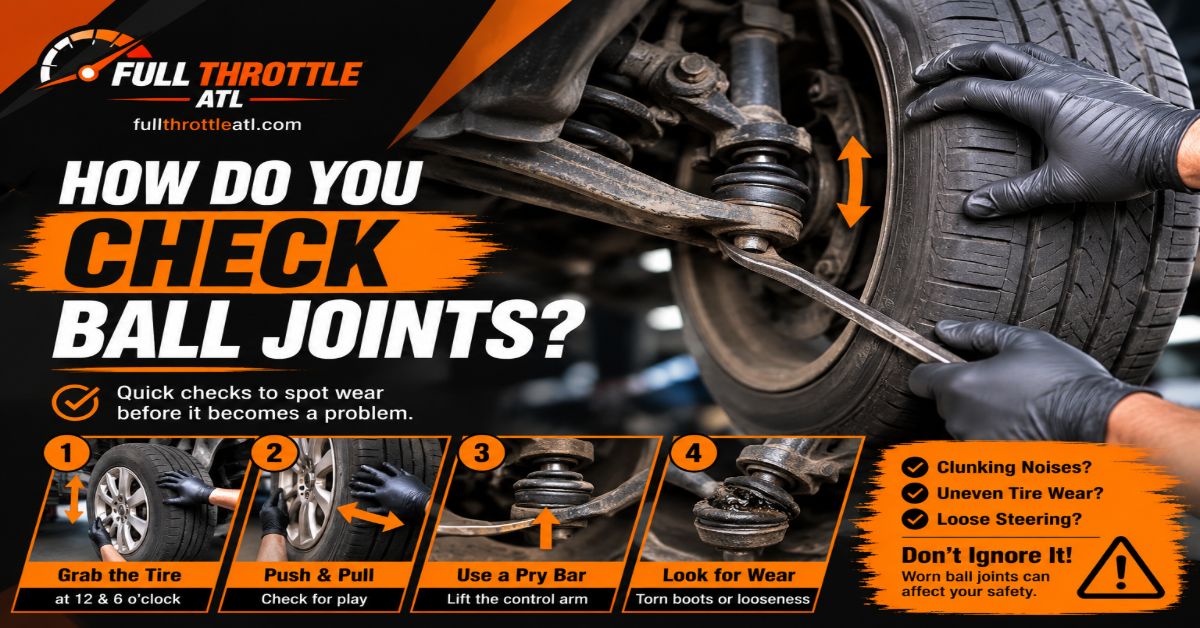
Checking your ball joints ensures your vehicle remains safe, tracks straight, and avoids catastrophic suspension failure. This comprehensive guide outlines the exact inspection process for a standard independent front suspension. You will complete this task in 45 to 60 minutes at an intermediate skill level by following six structured phases, with success depending entirely on correctly isolating the suspension load before applying mechanical force.
Before You Start
- Time Required: 45 to 60 minutes total.
- Skill Level: Intermediate.
- Estimated Cost: $0 if you already own tools; $50 to $100 to purchase a dial indicator and pry bar kit.
- Tools and Materials Checklist:
- Hydraulic floor jack: 1 unit (rated for your vehicle weight, minimum 2.5-ton capacity).
- Jack stands: 2 units (minimum 3-ton capacity).
- Wheel chocks: 2 units.
- Pry bar: 1 unit (12 to 24 inches long).
- Dial indicator with flex arm and magnetic base: 1 unit.
- Flashlight or work light: 1 unit.
- Safety glasses and mechanics gloves: 1 set.
- Wire brush and automotive brake cleaner: 1 can.
- Prerequisite Conditions: Perform this inspection on a flat, dry, level concrete surface. Ensure the engine is off and the transmission is placed in Park (automatic) or Reverse (manual).
Step 1: Secure and Elevate the Vehicle Safely
Park on a flat, level concrete surface, engage the parking brake firmly, and place wheel chocks securely behind the rear tires. Locate your vehicle’s designated frame lift points specified in the factory service manual. Raise the front wheels off the ground using the floor jack, place heavy-duty jack stands under the frame support points, and lower the jack slowly until the vehicle rests securely on the stands with its weight completely off the suspension frame rails.
- Action Details: Verify that the jack stands are locked at an identical height notch on both sides. Give the vehicle a firm shoulder shove from the side to confirm it will not shift or slip off the stands.
- Success Check: You will know this step worked when the front tires hang completely free or rest safely above the ground, and the chassis is rock-solid on the stands with zero wobble.
- Common Mistake: Placing jack stands on thin sheet metal floor pan areas instead of structural subframe members or pinch welds. Always consult your service manual for exact factory stamp locations.
Step 2: Determine and Configure Suspension Load State
Check your service manual to determine your suspension type and configure the lower control arm load accordingly. If your vehicle uses a MacPherson strut setup, keep the wheel hanging freely to check the joint. If your vehicle uses a Short-Long Arm (SLA) or double wishbone suspension with a coil spring resting on the lower control arm, place the floor jack directly under the lower control arm ball joint area and jack it up slightly to compress the spring and take the weight off the joint.
- Action Details: For SLA suspensions, lift the lower control arm until the spring begins to compress slightly by roughly 1 inch, which neutralizes the pre-load tension of the heavy coil spring.
- Success Check: You will know this step worked when the suspension is correctly configured to match its design load state, preventing false readings caused by abnormal spring tension binding the joint socket.
- Common Mistake: Leaving an SLA lower control arm unsupported while hanging freely. This creates extreme tension that masks vertical play inside a worn-out lower ball joint.
Step 3: Perform the 12 and 6 O’Clock Wheel Play Test
Grip the front tire firmly at the 12 o’clock and 6 o’clock positions and push in and pull out alternately with a rhythmic rocking motion. Feel and listen for any clicking, popping, or independent movement of the wheel hub relative to the suspension knuckle.
- Action Details: Keep your arms straight and apply alternating pressure of roughly 20 to 30 pounds of force. Have an assistant look closely at the back of the wheel hub assembly while you rock the tire.
- Success Check: You will know this step worked when you can clearly distinguish between a loose wheel bearing (which rocks evenly across all angles) and a loose ball joint (which shows distinct play only at the top or bottom pivot point).
- Common Mistake: Shaking the tire at the 3 o’clock and 9 o’clock positions instead. Moving the tire horizontally checks outer and inner tie rod ends, not the vertical ball joints.
Step 4: Execute the Pry Bar and Boot Integrity Check
Shine your work light directly onto the upper and lower ball joints, wedge the pry bar between the lower control arm and the steering knuckle, and pry upward firmly to check for vertical or lateral movement in the joint stud. Inspect the rubber grease boot thoroughly for tears, cracks, grease leaks, or dry rot.
- Action Details: Insert the pry bar tip into the designated pocket or gap between the control arm casting and the knuckle base. Apply steady upward leverage of about 15 to 25 pounds of force while observing the joint stud gap.
- Success Check: You will know this step worked when you can visually confirm whether the internal stud moves up and down inside its socket housing, and whether the rubber boot remains pliable, sealed, and free of splits.
- Common Mistake: Jamming the pry bar into the thin rubber grease boot itself, which punctures a healthy boot and introduces immediate road grit contamination. Always wedge against solid metal components.
Step 5: Measure Play with a Dial Indicator
Mount the dial indicator magnetic base securely to the lower control arm, position the indicator plunger tip directly against the steering knuckle housing near the ball joint stud, zero out the dial face, and use the pry bar to move the joint vertically. Read the maximum gauge deflection value and compare it against your vehicle manufacturer wear limit.
- Action Details: Ensure the magnetic base is attached to a clean, flat, unpainted metal surface on the control arm so it does not slip. Apply the same pry bar upward pressure used in the previous step while watching the needle sweep across the dial face.
- Success Check: You will know this step worked when the dial indicator records a precise numerical measurement of vertical play, such as a stable reading falling within your manual specification.
- Common Mistake: Failing to wipe away dirt and grease from the magnetic base mounting spot, causing the base to shift slightly during prying and generating a falsely inflated deflection reading.
Step 6: Interpret Results and Diagnose Failure Modes
Compare your findings from the physical play tests and dial gauge measurements against the maximum allowable factory tolerances, which typically range from 0.5 mm to 1.5 mm or 0.020 to 0.060 inches depending on the vehicle weight rating. Determine whether the component requires immediate replacement, servicing, or continued monitoring.
- Action Details: If dial deflection exceeds 1.5 mm, or if you feel a distinct clunking pop during the manual pry test, write down the affected side and order replacement ball joints immediately.
- Success Check: You will know this step worked when you have an unambiguous diagnosis backed by numerical data, allowing you to buy the correct replacement parts with confidence.
- Common Mistake: Assuming a joint is fine just because it has no external noise. Some internal-load ball joints wear silently until they separate completely while driving.
Common Mistakes and How to Fix Them
- Jacking the wrong support point: Placing your hydraulic jack under a strut-style lower control arm unloads the suspension incorrectly and masks severe internal wear. Fix: Always reference your factory manual to confirm whether your suspension is weight-carrying or follower-type before elevating.
- Confusing wheel bearing play with ball joint play: Mistaking bearing looseness for a bad joint leads to replacing expensive control arms unnecessarily. Fix: Watch the actual stud-to-socket interface while rocking the tire; if the entire hub assembly moves uniformly without joint separation, the wheel bearing or hub assembly is the culprit.
- Overlooking hairline boot cracks: Dismissing minor surface crazing on the rubber boot allows moisture and sand particles to enter the joint cavity. Fix: Wipe the boot clean with brake cleaner and flex it gently with your fingers to expose hidden tears deep inside the folds.
- Ignoring one-sided wear patterns: Checking only one side of the vehicle and stopping once you find a bad joint. Fix: Suspension components wear at similar rates due to road conditions, so always inspect both front driver and passenger sides completely.
Variations of the Inspection Process
- Press-In vs. Bolt-On vs. Control Arm Assemblies: Some vehicles feature ball joints pressed directly into the control arm requiring a heavy ball joint press tool for replacement, while others bolt on or require replacing the entire stamped control arm assembly as a single unit. Adjust your diagnostic focus to check whether the rivet heads or mounting bolts show signs of shearing or looseness.
- Sealed vs. Greaseable Aftermarket Joints: Factory sealed joints lack a grease zerk fitting and cannot be lubricated during routine oil changes, meaning any internal dryness requires complete unit replacement. Serviceable aftermarket joints feature a zerk fitting; if these show stiffness or squeaking, inject high-temperature chassis grease using a manual grease gun before condemning the joint.
- Trucks and SUVs with Torsion Bars: Heavy-duty trucks using front torsion bar suspensions require specialized unloading techniques, often needing a torsion bar unloader tool or a heavy-duty frame jack to relieve extreme torsional spring pressure safely before the pry bar test can be performed accurately.
How Long Does It Take and What Does It Cost?
Performing a thorough ball joint inspection takes 45 to 60 minutes for a DIY practitioner working methodically on both front wheels.
If you already own standard hand tools, a hydraulic jack, and jack stands, the diagnostic cost is $0. Purchasing a professional-grade dial indicator kit with a magnetic flex arm and a heavy-duty 18-inch pry bar will cost between $40 and $90 total, which is a fraction of what an auto repair shop charges for a diagnostic inspection hour.
Frequently Asked Questions
What are the main driving symptoms of a bad ball joint?
Common symptoms include a rhythmic clunking or popping noise when driving over bumps, steering wheel vibration, a vehicle that wanders or pulls to one side while driving straight, and uneven front tire wear where the outer or inner tread is cupped or bald.
Can I drive with a worn ball joint if it only makes noise?
No, you should never drive with a worn ball joint. Once a ball joint’s internal seat or stud fails completely, the wheel can separate from the steering knuckle, causing an immediate and catastrophic loss of steering control and severe vehicle damage.
How do I know if my ball joints are upper or lower?
Vehicles with double wishbone or SLA suspensions feature both an upper and a lower ball joint, whereas vehicles with MacPherson strut setups typically feature only a lower ball joint. Lower ball joints bear the primary vehicle weight and fail more frequently.
Do I need a wheel alignment after checking ball joints?
Simply inspecting your ball joints does not alter your alignment settings, so no alignment is required if you only performed diagnostic checks. However, if you replace a worn ball joint during or after the inspection, a professional front-end wheel alignment is mandatory.