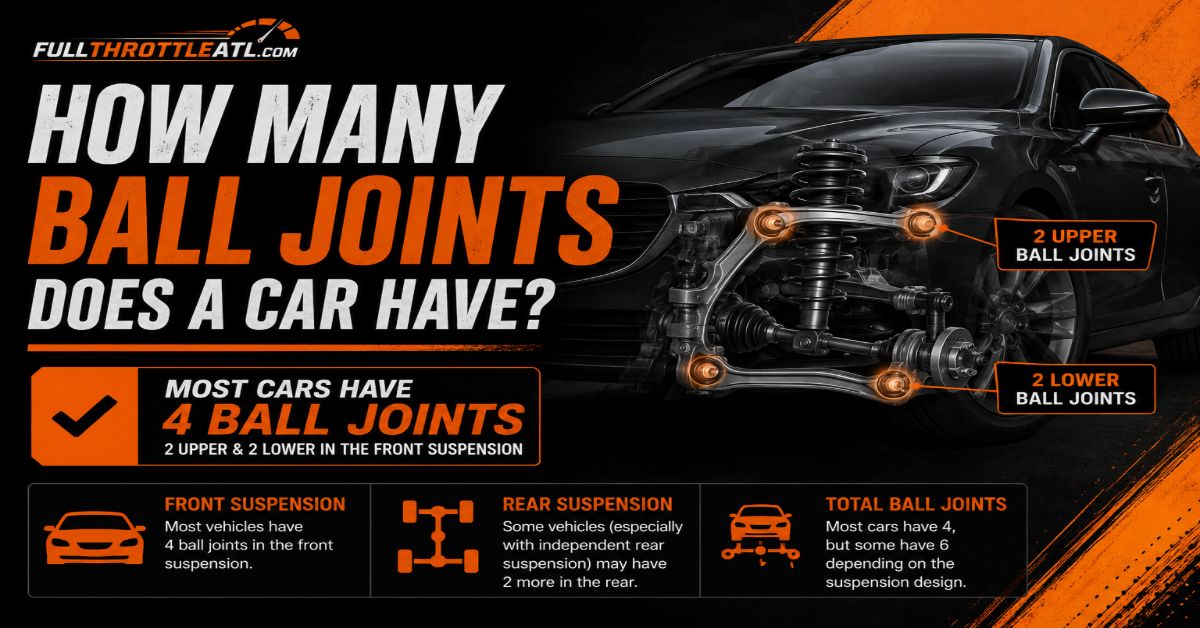
Replacing suspension components can feel intimidating, but understanding how many ball joints does a car have and mastering the replacement process saves hundreds in labor costs. A typical passenger car has between 2 and 4 ball joints depending on its suspension design, with front-wheel-drive MacPherson strut cars utilizing 2 lower joints and double-wishbone or 4WD vehicles utilizing 4 joints. This guide covers a complete 6-step replacement procedure, taking 2 to 4 hours, requiring intermediate mechanical skill, and anchored by precise safety protocols and success checkpoints.
Before You Start
- Time Required: 2 to 4 hours (1 to 2 hours per side)
- Difficulty Level: Intermediate to Advanced
- Typical Cost: $50 to $150 for parts (depending on whether you buy individual joints or complete control arm assemblies); $150 to $300 if purchasing a ball joint press tool kit.
- Prerequisite Conditions: Perform this work on a flat, level concrete surface. Ensure you have mechanical aptitude, strong upper body strength to operate breaker bars and presses, and an understanding of suspension geometry.
Tools and Materials Checklist
- Replacement Ball Joints: 2 or 4 units (always replace in matching pairs per axle).
- Floor Jack and Jack Stands: 1 heavy-duty floor jack and 2 jack stands rated above your vehicle curb weight.
- Ball Joint Press Kit or Pickle Fork: 1 master C-clamp press tool set with receiving adapters.
- Socket Set and Breaker Bar: Standard and metric sockets ranging from 14mm to 22mm, plus a 1/2-inch drive breaker bar.
- Torque Wrench: 1 click-type torque wrench capable of measuring 40 to 120 lb-ft.
- Hand Tools: Needle-nose pliers, wire brush, rubber mallet, and a mechanics wire or bungee cord.
- Chemicals & Consumables: 1 can of penetrating oil (PB Blaster or WD-40 Specialist), 1 can of non-chlorinated brake cleaner, high-temperature chassis grease (if joints are greaseable), new cotter pins, and castle nuts.
Step-by-Step Replacement Process
Step 1: Secure and Lift the Vehicle Safely
- Action: Park the vehicle on solid, level ground, engage the emergency brake firmly, and loosen the front wheel lug nuts by one complete counter-clockwise turn using a breaker bar.
- Execution Details: Position your floor jack under the manufacturer-designated front frame lift point or subframe crossmember. Raise the front end until the tires clear the ground by 6 inches. Slide heavy-duty jack stands under both front pinch welds or frame rails, lower the vehicle safely onto the stands, and remove the lug nuts and wheels completely.
- Success Checkpoint: You will know this step worked when the vehicle rests completely stable and immovable on locked jack stands, with both front wheel hubs elevated off the ground.
- Common Mistake: Lifting the car on a sloped driveway or placing jack stands under thin floor pan sheet metal. Always use structural frame points and wheel chocks on the rear wheels.
Step 2: Apply Penetrating Oil and Disassemble Fasteners
- Action: Spray all threaded fasteners, mounting bolts, and the ball joint tapered stud base liberally with penetrating oil and let it soak for 15 minutes.
- Execution Details: Use needle-nose pliers to grasp, extract, and discard the old cotter pin from the ball joint castle nut. Loosen the castle nut using the correct metric socket and breaker bar, backing it off until it sits flush with the very top of the threaded stud. This protects the threads and prevents components from violently separating when popped.
- Success Checkpoint: You will know this step worked when the old cotter pin is completely removed and the castle nut is threaded flush to the top of the stud with zero binding on the socket.
- Common Mistake: Completely removing the castle nut before breaking the taper. Leaving it flush prevents the steering knuckle from dropping onto your feet or tearing brake lines.
Step 3: Separate the Ball Joint from the Steering Knuckle
- Action: Insert your ball joint separator tool between the steering knuckle and the control arm to pop the tapered stud free.
- Execution Details: If using a pickle fork, wedge it between the joint boot and knuckle, striking it squarely with a heavy 3-pound sledgehammer until the stud unseats. If using a screw-type ball joint separator, clamp its jaws securely and tighten the drive bolt until the taper releases with a loud pop. Unthread the castle nut entirely, lift the steering knuckle out of the joint, and immediately secure the knuckle to the coil spring or chassis using a bungee cord or mechanics wire.
- Success Checkpoint: You will know this step worked when the tapered ball joint stud drops completely clear of the steering knuckle hole, and the knuckle is safely suspended without tension on the rubber brake hose.
- Common Mistake: Allowing the heavy steering knuckle to dangle unsupported by its rubber brake line or electronic ABS wheel speed sensor wire, which causes internal wire fractures or fluid leaks.
Step 4: Press Out the Old Ball Joint
- Action: Setup your master ball joint press C-clamp kit with the correct receiving and installing cups to force the old joint out of the control arm.
- Execution Details: Select a receiving tube large enough in diameter to swallow the body of the ball joint as it moves downward. Place a smaller forcing cup on top of the joint housing. Turn the press drive screw using a ratchet or impact gun to press the old joint out of the control arm bore. Once removed, use a wire brush and brake cleaner to scrub the interior of the control arm ring until bare metal is exposed. (Note: If your vehicle uses a bolt-on control arm joint or factory-riveted joint, use an angle grinder to remove rivet heads and punch them out instead of pressing).
- Success Checkpoint: You will know this step worked when the old ball joint falls completely out of the control arm and the internal mounting bore is entirely free of rust, scale, and debris.
- Common Mistake: Using an incorrectly sized receiving cup that binds against the control arm lip, which can bend or crack the metal control arm.
Step 5: Press and Install the New Ball Joint
- Action: Reverse the press tool configuration to press the new replacement ball joint straight and square into the control arm bore.
- Execution Details: Apply a thin film of clean chassis grease to the outer sleeve of the new ball joint and the inner ring of the control arm to ease entry. Align the new joint perfectly straight by hand. Assemble the C-clamp press with a large installation cup supporting the bottom flange and a flat adapter pressing directly on the top housing rim. Slowly crank the press tool until the joint bottoms out completely against the control arm shoulder.
- Success Checkpoint: You will know this step worked when the upper flange of the new ball joint sits 360 degrees flush against the control arm with zero visible gaps or tilt.
- Common Mistake: Pressing the joint in at an angle. If resistance feels abnormally high halfway through, stop immediately, unclamp, and realign the joint to avoid shaving aluminum or steel off the control arm bore.
Step 6: Torque Fasteners and Reassemble Components
- Action: Reattach the steering knuckle to the new ball joint stud, thread a new castle nut, and torque all hardware strictly to factory specifications.
- Execution Details: Guide the new ball joint stud into the steering knuckle taper hole. Hand-thread the new castle nut. Consult your vehicle service manual for exact torque specifications (typically lower joints require 60 to 90 lb-ft, while upper joints require 40 to 60 lb-ft). Use your torque wrench to reach the exact value. Inspect the cotter pin hole; if it does not align with the castle nut slots, tighten the nut slightly further until it matches. Never loosen the nut to align the hole. Insert a new cotter pin through the hole and bend the legs outward around the nut. Reinstall the wheel, lower the vehicle, and torque lug nuts in a star pattern to 80 to 100 lb-ft.
- Success Checkpoint: You will know this step worked when the castle nut is torqued to specification, the cotter pin is securely locked in place with zero rotational play, and wheels are tightened correctly.
- Common Mistake: Using an air impact wrench to tighten the final castle nut. This over-stretches the stud and strips threads, leading to sudden steering failure on the road.
Common Mistakes and How to Fix Them
| Symptom | Root Cause | How to Fix |
|---|---|---|
| Clunking or popping noises when turning or hitting bumps | Worn internal ball and socket, or torn rubber boot letting in dirt and losing grease. | Jack up the car, place a pry bar under the tire, and pry upward. If you see vertical play in the joint, it must be replaced immediately. |
| The vehicle wanders or pulls sharply to one side | Extreme play in the joint causing unaligned toe/camber settings while driving. | Inspect the joint for shifting or physical tears. Replace the pair and schedule a professional wheel alignment. |
| New joint squeaks intensely during low-speed steering | Lack of lubrication inside the boot. | If it features a Zerk fitting, inject high-temp chassis grease with a grease gun until the boot purges slightly. If it is a sealed joint, it is defective or damaged and needs replacement. |
| Uneven or rapid inner tire tread wear after replacement | Altered steering geometry due to new component installation without recalibration. | Book an appointment immediately at an alignment shop to correct toe, camber, and caster angles. |
Variations and Alternative Configurations
Bolt-On vs. Press-In Ball Joints
While many modern vehicles feature press-in ball joints requiring a C-clamp press kit, trucks and older SUVs often use bolt-on ball joints secured by two or three heavy-duty bolts. For bolt-on variants, skip the C-clamp setup entirely. Simply unbolt the mounting hardware, tap the old joint loose with a rubber mallet, bolt the new unit directly to the control arm, and torque mounting bolts to factory specifications.
Riveted Factory Ball Joints
Factory-installed ball joints on many vehicles are secured with heavy steel rivets rather than bolts or press fits. To remove these, you cannot press them out. Instead, use an angle grinder to grind off the factory rivet heads flush with the control arm surface, then use a punch and hammer to drive the remaining rivet shafts out of the holes. Secure the new replacement ball joint using the grade 8 hardware bolts and nuts provided in the replacement kit.
Frequently Asked Questions
Can I replace just one ball joint, or do I need to replace both?
You should always replace ball joints in matching pairs (both left and right sides on the same axle). Because suspension components experience identical wear and mileage, if one ball joint fails, the opposing side is structurally fatigued and will likely fail shortly after. Replacing both ensures balanced handling and uniform steering response.
How do I know if my car has upper and lower ball joints?
Vehicles with double-wishbone, multi-link, or heavy-duty truck suspension designs feature both upper and lower ball joints (totaling 4 joints). Passenger cars utilizing standard MacPherson strut front suspension systems only feature 2 lower ball joints, as the top of the steering knuckle connects directly to the strut assembly instead of an upper control arm.
Is a wheel alignment necessary after replacing a ball joint?
Yes, a professional four-wheel alignment is mandatory immediately after replacing any suspension ball joint. Unbolting and replacing components alters your vehicle camber and toe angles. Driving without an alignment will cause severe, rapid tire wear and can make the vehicle handle unpredictably at highway speeds.
Can I drive with a bad ball joint?
Driving with a worn ball joint is extremely dangerous and not recommended. As a ball joint degrades, the internal socket can separate completely, causing the wheel to detach from the steering knuckle. This results in an immediate, catastrophic loss of vehicle control, often leading to a severe accident or rollover on the roadway.