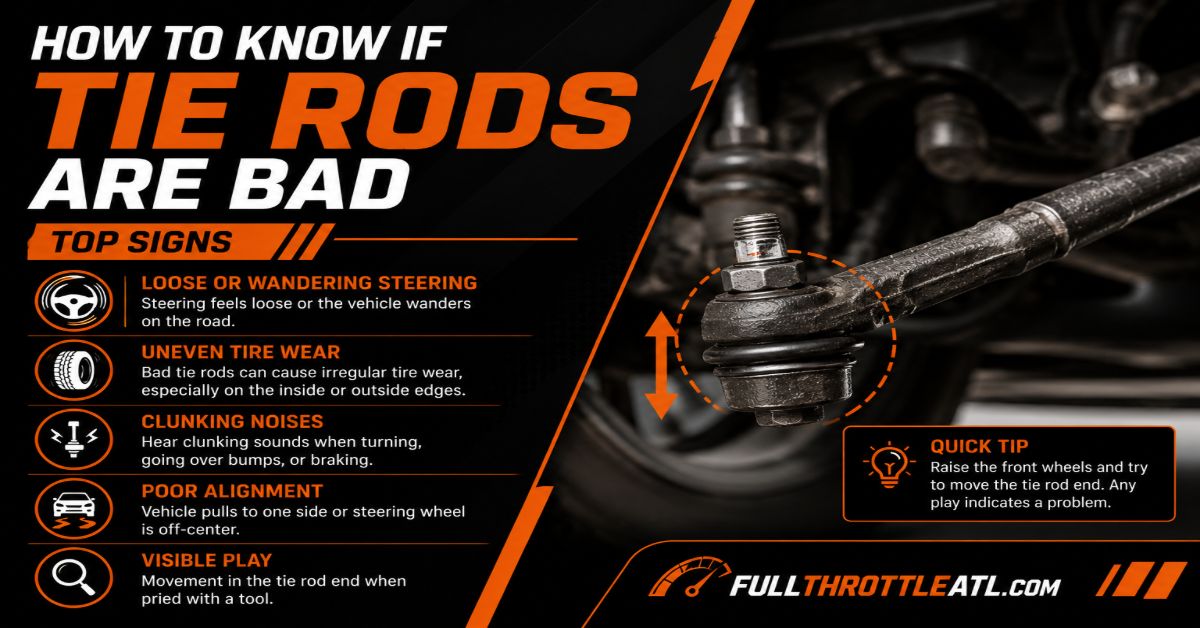
Diagnosing failing steering components early prevents catastrophic steering loss. This comprehensive diagnostic process takes 30 to 45 minutes across 5 distinct steps using basic garage tools, requiring moderate mechanical care and a systematic physical inspection to isolate worn inner and outer joints.
Before You Start
- Time Required: 30 to 45 minutes.
- Difficulty Level: Beginner to Intermediate.
- Cost: 0 USD for diagnostics; 50 to 200 USD for replacement parts if needed.
- Tools and Materials Checklist:
- 1 Floor jack rated for 2 to 3 tons.
- 2 Steel jack stands.
- 2 Rubber or heavy-duty wheel chocks.
- 1 High-lumen LED flashlight or headlamp.
- 1 Pair of durable mechanic gloves.
- 1 Steel pry bar (18 inches or longer).
- Prerequisite Conditions: Park on a completely flat, level concrete surface with the steering wheel locked in the straight-ahead position.
Step 1: Vehicle Elevation and Safety Securing
Lift the front end of your vehicle securely onto stable jack stands before checking steering components. Park your vehicle on a flat concrete surface, pull the emergency brake firmly, and wedge two wheel chocks tightly behind both rear tires. Locate the front factory pinch weld or subframe lift points specified in your owner manual. Position your 2-ton floor jack under the designated lifting point and pump the handle until both front wheels are 3 to 6 inches off the ground. Slide your two steel jack stands beneath the reinforced frame rails adjacent to the jack, and slowly turn the floor jack release valve counterclockwise to lower the vehicle weight entirely onto the stands. Give the vehicle a firm push from the side to ensure absolute stability before getting near or underneath it.
You will know this step worked when the vehicle rests securely on all-steel jack stands with the front wheels suspended freely in the air and zero hydraulic pressure holding the weight.
Common Mistake: Relying on a hydraulic floor jack alone while inspecting underneath. Always transfer the weight to solid jack stands.
Step 2: The 9-and-3 O’Clock Radial Shake Test
Perform a manual radial shake test by gripping the front tire at opposite horizontal sides to detect loose steering linkage play. Put on your mechanic gloves, stand facing the front driver-side tire, and place your left hand firmly at the 9 o’clock position and your right hand at the 3 o’clock position. Push inward with your right hand while pulling outward with your left hand, then reverse the motion in a rapid push-pull rhythm. Watch the steering linkage and listen closely for any metallic clicking, clunking, or loose shifting movement inside the wheel well. Repeat this exact procedure on the passenger-side front tire.
You will know this step worked when you can clearly feel or hear a loose, knocking motion or observe the tire wobbling independently on its horizontal axis without turning the steering wheel.
Common Mistake: Placing hands at the 12 and 6 o’clock positions during this specific test. The 12-and-6 position tests wheel bearings and ball joints, whereas 9-and-3 tests tie rod ends.
Step 3: Under-Car Visual Inspection of Boots and Hardware
Inspect the physical condition of the inner and outer tie rod ends using a high-lumen flashlight. Slide underneath the front end of the vehicle wearing your LED headlamp or holding your flashlight. Locate the outer tie rod end where the steering knuckle connects to the steering linkage near the inside of the brake rotor, and follow the metal shaft inward toward the center to find the inner tie rod boot. Carefully examine the flexible rubber dust boots enclosing each joint for any visible tears, deep dry-rot cracks, or grease leaks. Look closely for orange or brown rust bleeding out from underneath the rubber boot seals, which indicates internal moisture contamination and total joint failure.
You will know this step worked when you have visually scanned every square inch of both the inner and outer rubber boots on both sides of the vehicle, identifying any compromised seals or grease leakage.
Common Mistake: Ignoring minor grease seepage. Even a small hairline crack in a rubber boot allows abrasive road salt and dirt inside, which destroys the internal ball joint within weeks.
Step 4: The Hands-On Joint Squeeze and Pry Bar Test
Check for internal joint slop by physically manipulating the outer and inner tie rod joints under load. Reach up with your gloved hand and firmly grab the outer tie rod ball joint housing. Shake it up and down and side to side to check if the internal ball stud moves independently inside its socket. If you are working alone, insert your steel pry bar between the steering knuckle and the outer tie rod end, applying gentle leverage to check for vertical separation. If you have an assistant, have them gently rock the tire back and forth at the 9 and 3 o’clock positions while your fingers touch the inner and outer joints to feel for micro-impacts or internal knocking.
You will know this step worked when you can distinctly feel the metal ball stud knocking or sliding inside its socket under your fingertips during the shake test.
Common Mistake: Prying too aggressively with a massive pry bar. Applying excessive force can bend healthy steering components or damage the steering rack housing.
Step 5: Differential Diagnosis (Isolating Tie Rods from Steering Racks)
Isolate whether the detected play originates from the tie rod or deeper inside the steering rack assembly. While an assistant wiggles the front tire back and forth at the 9 and 3 o’clock positions, look specifically at the inner tie rod rubber bellows boot where it enters the metal steering gear rack housing. Place your fingers directly over the inner joint pivot point hidden beneath the rubber boot. If the outer joint remains completely steady while the inner joint shaft slides laterally inside the rack housing, or if the entire steering rack shifts sideways on its mounting bushings, the issue is internal steering rack wear rather than a bad tie rod.
You will know this step worked when you have successfully determined whether the mechanical play is isolated entirely within the tie rod ball joint or coming from the inner rack gear.
Common Mistake: Replacing a healthy tie rod when the actual source of loose steering play is a worn-out steering rack inner bushing or loose mounting bolts.
Common Mistakes and How to Fix Them
- Testing with Vehicle Weight on the Tires: Shaking the steering components while the tires are resting flat on the ground creates ground friction that masks loose tie rod play. Fix: Always lift the vehicle completely off the ground onto jack stands before performing physical shake tests.
- Misdiagnosing Wheel Bearing Failure: Experiencing play at both 9-and-3 and 12-and-6 o’clock positions, often accompanied by a loud humming noise while driving at highway speeds. Fix: Check if the entire wheel hub assembly rocks uniformly. If it does, replace the wheel bearing instead of the tie rods.
- Failing to Get a Wheel Alignment After Replacement: Installing new tie rods alters your vehicle front-end geometry instantly, which can destroy a brand-new set of tires in less than 1,000 miles. Fix: Schedule a professional four-wheel alignment immediately after finishing any tie rod replacement work.
- Reusing Damaged Cotter Pins: Installing old, fatigued cotter pins on castle nuts during reassembly can cause the retaining nut to back off while driving. Fix: Always discard old cotter pins and install brand-new stainless steel cotter pins during reassembly.
Variations: Diagnosing Under Different Conditions
- Vehicles with Electronic Power Steering (EPS): Modern vehicles with electric power steering may feel slightly resistant or spongy when shaken by hand due to internal motor resistance in the rack. Turn off the ignition completely before testing to disengage electronic steering resistance.
- Trucks and Heavy SUVs with Idler Arms: Larger body-on-frame trucks often feature parallel steering linkages containing idler arms and pitman arms. If the entire center link shifts side to side while checking tie rods, inspect the pitman arm and idler arm for wear as well.
- Limited Tool Access Without a Pry Bar: If you do not own a steel pry bar, you can substitute a thick box-end wrench or large flathead screwdriver to apply gentle leverage, provided you do not slip and puncture the rubber dust boots.
How Long Does It Take and What Does It Cost?
- Diagnostic Time: Expect to spend 30 to 45 minutes for a thorough inspection of both the driver and passenger sides.
- Professional Inspection Cost: Repair shops typically charge 50 to 150 USD just to diagnose steering and suspension components, though many shops bundle this into a free multi-point inspection.
- Part Replacement Cost: If a tie rod is bad, replacement parts cost between 20 and 80 USD per side for parts, while professional mechanic labor ranges from 150 to 300 USD including the mandatory wheel alignment.
Frequently Asked Questions
Can I drive with a bad tie rod?
Driving with a bad tie rod is extremely dangerous and not recommended. A severely worn tie rod can snap or separate completely while driving, causing an immediate, total loss of steering control over that wheel, which frequently leads to severe high-speed accidents.
What are the main symptoms of bad tie rods while driving?
Common driving symptoms include a loose or sloppy steering wheel with excessive dead space when turning, persistent front-end vibration that worsens during acceleration, wandering steering where the car pulls to one side, and rapid feathering wear on the inner or outer edges of your front tires.
How do I know if it is an inner or outer tie rod?
Outer tie rods fail most frequently and show visible ball joint separation or boot tears right at the steering knuckle. Inner tie rods connect closer to the center of the car underneath a rubber bellows boot, and failure results in axial play or looseness deep inside that inner socket.
Do I need to replace both tie rods at the same time?
Replacing both sides simultaneously is not strictly mandatory if only one side exhibits mechanical failure, but it is heavily recommended. Because both parts experience identical mileage and road stress, the opposite tie rod typically fails shortly after the first one.
How often do tie rods need to be replaced?
Tie rods do not have a fixed mileage replacement interval like spark plugs or oil filters. Most factory tie rods last anywhere from 70,000 to 150,000 miles depending on road conditions, driving style, pothole impacts, and whether suspension grease fittings are maintained regularly.