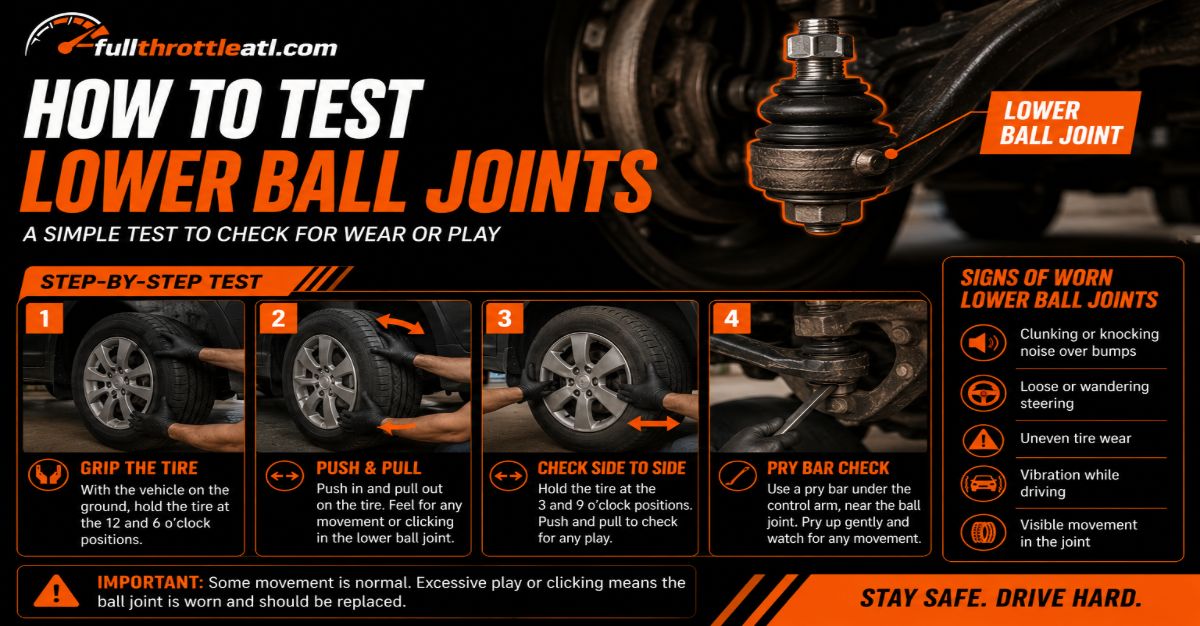
Testing lower ball joints requires isolating the suspension, lifting vehicle weight, and checking for physical play using a pry bar and wheel shake test. This complete guide walks through 6 precise steps over 30 to 45 minutes per side at an intermediate difficulty level, with proper load management being the key factor that determines diagnostic success.
Before You Start
- Time Required: 30 to 45 minutes per side
- Difficulty Level: Intermediate
- Estimated Cost: $0 (if you own tools) to $50 (if purchasing a basic pry bar and dial indicator)
- Tools and Materials Checklist:
- Floor jack (1, rated for vehicle weight)
- Jack stands (2, minimum 3-ton capacity)
- Wheel chocks (2)
- Heavy-duty pry bar (1, 12 to 24 inches long)
- Dial indicator with magnetic base (1, optional for precise measurements)
- Flashlight or headlamp (1)
- Safety glasses and mechanics gloves (1 pair each)
- Penetrating fluid (1 can, e.g., PB Blaster or WD-40 Specialist)
- Prerequisite Conditions: A flat, level concrete workspace; vehicle engine turned off; emergency parking brake fully engaged.
Step 1: Secure the Vehicle and Chock Tires
Park on a flat, level concrete surface, engage the emergency parking brake firmly, and place two wheel chocks securely behind the rear tires. This prevents any unintended vehicle rolling or shifting while the chassis is elevated off the ground.
- How to execute: Shift your automatic transmission into Park (or manual transmission into Reverse), pull the handbrake up until it clicks tightly, and wedge the rubber or wooden wheel chocks squarely against the rear tread of both rear wheels.
- You’ll know it worked when: The vehicle is completely immobilized and immobile when you attempt to push it forward or backward by hand.
- Common mistake: Working on an asphalt driveway on a hot day. Floor jacks and jack stands can sink into soft asphalt, causing catastrophic vehicle slips. Always use solid concrete.
Step 2: Raise the Suspension Correctly
Lift the vehicle and support the suspension according to your specific strut design to either unload or maintain tension on the lower ball joint.
- How to execute: Determine your suspension type. For MacPherson strut suspensions, lift the vehicle frame with your floor jack and let the wheel hang completely free to fully unload the joint. For SLA or Double Wishbone suspensions, place the floor jack directly under the lower control arm and lift until the tire clears the ground to keep spring tension loaded. Slide your 3-ton jack stands under approved frame pinch weld points and lower the vehicle onto them securely.
- You’ll know it worked when: The vehicle rests solidly on the jack stands with zero body wobble, and the wheel is elevated off the ground by 2 to 3 inches.
- Common mistake: Lifting a MacPherson strut vehicle by the lower control arm. This compresses the spring and keeps the ball joint loaded, masking looseness entirely during your inspection.
Step 3: Perform the Visual Boot Inspection
Shine a flashlight directly onto the lower ball joint rubber dust boot to check for tears, cracks, grease leaks, or missing retaining rings.
- How to execute: Put on your safety glasses and headlamp, crouch or kneel beside the front wheel assembly, and inspect the rubber boot encasing the ball joint stud. Look closely for split rubber, oozing black or brown grease, or grease splatter flung onto the inside rim of the wheel or brake rotor. Use a shop rag to wipe away heavy dirt accumulation if visibility is obstructed.
- You’ll know it worked when you can see: The entire perimeter of the rubber boot clearly, confirming whether the internal grease seal is intact or compromised by road debris.
- Common mistake: Assuming a dry, dirty boot is healthy. Wipe away caked-on mud with a rag soaked in a mild degreaser to reveal micro-cracks hiding in the rubber folds.
Step 4: Execute the 12-and-6 O’Clock Wheel Shake Test
Place your hands at the 12 and 6 o’clock positions on the tire and push inward while pulling outward to check for vertical movement and bearing play.
- How to execute: Stand facing the side of the tire. Place your right hand at the 12 o’clock position (top) and your left hand at the 6 o’clock position (bottom). Push firmly inward with your top hand while pulling outward with your bottom hand, then reverse the motion in a rapid push-and-pull rocking cadence. Listen for a distinct clunking sound and feel for any structural play inside the hub assembly.
- You’ll know it worked when: You can isolate whether the wheel assembly rocks on its vertical axis or remains completely rigid.
- Common mistake: Confusing wheel bearing play with ball joint wear. If you feel movement, have an assistant press and hold down the brake pedal while you repeat the shake. If the play disappears entirely, your wheel bearing is loose, not the ball joint.
Step 5: Leverage the Pry Bar Against the Control Arm
Insert a heavy-duty pry bar between the lower control arm and the steering knuckle, then apply upward pressure to detect vertical joint play.
- How to execute: Slide the tip of your 12-to-24 inch pry bar underneath the lower control arm close to the ball joint housing, bracing the shaft against the steering knuckle or subframe lip. Use your body weight to pry upward with firm, steady pressure. Watch the joint housing and stud connection point closely with your flashlight to see if the stud shifts vertically inside its socket.
- You’ll know it worked when: You apply maximum safe leverage and can visually confirm whether the control arm moves independently from the steering knuckle without the ball joint holding them tightly together.
- Common mistake: Prying against the rubber boot itself. Prying directly on the boot will puncture the rubber and ruin a healthy component instantly. Always place the pry bar tip against solid cast metal surfaces.
Step 6: Measure Precise Play with a Dial Indicator (Optional)
Mount a magnetic-base dial indicator to the lower control arm to measure the exact millimeters of vertical play in the joint.
- How to execute: Clean a flat metal spot on the lower control arm and attach the magnetic base of your dial indicator securely. Position the spring-loaded indicator plunger tip so it rests flat against the bottom of the steering knuckle or ball joint housing plate. Set the dial face bezel to zero. Have a helper pry upward on the control arm as instructed in Step 5, and read the maximum numeric deflection shown on the dial face.
- You’ll know it worked when: The needle sweeps across the gauge scale and stops at a stable peak measurement during upward prying force.
- Common mistake: Mounting the magnetic base to a flexible plastic splash shield or a curved stamped steel bracket that flexes under pressure, which results in false high readings.
Specifications and Wear Limits
Knowing the exact engineering tolerances prevents unnecessary parts replacement or driving on dangerous hardware. Compare your physical findings or dial indicator measurements against these industry thresholds:
- Acceptable Play: Less than or equal to 0.050 inches (1.27 mm) for standard passenger cars and light trucks.
- Maximum Wear Limit: Any vertical play exceeding 0.050 inches (1.27 mm) indicates internal socket degradation, requiring immediate replacement.
- Wear Indicator Pins: Factory ball joints on many trucks and SUVs feature a built-in grease fitting pin with a prominent shoulder. If that shoulder recedes flush or moves inside the housing while the vehicle weight rests on the tires, the internal bearing surface is worn out and must be replaced regardless of pry bar feel.
Common Mistakes and How to Fix Them
- Mistake: Lifting a MacPherson strut suspension by the lower control arm during testing.
- Fix: Lower the vehicle, reposition your floor jack under the frame rail, and lift until the lower control arm drops completely down, unloading the internal spring tension.
- Mistake: Shaking the tire at the 3 and 9 o’clock horizontal positions.
- Fix: Shift your hands immediately to the 12 and 6 o’clock vertical positions. Horizontal shaking tests your outer tie rod ends and steering rack, not your lower ball joints.
- Mistake: Misinterpreting loose wheel bearing movement as a failed ball joint.
- Fix: Perform a two-person check. Have a helper step hard on the service brake pedal while you shake the tire. If the clunking stops, replace the wheel hub bearing instead of the ball joint.
- Mistake: Assuming a torn rubber boot means the joint is already mechanically ruined.
- Fix: Inspect the joint for active grit contamination and physical play using the pry bar. If the joint is tight and the grease inside is clean, you can clean the area, inject fresh synthetic chassis grease, and install an aftermarket universal replacement dust boot.
Variations: Testing Under Different Conditions
- Riveted or Bolted Ball Joints: If your vehicle uses bolted or riveted ball joints (common on older trucks and rear-wheel-drive sedans), you can often isolate the joint completely by unbolting it from the control arm while leaving it attached to the steering knuckle, allowing you to manually articulate the ball stud by hand to check for roughness or binding.
- Seized or Rusted Components: In northern rust-belt regions, road salt fuses steel components together. Spray penetrating fluid around the ball joint stud and control arm mating surface 15 minutes before starting your inspection to prevent false movement readings caused by sliding rust flakes.
How Long Does It Take / What Does It Cost
- Time Investment: Expect to spend 30 to 45 minutes for the first side as you set up jack stands and locate angles, and 15 to 20 minutes for the second side.
- Financial Cost: DIY diagnostic testing costs nothing if you already own basic garage tools. Purchasing a heavy-duty 24-inch pry bar costs between $15 and $30, while a magnetic dial indicator kit runs between $25 and $40. Professional mechanic diagnostic fees typically range from $70 to $150.
Frequently Asked Questions
Can I drive with a bad lower ball joint?
Driving with a worn lower ball joint is extremely dangerous. If the ball stud pulls completely out of its socket while driving, the control arm drops, the wheel turns sideways, and you will instantly lose steering control of the vehicle, risking a severe accident. Replace a failed joint immediately.
Do I need an alignment after replacing a ball joint?
Yes. Replacing a lower ball joint alters the precise geometry of your front steering and suspension assembly. Even if you reinstall components carefully, camber and toe angles will shift, requiring a professional four-wheel alignment to prevent rapid front tire tread wear.
Should I replace both lower ball joints at the same time?
You should replace both sides simultaneously. Suspension components experience near-identical wear cycles over equivalent mileage. If the driver side lower ball joint has failed from fatigue, the passenger side joint has experienced the same stress load and will likely fail soon after.
How do I know if my upper ball joint is bad instead?
Upper ball joints are tested similarly using a pry bar placed between the upper control arm and the frame or steering knuckle. If your lower ball joint tests solid with zero play but you still hear a sharp clunking sound when driving over bumps, inspect the upper ball joints and control arm bushings.
What causes lower ball joints to wear out prematurely?
The primary cause of premature failure is a torn rubber dust boot. Once the protective rubber seal splits, water, road salt, and abrasive sand wash away the internal synthetic grease, causing rapid metal-on-metal grinding, friction wear, and eventual socket separation.