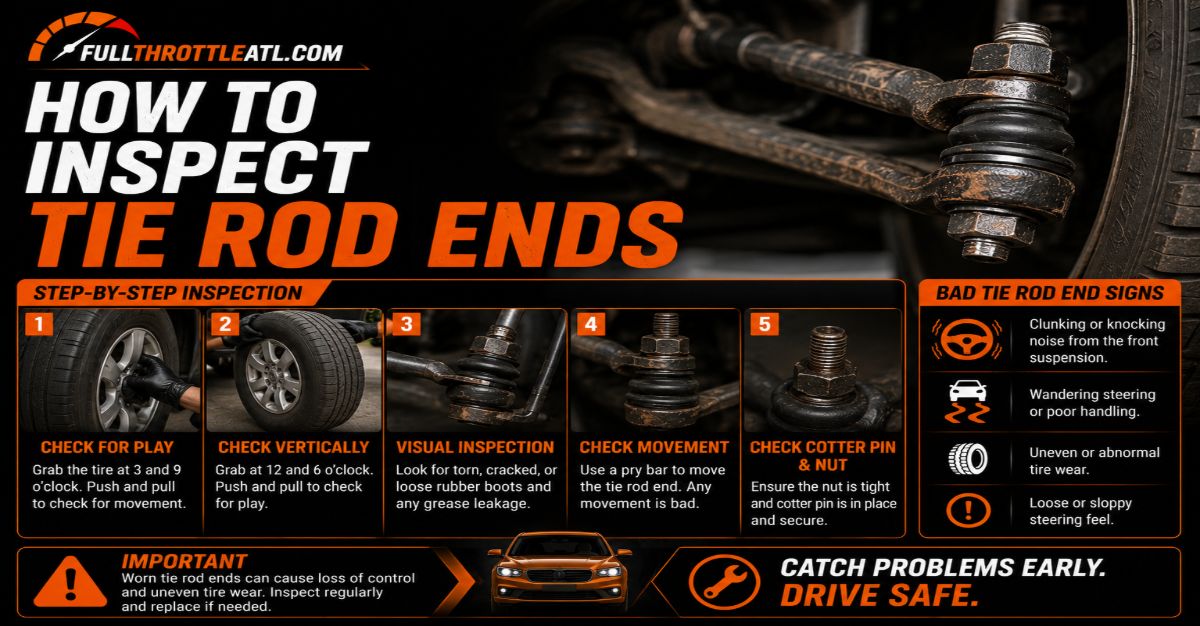
Diagnosing failing steering components prevents catastrophic loss of control and uneven tire wear. This complete process covers vehicle elevation, the 9-and-3 wheel shake test, boot integrity checks, and mechanical play isolation across 5 distinct steps in 25 to 35 minutes at an intermediate skill level, where mechanical diligence and correct tool placement ensure absolute safety.
Before You Start
- Time Required: 25 to 35 minutes per vehicle end
- Difficulty Level: Intermediate (requires basic jack safety and mechanical leverage)
- Cost: 0 USD if using existing tools; 15 to 30 USD if purchasing a pry bar and mechanic gloves
- Tools and Materials Checklist:
- Hydraulic floor jack (rated for minimum 2 tons)
- Certified jack stands (1 pair, rated for vehicle weight)
- Wheel chocks (1 pair)
- 12 to 18-inch pry bar or large flathead screwdriver
- High-lumen LED flashlight or work light
- Mechanic gloves and safety glasses (1 pair each)
- Aerosol brake cleaner (1 can) and shop rags
- Prerequisite Conditions: Park on level, hard asphalt or concrete. Never inspect suspension components on loose gravel or dirt surfaces while relying solely on a hydraulic jack.
Step 1: Prep and Secure the Vehicle Safely
Park the vehicle on level ground, engage the parking brake firmly, and place wheel chocks behind both rear tires. Loosen the front wheel lug nuts by one-quarter turn using a lug wrench before lifting the car. Position the hydraulic floor jack under the manufacturer-approved front subframe lift point or pinch weld, pump the handle until the front tires clear the ground by 3 inches, and slide certified jack stands underneath the designated frame support rails. Lower the hydraulic jack slowly until the vehicle weight rests completely and securely on the jack stands, then give the vehicle a firm push at the fender to verify absolute stability.
- Success Check: You will know this step worked when the vehicle rests immovably on solid jack stands with both front wheels hanging freely off the ground.
- Common Mistake: Placing the floor jack under thin sheet metal floorboards or oil pans, which causes severe structural damage. Always reference your owner manual for correct pinch weld or frame lift locations.
Step 2: Perform the 9-and-3 Horizontal Wheel Shake Test
Grasp the front tire firmly with your hands positioned precisely at the 9 o’clock and 3 o’clock positions on the tread surface. Push inward with your right hand while pulling outward with your left hand in a rapid, alternating rocking motion, then reverse the push-pull direction repeatedly. Listen closely for any clicking, clunking, or metallic shifting noises originating from behind the wheel hub assembly, and pay attention to whether the steering wheel moves freely before engaging the steering rack resistance.
- Success Check: You will know this step worked when you isolate horizontal free play; if the tire moves more than 3 millimeters before encountering internal steering resistance, a loose inner or outer tie rod end is present.
- Common Mistake: Confusing wheel bearing looseness with tie rod play. Have a helper watch the rear of the steering knuckle while you shake the wheel; if the entire wheel assembly rocks equally at 12-and-6 o’clock as well, the issue points to a wheel bearing or ball joint rather than solely a tie rod.
Step 3: Conduct a Detailed Visual Inspection of Dust Boots
Turn the steering wheel fully toward the side you are inspecting to extend the outer tie rod and expose its inner assembly joint. Shine your LED flashlight directly onto the rubber dust boot encasing the outer tie rod ball joint, and inspect the entire circumference for fine cracks, splits, dry rot, or missing metal retaining rings. Spray a small burst of brake cleaner onto a shop rag and wipe away accumulated road grime, grease, and mud to check for fresh weeping fluid or grease oozing from microscopic punctures in the rubber.
- Success Check: You will know this step worked when you can clearly see clean, intact rubber bellows with zero grease leaks, exposed metal ball studs, or dry-rot fissures.
- Common Mistake: Ignoring the inner tie rod bellows boot located near the center steering rack housing. Slide your hand along the inner rubber boot to check for internal fluid accumulation or tears hidden behind the chassis subframe.
Step 4: Execute the Physical Pry Bar Leverage Test
Locate the exact pivot point where the threaded stud of the outer tie rod end inserts into the steering knuckle arm. Insert the tip of your 12 to 18-inch pry bar between the steering knuckle and the outer tie rod housing, using a sturdy mounting ledge as a fulcrum. Apply gentle, controlled upward and downward leverage pressure while watching the ball-and-socket joint interface for any vertical displacement.
- Success Check: You will know this step worked when you confirm that a healthy tie rod joint exhibits zero vertical up-and-down free play, though it may resist rotation under heavy tool pressure. Any vertical slop means the internal socket spring and socket wall have worn out.
- Common Mistake: Applying excessive force with a massive 3-foot breaker bar, which can bend healthy linkage arms or damage the steering knuckle mounting taper. Use moderate hand pressure only.
Step 5: Verify Inner Tie Rod Socket Stability
Peel back or slide the inner tie rod rubber bellows clamp away from the steering gear housing to expose the inner ball joint socket. Have an assistant gently rock the front tire back and forth at the 9-and-3 position while you grip the inner tie rod socket housing directly with your bare hand or a mechanics glove. Feel for any internal knocking, jarring impulses, or axial sliding movement where the inner rod connects to the steering rack rack-end joint.
- Success Check: You will know this step worked when you feel a solid, direct transfer of steering rack movement with zero internal socket clunking or dead play.
- Common Mistake: Assuming the inner tie rod is healthy simply because the outer tie rod passed inspection. Inner joints fail frequently due to torn steering rack boots admitting water and road salt.
Common Mistakes and How to Fix Them
- Failing to Mark Thread Counts During Replacement: If you replace a tie rod without counting exact thread turns, your front-wheel alignment will be dangerously out of specification. Fix this by counting every full rotation required to unscrew the old tie rod, and screw the new replacement component in by the exact same number of turns before tightening the jam nut.
- Reusing Damaged Cotter Pins: Reusing old, brittle split pins on castle nuts can lead to sudden fastener detachment. Always install a brand-new stainless steel cotter pin and bend the legs securely around the castle nut.
- Neglecting Post-Repair Wheel Alignment: Assuming a DIY replacement maintains alignment specs. Changing suspension steering components alters front-end toe angles immediately, requiring a professional alignment within 3 days to prevent rapid tire cupping.
- Over-Torquing Castle Nuts: Forcing a castle nut past its specified torque rating to align the cotter pin hole can shear the threaded stud. If the hole does not align with the slot, tighten slightly further (never loosen) until the pin slides through smoothly.
Variations: Adapting the Process
- Vehicles with Limited Ground Clearance: If a hydraulic floor jack cannot fit beneath low-profile sports cars, drive the front tires onto heavy-duty low-profile service ramps before setting wheel chocks and engaging the parking brake.
- Seized Jam Nuts on Rusted Tie Rods: In regions heavily treated with winter road salt, outer tie rod jam nuts frequently rust solid. Spray penetrating catalyst oil onto the threads, let it soak for 15 minutes, and apply localized heat using a propane torch while holding the tie rod shaft with an open-end wrench.
- Trucks and Heavy SUVs with Idler Arms: Full-size trucks utilize complex parallelogram steering linkages with idler arms and pitman arms. For these platforms, perform a dry-park steering test where an assistant rapidly rocks the steering wheel back and forth 2 inches while you crawl underneath to watch every pivot point for play.
How Long Does It Take / What Does It Cost
- Time Investment: Diagnosing both sides takes 25 to 35 minutes for a beginner, while replacing a single tie rod end takes 45 to 60 minutes per side.
- Financial Cost: A diagnostic inspection costs nothing if performed in your driveway. Replacement outer tie rod ends cost 20 to 60 USD per part, and a professional wheel alignment post-installation costs 80 to 120 USD.
Frequently Asked Questions
Can I drive with a worn tie rod end?
Driving with a worn tie rod end is extremely dangerous because a complete joint separation causes total loss of steering control on that wheel. If you detect excessive play, knocking sounds, or wandering steering at highway speeds, park the vehicle and replace the component immediately before driving again.
What are the primary symptoms of a bad tie rod?
Common symptoms include a loose or wandering steering wheel that requires constant minor corrections, persistent vibration at higher speeds, a distinct clunking noise when turning sharply into driveways, and rapid, uneven feathering wear on the inner or outer edges of your front tires.
Do I need to replace inner and outer tie rods together?
You do not automatically need to replace both inner and outer tie rods unless both show physical play or torn boots. Inspect each component independently using the pry bar and socket checks, and replace only the specific part that exhibits mechanical wear or boot failure.
How do I know whether to replace the inner or outer tie rod?
Use a helper to wiggle the wheel while you touch the linkage. If play occurs where the outer tie rod connects to the steering knuckle, replace the outer end. If movement happens closer to the center of the car where the rod enters the steering rack boot, the inner tie rod has failed.
Should I get an alignment after replacing a tie rod?
Yes, you must get a professional wheel alignment immediately after replacing any inner or outer tie rod end. Even precise measurement matching during installation cannot guarantee exact factory toe angles, and unaligned wheels will destroy a new set of tires in less than 1,000 miles.