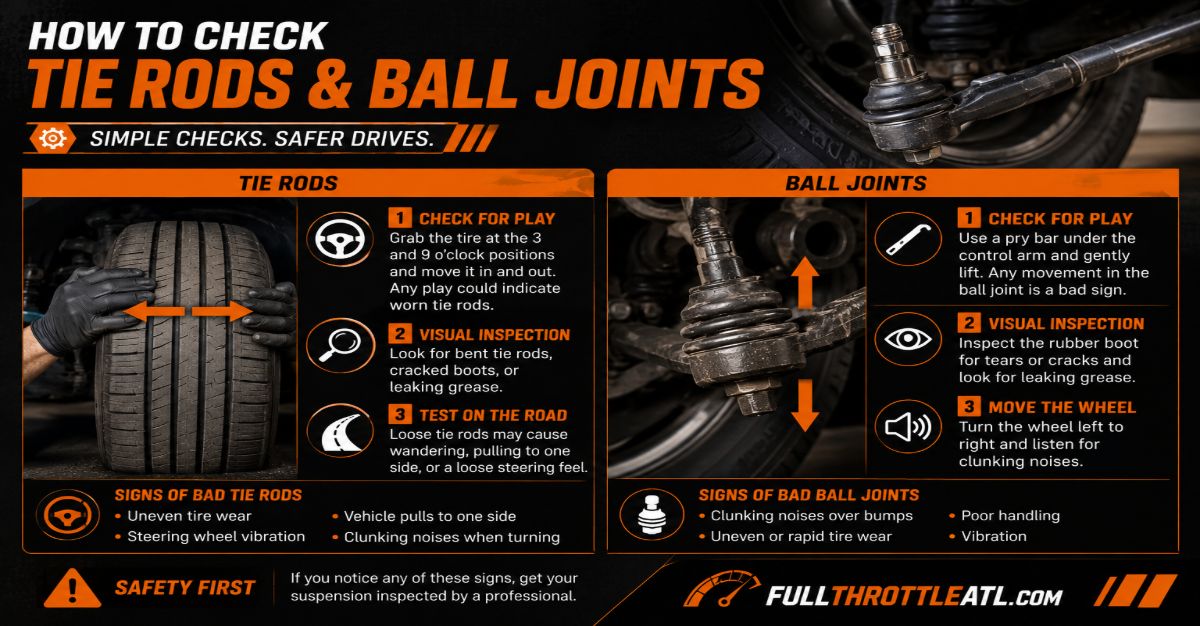
Accurately diagnosing steering and suspension wear requires completely unloading vehicle weight from the specific joint under test to prevent false negatives. By following this structured eight-step diagnostic process, you can identify failing tie rods and ball joints in 30 to 45 minutes using standard garage tools, saving hundreds in repair shop diagnostic fees.
Before You Start
- Time Required: 45 minutes total
- Difficulty Level: Intermediate
- Estimated Cost: Zero (if you own tools) to $50 if purchasing a pry bar and jack stands
- Tools and Materials Checklist:
- Hydraulic Floor Jack: 1 unit (Rated for 2+ tons minimum)
- Jack Stands: 2 units (Rated for 2+ tons minimum)
- Heavy-Duty Pry Bar: 1 unit (24 to 36 inches in length)
- Wheel Chocks: 2 units
- Flashlight or Headlamp: 1 unit (LED, high-lumen)
- Mechanic’s Gloves: 1 pair
- Torque Wrench: 1 unit (capable of 100 to 150 foot-pounds)
- Prerequisite Conditions: Flat, hard concrete surface; vehicle parked with the steering wheel locked in the straight-ahead position.
Step 1: Secure Vehicle and Block Rear Wheels
Park your vehicle on a flat, level concrete surface and engage the parking brake firmly before lifting any portion of the frame.
Place two heavy-duty wheel chocks tightly behind both rear tires to prevent the vehicle from rolling backward or forward when the front end is elevated.
- Success Check: You will know this step worked when the vehicle is completely immobilized and the emergency brake lever or pedal offers firm resistance.
- Common Mistake: Chocking the front wheels instead of the rear wheels. Always chock the wheels that remain on the ground.
Step 2: Elevate and Support the Front Suspension
Lift the front axle using your hydraulic floor jack centered beneath the manufacturer-approved front crossmember until the front tires clear the ground by 2 to 3 inches. Place your two jack stands securely under the factory designated frame pinch welds or subframe structural points, then slowly lower the vehicle weight onto the stands.
- Success Check: You will know this step worked when the floor jack is completely unloaded, the vehicle rests solidly on both jack stands, and rocking the vehicle frame yields zero shifting.
- Common Mistake: Leaving the hydraulic jack to support the vehicle weight while you crawl underneath or apply leverage to the suspension. Always use rated jack stands.
Step 3: Perform the Horizontal Tie Rod Test (3 and 9 O’clock)
Position your hands firmly at the 3 and 9 o’clock positions on the front driver-side tire and alternately push inward with your left hand while pulling outward with your right hand.
Rock the wheel back and forth horizontally with moderate force while listening and feeling for any distinct clicking, popping, or mechanical dead space before the steering rack responds.
- Success Check: You will know this step worked when you can clearly distinguish between smooth steering linkage resistance and loose, clacking mechanical play.
- Common Mistake: Confusing tire tread squirm with steering component play. Focus your attention strictly on the inner and outer metal joints behind the wheel.
Step 4: Inspect Inner Tie Rod Axial Joints Under the Boot
Have a helper repeat the 3 and 9 o’clock horizontal shaking motion while you shine a high-lumen LED flashlight directly behind the steering knuckle onto the outer tie rod and deep into the inner tie rod rubber boot.
Observe the outer tie rod end for independent up-and-down or side-to-side movement, then squeeze the rubber bellows boot of the inner tie rod to feel for internal axial clunking.
- Success Check: You will know this step worked when you pinpoint whether the play originates in the outer ball stud or the hidden inner rack joint.
- Common Mistake: Assuming the outer tie rod is the only point of failure. Inner tie rods wear out frequently inside their protective rubber housing.
Step 5: Configure Suspension for Ball Joint Unloading
Adjust your lifting strategy based on your vehicle suspension design to completely unload the tension on the ball joints.
For MacPherson Strut suspensions where weight hangs from the frame, keep the jack stands on the frame rails and let the lower control arm hang free. For short-long arm (SLA) or double-wishbone suspensions where coil springs push down on the lower control arm, place your hydraulic floor jack directly beneath the lower control arm and raise it slightly to compress the spring and unload the lower ball joint.
- Success Check: You will know this step worked when the suspension joint you are testing is freed from binding spring pressure.
- Common Mistake: Using the wrong support method for double-wishbone suspensions, which leaves the spring compressed against the ball joint and hides severe wear.
Step 6: Perform the Vertical Shake and Pry Bar Test
Position your hands at the 12 and 6 o’clock positions on the tire, pushing inward at the top and pulling outward at the bottom to test for vertical play, then slide your heavy-duty pry bar flat onto the ground beneath the outer tire tread.
Lever the pry bar upward gently while watching the lower ball joint housing, looking for any vertical separation or gap opening and closing between the ball stud and its socket.
- Success Check: You will know this step worked when you observe zero vertical gap opening during the pry bar lift.
- Common Mistake: Prying against brake dust shields or aluminum control arms rather than using the ground as a solid fulcrum beneath the tire tread.
Step 7: Conduct Comprehensive Rubber Boot and Joint Inspection
Wipe away road grime and grease from all rubber dust boots on your inner tie rods, outer tie rods, and ball joints using a clean shop towel.
Inspect every rubber boot closely for tears, deep dry-rot cracks, pinholes, or grease oozing out from the metal clamping rings.
- Success Check: You will know this step worked when all rubber boots are pristine, pliable, and securely clamped at both ends without grease leaks.
- Common Mistake: Overlooking hairline cracks in old rubber boots that will soon admit moisture and road salt, destroying the internal joint bearings.
Step 8: Re-secure Vehicle and Verify Wheel Lug Torques
Raise the vehicle off the jack stands, remove the stands, lower the vehicle completely to the ground, and torque all wheel lug nuts in a star pattern using your torque wrench to the manufacturer specification, typically 100 to 140 foot-pounds.
Remove your wheel chocks and store your tools safely before conducting a low-speed functional test drive around your neighborhood.
- Success Check: You will know this step worked when every lug nut clicks firmly at the correct torque specification and the vehicle drives straight.
- Common Mistake: Tightening lug nuts by hand with a standard lug wrench without a calibrated torque wrench, leading to warped brake rotors or loose wheels.
Common Mistakes and How to Fix Them
- Failing to Isolate Wheel Bearing Play: If you feel play at both 3/9 and 12/6 positions simultaneously, the culprit is usually a loose wheel bearing rather than steering components. Fix: Watch the axle nut center while rocking the wheel; if the center moves independently of the spindle, replace the wheel bearing first.
- Ignoring Minor Inner Boot Tears: A torn boot without immediate play is often ignored by DIYers. Fix: Replace the boot and repack grease immediately, or road grit will destroy the polished metal socket within weeks.
- Incorrect Pry Bar Placement: Forcing a pry bar directly against thin sheet metal control arms can bend suspension components. Fix: Always place the pry bar beneath the thick tire tread, using the concrete floor as your leverage fulcrum.
- Skipping Wheel Alignment After Replacement: Changing tie rods alters your toe angle instantly. Fix: Schedule a professional four-wheel alignment immediately after installing any new steering or suspension linkage component.
Variations: How the Process Adapts
- Trucks and SUVs with Torsion Bars: For heavy trucks with torsion bar front suspensions, place your floor jack directly under the lower control arm control pocket to unload the lower ball joint safely before performing the 12 and 6 o’clock pry test.
- Vehicles with Electronic Air Suspension: If you are working on a modern luxury vehicle with air suspension, disable the electronic leveling system via the trunk switch or infotainment menu before lifting the vehicle to prevent the air compressor from over-inflating and damaging the system.
- Using a Dial Indicator for Precision: For absolute confirmation on borderline wear where movement is hard to see by eye, attach a magnetic base dial indicator to the control arm with the plunger resting against the ball joint housing, and check if total play exceeds the manufacturer limit of 0.50mm or 0.020 inches.
Frequently Asked Questions
Can I drive with a bad tie rod or ball joint?
Driving with a worn tie rod or ball joint is extremely dangerous because a complete joint separation causes total loss of steering control at speed. If you detect noticeable play, clunking, or wandering steering, replace the failed component immediately before driving further.
How do I know if the inner or outer tie rod is bad?
Outer tie rod failure is confirmed when play is felt at 3 and 9 o’clock and the outer joint housing moves independently of the steering knuckle. Inner tie rod failure is confirmed when the outer joint remains tight, but you feel a distinct clunking or dead space inside the protective rubber steering rack boot.
Do I need an alignment after replacing ball joints?
Replacing upper or lower ball joints alters your vehicle camber and toe alignment angles. You must have a professional alignment performed immediately after installation to prevent rapid, uneven front tire wear and erratic highway steering pull.
How long do tie rods and ball joints typically last?
Most modern OEM tie rods and ball joints last between 70,000 and 150,000 miles depending on road conditions, driving style, frequency of hitting potholes, and whether your suspension components feature grease fittings that require regular lubrication maintenance.
What tools are strictly necessary if I do not have a pry bar?
While a 24 to 36-inch heavy-duty pry bar is ideal for leveraging lower ball joints, you can perform basic horizontal and vertical wheel shaking tests using your bare hands. However, stubborn ball joints under heavy vehicle design loads require a pry bar to expose micro-play.