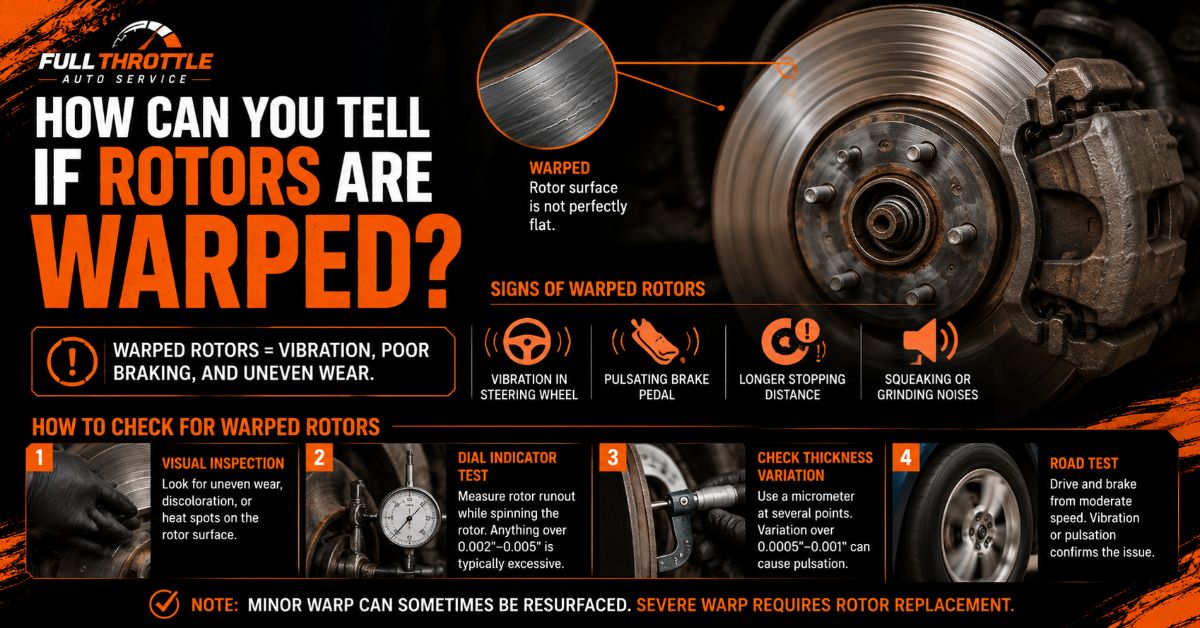
You can tell if your brake rotors are warped primarily by a distinct pulsation in the brake pedal or a violent vibration in the steering wheel that occurs only while braking and scales directly with vehicle speed. As the brake pads squeeze an uneven rotor surface, the high and low spots push back against the pads, sending hydraulic surges through the pedal and mechanical shaking through the steering rack.
At a Glance
- Primary Symptom: Steering wheel shimmy or brake pedal pulsation under deceleration.
- Root Cause: Uneven Disc Thickness Variation (DTV) caused by brake pad deposits, rarely physical bending.
- Tolerance Limit: Maximum allowable lateral runout is 0.05 mm (0.002 in); DTV limit is 0.0127 mm (0.0005 in).
- Best Fix: Full rotor replacement with matching new brake pads (resurfacing often causes recurring vibration within 5,000 miles).
- Installation Trap: Failing to wire-brush hub rust causes brand-new, flat rotors to wobble instantly.
What Are the Main Symptoms of a Warped Brake Rotor?
The main symptoms of a warped brake rotor are brake pedal pulsation, steering wheel vibration under braking, uneven pad wear, and audible squealing or clunking during deceleration. These symptoms stem from the friction surfaces of the rotor failing to maintain a perfectly parallel flat plane.
- Brake Pedal Pulsation: The brake pedal moves up and down against your foot as the hydraulic fluid reacts to high and low spots on the rotor surface.
- Steering Wheel Vibration (Shimmy): If the front rotors are affected, friction variations force the steering rack to oscillate horizontally, shaking the steering wheel.
- Chassis or Seat Vibration: If the rear rotors are affected, the vibration passes through the rear suspension subframe and manifests as a body shake felt in your seat.
- High-Speed Loud Groaning: Braking from speeds above 55 mph on compromised rotors produces a rhythmic, low-frequency hum or groaning noise.
What Actually Happens to a Rotor When It Becomes “Warped”?
Brake rotors rarely bend or twist out of shape from heat under normal driving conditions; instead, “warping” is almost always Disc Thickness Variation (DTV) caused by uneven brake pad friction material transferred onto the iron surface.
When a driver performs a hard stop, the brake pads reach extreme temperatures. If the vehicle comes to a complete halt and the driver holds the brake pedal down firmly, the red-hot pad material glues itself to one specific spot on the rotor face. This creates a microscopic high spot.
Normal Rotor Face:      [====================================] (Uniform Flat Iron)
Improper Pad Stop:      [============[PAD DEPOSIT]===========] (Creates High Spot)
Repeated Friction Heat: [============[  CEMENTITE  ]===========] (Hardened Surface Structure)
As the rotor continues to rotate against the pads during daily driving, that raised deposit experiences localized friction heating. Over time, this intense heat transforms the underlying cast iron structure into a super-hard iron-carbide compound known as cementite. Because cementite wears down at a much slower rate than surrounding raw iron, the rotor develops permanent variations in thickness around its circumference.
What Precision Measurements Determine If a Rotor Is Usable or Scrap?
Precision measurements using a dial indicator and a micrometer determine whether a brake rotor meets safety specifications or must be discarded. Mechanics rely on three primary dimensional checks rather than visual inspection.
| Diagnostic Metric | Measuring Tool | Maximum Allowable Limit | Mechanical Consequence If Exceeded |
| Lateral Runout | Dial Indicator | 0.05 mm (0.002 inches) | Steering wheel vibration; uneven pad friction. |
| Disc Thickness Variation (DTV) | Precision Micrometer | 0.0127 mm (0.0005 inches) | Severe brake pedal pulsation during light deceleration. |
| Minimum Discard Thickness | Vernier Caliper / Micrometer | Stamped on rotor hat (usually 2–3 mm below new spec) | Over-extension of caliper piston; thermal failure; structural cracking. |
    DIAL INDICATOR TEST
    (Measures Lateral Runout)

       +---------+
       | Dial Gauge |
       +----+----+
            |  <-- Stylus touches rotor face
      .-----v-----.
     /    ROTOR    \
    |   DISC HAT    |
     \             /
      '-----------'
Beyond these metrics, lug nut torque plays a direct structural role. Tightening lug nuts unevenly—such as applying 140 ft-lbs to one stud and 70 ft-lbs to another—mechanically pulls the rotor hat out of alignment, creating artificial lateral runout even on a brand-new rotor. Always use a torque wrench set to manufacturer specs (typically 80–100 ft-lbs for light vehicles) in a cross-star pattern.
Can You Drive with Warped Rotors, and Is It Dangerous?
Yes, you can physically drive with warped rotors in an emergency, but doing so is dangerous over extended periods because it increases stopping distances and damages surrounding suspension components.
The primary danger is reduced tire contact stability during hard braking. The rapid pulsing of the friction force causes the front tires to repeatedly grip and release the road surface, which can prematurely trigger the Anti-lock Braking System (ABS) and extend stopping distance by up to 15%.
Additionally, prolonged mechanical vibration transfers stress into the wheel bearings, lower control arm bushings, ball joints, and tie-rod ends. What starts as an ignored $100 rotor issue can degrade front suspension components, resulting in hundreds of dollars in secondary repairs.
How Much Does It Cost to Fix or Replace Warped Rotors?
Replacing warped rotors costs between $250 and $600 per axle for standard consumer vehicles when performed at a repair shop. DIY replacement costs between $90 and $200 in total parts.
- Parts Cost (Per Axle): High-quality aftermarket rotors cost $35 to $90 each ($70–$180 per pair). Matching ceramic or semi-metallic brake pad sets cost $30 to $65.
- Labor Cost (Per Axle): Professional labor takes 1.0 to 1.5 hours per axle, adding $120 to $250 depending on regional shop rates.
- Resurfacing Cost (Bench Machining): Machining an old rotor on a brake lathe costs $20 to $45 per rotor in labor, but is rarely economical given modern low rotor replacement prices.
How Long Do Brake Rotors Typically Last Before Needing Replacement?
Brake rotors typically last between 30,000 and 70,000 miles, depending on driving habits, brake pad compound hardness, vehicle weight, and regional climate conditions.
Aggressive urban driving, frequent heavy towing, and living in mountainous areas generate sustained high thermal cycles that shorten rotor lifespan to 25,000–35,000 miles. Conversely, highway driving with light brake application allows premium rotors to exceed 80,000 miles. Rotors should always be replaced immediately if their measured thickness falls below the cast discard limit, regardless of mileage.
What Else Causes Steering Wheel Vibration Under Braking Besides Warped Rotors?
Steering wheel vibration under braking can be caused by worn control arm bushings, sticking caliper slider pins, improperly balanced tires, or uneven hub rust, even when the rotors themselves are perfectly flat.
- Sticking Caliper Slider Pins: If one slider pin seizes due to dried grease or corrosion, the brake caliper cannot center itself. It presses against the rotor from only one side, flexing the iron disc laterally and mimicking a warped rotor.
- Degraded Control Arm Bushings: Rubber suspension bushings absorb normal, microscopic road variations. When bushings tear or soften, they lose compliance, amplifying tiny, acceptable rotor variations into violent steering wheel shake.
- Corroded Wheel Hub Faces: Rust buildup between the hub flange and the rotor hat prevents the rotor from seating flush, introducing extreme runout at the outer edge.
- Out-of-Balance Wheels: Unbalanced tires cause a continuous vibration that increases with road speed. Unlike rotor issues, this shake persists whether you step on the brake pedal or not.
Why Do Brand-New Rotors Shake Right After Installation?
Brand-new brake rotors shake right after installation primarily because rust and debris were left on the wheel hub face, or because the lug nuts were torqued unevenly without a calibration tool.
       INCORRECT INSTALLATION                     CORRECT INSTALLATION
   (Rust Trapped Behind Hat)                   (Clean Flange Surface)

    Rotor Hat      Hub Flange               Rotor Hat      Hub Flange
     |   /|           |                      |    |           |
     |  / |  <-- Rust |                      |    |           |  <-- Cleaned
     | /  |      Flake                       |    |               Surface
     |/   |           |                      |    |           |
A tiny rust scale measuring just 0.02 mm (0.0008 inches) trapped behind the rotor hat acts as a wedge. Because the rotor extends 12 to 14 inches in diameter, that 0.02 mm imperfection near the center multiplies into 0.06 mm or more of lateral runout at the outer edge where the pads make contact. Before installing new rotors, mechanics must clean the axle hub face using a wire brush or hub cleaning disc until it reaches bare metal.
Can Warped Rear Rotors Cause a Front-End Steering Shake?
Yes, warped rear rotors can occasionally cause a front-end steering shake on vehicles equipped with sensitive independent rear suspensions or unified unibody chassis structures.
Vibrations generated at the rear axle travel along the subframe rails into the unibody shell. When these harmonic vibrations reach the front geometry, they can excite the steering column and make the driver feel as though the problem is originating from the front wheels.
A reliable way to isolate the source is to evaluate pedal feel versus steering wheel feel: pedal pulsation without steering wheel oscillation points to the rear brakes, whereas direct side-to-side steering wheel movement indicates the front brakes.
Can You Fix Warped Rotors with Aggressive Bedding Stops?
Yes, you can fix initial brake vibration using aggressive “bedding-in” stops if the symptom is caught early and is caused by soft pad material deposits rather than hardened cementite.
To scrub off minor pad deposits, perform the following sequence in a safe, traffic-free area:
1.Accelerate to 60 MPH:Ensure clear road conditions behind you.
Bring the vehicle up to 60 mph on an open stretch of road.
2.Apply Firm, Hard Braking:Do NOT engage ABS or lock the wheels.
Decelerate aggressively down to roughly 10 mph. Apply steady, strong force without bringing the vehicle to a complete standstill.
3.Repeat 4 to 5 Times consecutively:Do NOT hold the brake pedal down while stopped.
Accelerate back to 60 mph and repeat the hard deceleration 4 to 5 times to heat the brake system uniformly and scrub the rotor face clean.
4.Drive for 10 Minutes Without Braking:Crucial cooling phase.
Drive at moderate speeds for 10 minutes using minimal braking to allow the rotors to cool completely via airflow.
Note: If vibration continues after completing this process, the localized heat has permanently altered the iron microstructure into cementite, and the rotors must be replaced.
Should You Resurface (Machine) or Replace Warped Brake Rotors?
You should replace warped brake rotors rather than resurfacing them because modern rotors are manufactured with thinner cast dimensions to reduce unsprung vehicle weight, leaving insufficient metal for machining.
| Factor | Resurfacing (Machining) Rotors | Replacing with New Rotors |
| Initial Cost | $40–$90 (Labor only) | $70–$180 (Parts cost per pair) |
| Rotor Mass & Cooling Capacity | Reduced (Thinner metal heat-sinks faster) | Restored to 100% factory thermal specification |
| Risk of Recurrent Vibration | High: Often recurs within 3,000–5,000 miles | Very Low: Fresh metallurgical structure throughout |
| Turnaround Time | Requires off-car bench lathe processing | Instant direct bolt-on replacement |
Machining removes iron to level out high and low spots. However, reducing the rotor’s mass lowers its heat-absorption capacity. The thinned rotor operates at significantly higher temperatures during routine stops, making it far more susceptible to rapid pad re-deposition and recurring vibration. Replacement remains the most reliable long-term solution.
Do You Need to Replace Brake Pads When Changing Warped Rotors?
Yes, you must always replace the brake pads when installing new rotors.
Reusing old brake pads on brand-new rotors forces uneven friction wear patterns back onto the smooth iron. Old pads that have been running on a rotor with Disc Thickness Variation will have an uneven face matching those original high and low spots.
  OLD UNEVEN PAD             NEW FLAT ROTOR           RESULTING TRANSFER
+-----------------+        ====================     ====================
|   /\     /\     |   +    |                  |  =  |   /\     /\     |
|__/  \___/  \____|        ====================     ====================
 (Uneven Friction Face)       (Perfectly Flat Iron)   (Rapid High-Spot Deposit)
When clamped down, these high points on the old pad press disproportionately against the new rotor, concentrating friction heat in isolated patches. This ruins the new rotor surface within a few hundred miles.
How Can You Prevent Brake Rotors from Warping in the Future?
You can prevent brake rotors from developing thickness variation by modifying stopping habits, applying accurate lug nut torque, and keeping wheel hub components clean.
- Avoid Holding Brakes Hot at Complete Stops: After coming down a steep hill or making a hard highway stop, do not hold your foot firmly on the brake pedal while sitting stationary at a light. Shift into Neutral or park safely, or allow the car to inch forward slightly to prevent pad material from transferring onto one hot spot.
- Torque Lug Nuts with a Torque Wrench: Always use a calibrated torque wrench in a cross-star pattern when installing wheels. Never allow tire shops to impact-wrench lug nuts on without final hand-torque verification.
- Clean the Axle Hub Flange: Ensure all rust, scale, and corrosion are completely wire-brushed off the wheel hub before mounting a new rotor.
- Bed-in New Brakes Properly: Perform 4 to 5 moderate deceleration cycles (45 mph to 15 mph) after installing new pads and rotors to establish an even transfer layer of pad friction material across the disc face.
The Bottom Line
To tell if brake rotors are warped, look for a distinct steering wheel shimmy or brake pedal pulsation that occurs only while applying the brakes. What drivers call “warping” is rarely bent metal; it is almost always uneven brake pad material deposits (Disc Thickness Variation) that transform into hard cementite high spots over time.
When replacing rotors, always clean rust off the hub flange, torque lug nuts to specification with a torque wrench, and install a brand-new set of brake pads to ensure smooth, noise-free braking performance.