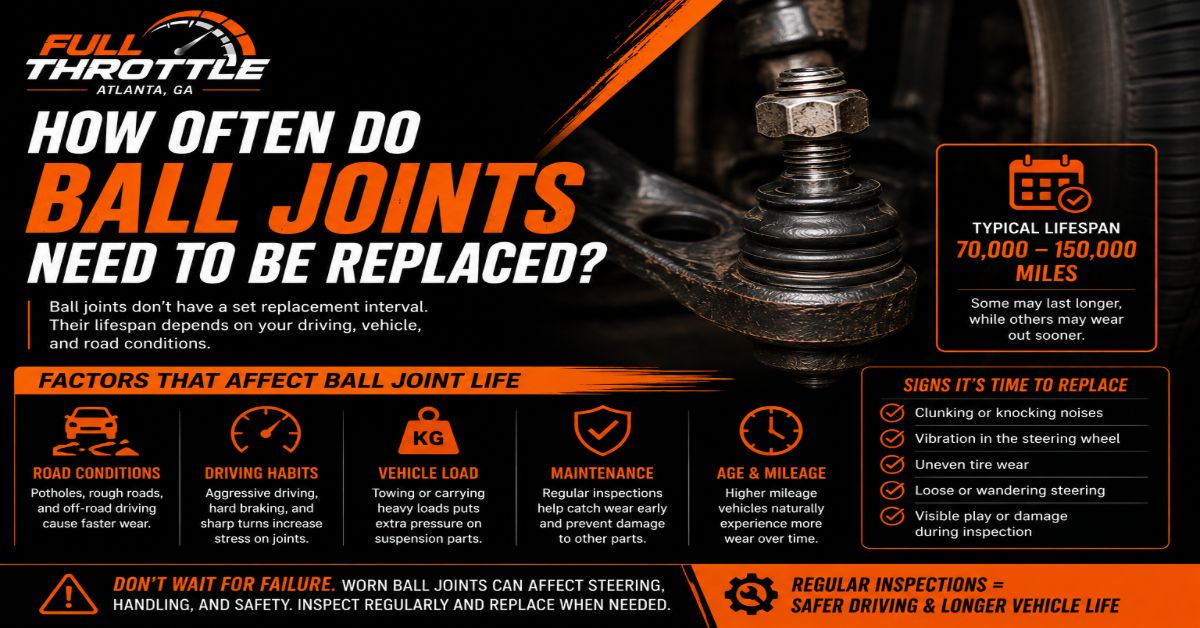
Ball joints typically require replacement every 70,000 to 150,000 miles depending on road conditions, vehicle weight, and driving habits. This comprehensive guide answers exactly how often do ball joints need to be replaced while walking you through the exact seven steps to perform the swap in your own garage. The single factor that most determines your success is preparing the control arm bore properly so the new joint presses in perfectly straight.
Before You Start
- Time Required: 2 to 4 hours per side.
- Difficulty Level: Intermediate to Advanced DIY.
- Typical Cost: $50 to $150 per side in parts (saving you $300 to $600 in labor).
- Prerequisite Skills: Comfort operating heavy manual tools, understanding basic suspension geometry, and the ability to safely lift a vehicle.
Tools and Materials Required:
- Floor Jack and Jack Stands: Minimum 2.5-ton capacity (Quantity: 1 jack, 2 stands).
- Socket Set and Ratchet: 1/2-inch drive, metric sizes from 10mm to 24mm.
- Ball Joint Press Kit: Heavy-duty C-frame press with receiving and driving adapter cups (Quantity: 1 kit, usually rentable).
- Ball Joint Separator: Mechanical screw-type separator preferred over a pickle fork.
- Torque Wrench: 1/2-inch drive capable of reading up to 150 ft-lbs.
- Breaker Bar: 24-inch length for stubborn bolts and operating the C-frame press.
- Heavy Hammer: 3-pound to 5-pound mini sledgehammer.
- Cleaning Supplies: Wire brush, 400-grit emery cloth, and brake cleaner (Quantity: 1 can).
- Penetrating Oil: WD-40 Specialist or PB Blaster (Quantity: 1 can).
- New Ball Joint Kit: Must include the joint, a new castle nut, cotter pin, and snap ring (Quantity: 1 per side).
- Chassis Grease: Synthetic high-pressure lithium grease (Quantity: 1 tube).
Step-by-Step Ball Joint Replacement Process
Step 1: Secure the Vehicle and Support the Lower Control Arm
Park your vehicle on a perfectly flat concrete surface, set the parking brake, and place heavy rubber wheel chocks firmly behind the rear tires.
Before lifting the vehicle, use a breaker bar to break loose the front wheel lug nuts by turning them counterclockwise one half-turn. Lift the front of the vehicle using the manufacturer specified central jacking point and carefully lower it onto your 2.5-ton jack stands placed under the pinched weld or main frame rails. Remove the wheel completely. Now, place your hydraulic floor jack directly under the lower control arm and apply light upward pressure. This critical step prevents the heavy coil spring from violently forcing the suspension downward when you separate the ball joint later.
- Success Checkpoint: You will know it worked when the vehicle is entirely stable on the stands and the lower control arm is lightly supported by the hydraulic jack without lifting the vehicle off the stands.
- Common Mistake: Forgetting to support the lower control arm on vehicles with coil-on-arm suspension. If you skip this, the sudden release of spring tension can cause severe injury.
Step 2: Strip the Hub and Brake Assembly
Remove the brake caliper and rotor to gain clear, unobstructed access to the steering knuckle and ball joint stud.
Locate the two 17mm or 19mm bolts holding the brake caliper bracket to the steering knuckle. Remove these bolts completely. Slide the entire brake caliper assembly off the brake rotor. Immediately secure the caliper to the upper suspension coil using a heavy bungee cord or mechanic wire. Pull the brake rotor straight off the hub wheel studs and set it aside. If the rotor is rusted in place, strike the flat hat section between the wheel studs with your hammer to break the rust bond.
- Success Checkpoint: You will know it worked when the steering knuckle is completely bare, allowing you to clearly see the castle nut securing the ball joint stud.
- Common Mistake: Letting the heavy metal brake caliper hang by its flexible rubber brake hose. This stretches and ruins the internal Teflon lining, guaranteeing a dangerous brake fluid leak in the near future.
Step 3: Break the Tapered Ball Joint Fit
Use a mechanical separator tool or targeted hammer strikes to release the friction fit between the ball joint stud and the steering knuckle.
Straighten the legs of the old cotter pin with needle-nose pliers and pull it out of the castle nut. Use your socket set to loosen the castle nut, but leave it threaded on the top three threads of the stud. Insert your mechanical ball joint separator between the control arm and the knuckle, then tighten the tool bolt until it pops the joint loose. Alternatively, take your 3-pound sledgehammer and strike the thick, cast-iron side of the steering knuckle exactly where the ball joint stud passes through it. The shockwave will deform the hole for a microsecond and release the tapered stud with a loud pop.
- Success Checkpoint: You will know it worked when the knuckle drops downward slightly and rests cleanly on the loosened castle nut you left in place.
- Common Mistake: Striking the threaded ball joint stud itself with the hammer. Hitting the stud just mushrooms the metal, trapping it permanently inside the steering knuckle.
Step 4: Press Out the Old Ball Joint and Prep the Bore
Utilize your heavy-duty C-frame press to push the old joint out of the control arm and aggressively clean the mounting hole.
Remove the loosened castle nut completely and pull the steering knuckle to the side, securing it with wire so it does not pull on the tie rod. Check the top of the ball joint for a metal snap ring and remove it with snap-ring pliers if present. Position the C-frame press over the control arm. Place a receiving adapter cup (large enough for the whole joint to slide into) on the bottom, and place the flat pressing plate on top of the old joint stud. Tighten the C-frame bolt clockwise with your 24-inch breaker bar until the joint falls out into the cup. Finally, spray brake cleaner into the empty control arm bore and scrub the inner walls vigorously with 400-grit emery cloth to remove all rust scale.
- Success Checkpoint: You will know it worked when the inside of the control arm bore is bare, shiny metal completely free of deep gouges or flaking rust.
- Common Mistake: Failing to sand away rust burrs inside the bore. A rusty bore creates immense friction that will cause the new ball joint to bind and go in crooked during the next step.
Step 5: Press In the New Ball Joint Perfectly Straight
Configure your C-frame press in reverse to install the new joint squarely into the control arm bore.
Retrieve your new ball joint from the freezer (cooling it overnight shrinks the steel by a few thousandths of an inch, making this step infinitely easier). Apply a very light coat of chassis grease to the shiny inner wall of the control arm bore. Push the new joint into the bore by hand from the bottom up. Set up your C-frame press with the receiving cup resting on top of the control arm and the driving cup pushing strictly on the solid outer metal flange of the new joint. Crank the C-frame slowly with a wrench. Stop every two turns to visually verify the gap between the joint flange and the control arm is perfectly even all the way around.
- Success Checkpoint: You will know it worked when the outer metal lip of the new ball joint sits 100 percent flush against the bottom of the control arm with zero daylight visible between them.
- Common Mistake: Forcing a crooked press. If the joint tilts sideways and you keep tightening the press, you will stretch and permanently ruin the circular bore in the control arm.
Step 6: Reassemble the Suspension and Apply Final Torque
Reconnect the steering knuckle, install the new hardware, and torque all fasteners to exact manufacturer specifications.
Wipe the tapered stud of the new joint with a clean rag to ensure it is completely free of grease. Guide the steering knuckle back over the stud and thread the brand new castle nut on by hand. Grab your torque wrench and tighten the castle nut to your vehicle specification (typically 40 to 80 ft-lbs). Look at the slots on the castle nut to see if they align with the hole drilled through the stud. If they do not align, tighten the nut slightly further until the next slot lines up perfectly. Insert the new cotter pin and bend the legs securely around the nut. Finally, thread in the grease zerk fitting and pump fresh grease into the joint until the rubber boot just begins to swell.
- Success Checkpoint: You will know it worked when the cotter pin slides through freely, the hardware is tightly secured, and the rubber dust boot looks plump but not overflowing.
- Common Mistake: Loosening the castle nut to align the cotter pin hole. Backing off the torque leaves the critical suspension joint loose, leading to catastrophic failure on the highway. Always tighten further to align the hole.
Step 7: Lower the Vehicle and Perform Alignment
Reinstall the braking system, mount the wheel, lower the vehicle safely, and schedule an immediate professional alignment.
Slide the brake rotor back onto the hub. Reposition the brake caliper bracket and torque the 17mm or 19mm bolts to 75 to 105 ft-lbs. Mount the wheel and hand-thread the lug nuts. Raise your floor jack slightly to remove the jack stands from under the frame, then lower the vehicle completely to the ground. Use your torque wrench to tighten the wheel lug nuts in a crisscross star pattern to 80 to 100 ft-lbs. Drive the vehicle at low speeds directly to a certified mechanic shop.
- Success Checkpoint: You will know it worked when the vehicle sits level on the ground and drives without the clunking noises that prompted the repair.
- Common Mistake: Skipping the professional wheel alignment. Replacing a ball joint permanently alters your steering geometry. Failing to align the front end will shred your tires down to the metal wires in less than a thousand miles.
Common Mistakes and How to Fix Them
The Ball Joint Stud Spins While Tightening the Nut
- The Problem: When threading on the castle nut, the entire ball joint stud spins freely in place, preventing the nut from threading downward.
- The Fix: Place a floor jack directly under the bottom of the new ball joint and apply heavy upward pressure. This jams the tapered stud firmly into the steering knuckle, utilizing friction to lock it in place so you can torque the nut.
The C-Frame Press is Binding and Will Not Turn
- The Problem: You are leaning on the breaker bar, but the threaded rod on the C-frame press refuses to move another millimeter.
- The Fix: Stop immediately. Back the tool off entirely. Generously apply extreme-pressure grease or anti-seize paste directly to the threads of the C-frame tool. Dry threads under immense load will gall and seize permanently.
The Rubber Dust Boot Bursts During Greasing
- The Problem: You pumped too much chassis grease into the joint, causing the protective rubber boot to rupture or pop off its retaining ring.
- The Fix: If the boot ruptured, you must replace the boot completely. To prevent this, rotate the steering wheel back and forth gently while pumping grease to distribute it evenly, and stop the moment the boot expands slightly.
The Pressing Cup Gets Stuck on the Control Arm
- The Problem: You finish pressing the new joint in, but the receiving cup is wedged tightly between the joint stud and the control arm housing.
- The Fix: You selected an adapter cup that was too narrow. Tap the side of the cup lightly with a hammer to shock it loose. Next time, ensure the receiving cup diameter clears the entire ball joint body with room to spare.
Variations for Different Vehicle Setups
Bolt-In or Riveted Ball Joints Many factory vehicles do not use pressed-in joints, but instead use heavy steel rivets to attach the joint to the control arm. You cannot press these out. You must drill a pilot hole into the center of the rivet head, chisel off the head, and punch the rivet body out with a drift pin. The replacement joint will include hardened Grade 8 bolts and lock nuts to replace the factory rivets.
Replacing the Entire Control Arm For many modern aluminum suspensions, the ball joint is entirely integrated and cannot be pressed out safely. Even on steel arms, the control arm bushings degrade at the same rate as the ball joints. In these situations, buying a fully assembled replacement control arm (which includes pre-installed bushings and a new ball joint) is highly recommended. It turns a frustrating three-hour press job into a simple one-hour bolt-on process.
How Long Does It Take and What Does It Cost?
A first-time DIY mechanic working on a severely rusted vehicle should allocate four hours for the first side and two hours for the second side (as the learning curve flattens). Professional shops bill between 1.5 to 2.5 hours of labor per side.
Financially, doing this yourself changes the math entirely. A premium Moog or AC Delco replacement ball joint costs $50 to $80. Renting the C-frame press from an auto parts store is typically free (you leave a deposit that is fully refunded upon return). Taking the vehicle to a dealership or independent shop usually results in a total bill of $400 to $800 after factoring in their parts markup and $150-per-hour labor rates.
Frequently Asked Questions
Can I continue driving with a bad ball joint? No. A failing ball joint is a critical safety hazard. If the joint separates while driving, the entire wheel assembly will collapse outward into the fender, resulting in an immediate and total loss of steering control at highway speeds.
Should I replace both front ball joints at the same time? Yes. Suspension components on the front axle experience nearly identical road forces and wear cycles. If the driver-side joint has failed, the passenger-side joint is almost certainly at the end of its lifespan as well.
Do upper and lower ball joints wear out at the exact same rate? No. On most independent suspension designs, the lower ball joints carry the entire physical weight of the vehicle and endure the majority of impact forces from potholes. Lower joints consistently fail long before upper ball joints do.
What is the difference between a sealed and a greaseable ball joint? Sealed ball joints are packed with grease at the factory and require zero maintenance, but cannot be refreshed once the grease dries out. Greaseable joints feature a small zerk fitting on top, allowing you to flush out old contaminants with fresh grease during routine oil changes, significantly extending their operational life.
Knowing how often do ball joints need to be replaced keeps your steering tight and your vehicle safe on the road. By mastering the C-frame press setup, freezing the new parts, and avoiding the common pitfall of a crooked installation, you can successfully perform this advanced suspension repair in your driveway. Always complete the job with a professional alignment to ensure your steering geometry remains perfect for the next 100,000 miles.