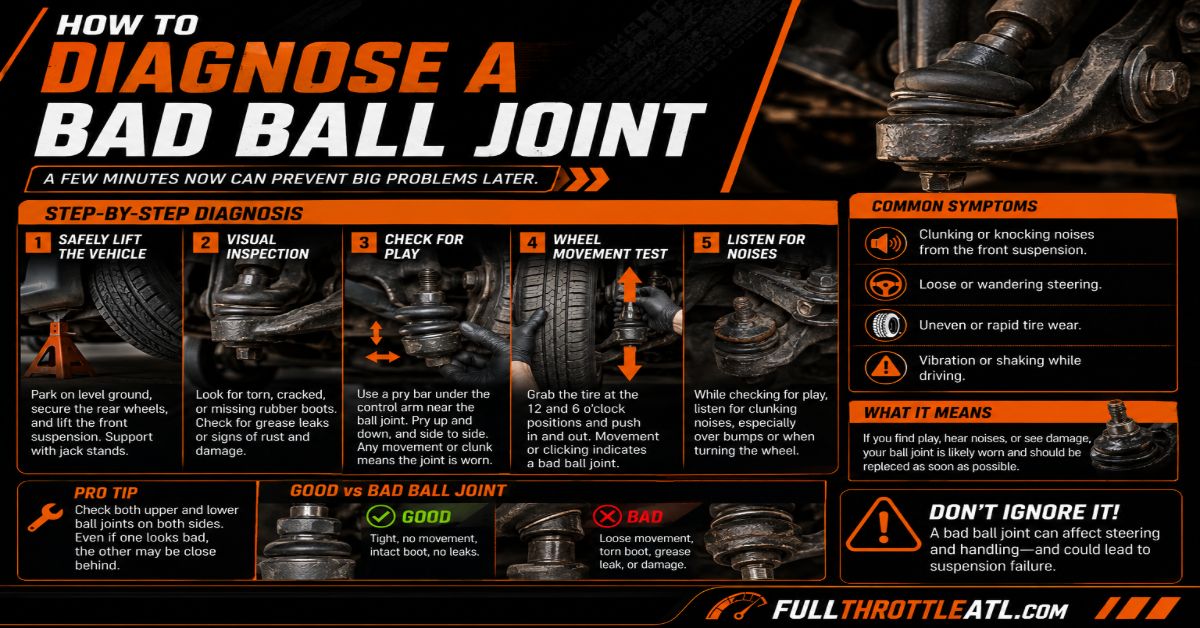
To successfully learn how to diagnose a bad ball joint, you must properly unload the vehicle suspension, perform a visual inspection, execute manual leverage tests, and measure the exact joint play. This diagnostic process takes roughly 45 minutes and requires moderate mechanical skill. The single most critical factor for success is placing your floor jack in the correct location so the joint is genuinely free to move.
Before You Start
- Time Required: 45 minutes
- Difficulty Level: Intermediate
- Cost: $0 to diagnose if you own basic tools; $100 to $150 if purchasing a dial indicator and pry bar.
- Prerequisite Skills: Ability to safely lift and support a vehicle using a floor jack and jack stands.
Required Tools and Materials Checklist:
- 1 Heavy-Duty Floor Jack (Minimum 2-ton to 3-ton lifting capacity)
- 2 Jack Stands (Rated for your vehicle’s weight and locked securely)
- 2 Wheel Chocks (Solid rubber or wood)
- 1 Long Pry Bar (24-inch to 36-inch length for adequate leverage)
- 1 Dial Indicator with Flex Arm (Must have 0.001-inch resolution graduations)
- 1 Flashlight or Work Light (Minimum 500 lumens for inspecting boots)
- 1 Wire Brush (For cleaning rust off measuring surfaces)
Step 1: Park and Prep the Vehicle
Park your vehicle on a completely level concrete surface and break the lug nuts loose before lifting.
You must start on hard, level concrete because asphalt can compress under the focused weight of a jack stand, and sloped surfaces invite the vehicle to roll. Apply the emergency parking brake firmly. Place your two wheel chocks snugly behind and in front of the rear tires. Take your lug wrench or breaker bar and loosen the front wheel lug nuts exactly 1/2 turn counterclockwise while the car’s weight is still on the ground. Do not remove the lug nuts completely.
Success Checkpoint: You will know this step worked when the vehicle cannot roll backward and the lug nuts are easily turnable by hand but still fully holding the wheel against the hub.
Common Mistake: Loosening the lug nuts after the vehicle is in the air. A suspended wheel will simply spin when you apply torque to the wrench, forcing you to lower the vehicle back down to break the nuts loose.
Step 2: Unload the Vehicle Suspension
Determine your specific suspension architecture and place your floor jack at the correct leverage point to relieve spring tension.
This is the most critical step. If the ball joint is squeezed by thousands of pounds of spring tension, it will feel perfectly tight even if it is dangerously worn out. Look behind your front wheel to identify your suspension type, then follow the exact lifting rule for that type. For a MacPherson Strut (a single thick shock absorber surrounded by a coil spring): Place the jack on the vehicle’s main frame rail. Lift until the tire clears the ground, place your jack stand under the frame, and lower the jack. The wheel will hang down, fully unloading the lower ball joint. For a Short-Long Arm (SLA) with the spring on the lower control arm: Place your floor jack directly under the lower control arm, as close to the lower ball joint as possible. Lift the arm until the tire clears the ground, then place your jack stand securely under the lower control arm. For an SLA with the spring on the upper control arm: Place the jack on the main frame rail. Lift the vehicle, insert the jack stand under the frame, and let the wheel hang freely. For a Torsion Bar suspension: Place your jack under the lower control arm, just like the lower-spring SLA method, and support the lower arm with your jack stand. Once supported, grab the vehicle bumper and give it a firm shake to ensure it is stable on the stands.
Success Checkpoint: You will know you successfully unloaded the suspension if you can grab the upper and lower control arms and feel no binding spring tension pushing the steering knuckle downward.
Common Mistake: Lifting a lower-spring SLA truck by the frame. This allows the heavy coil spring to push the lower control arm down with maximum force, binding the ball joint tight and masking any internal wear.
Step 3: Perform a Visual Boot Inspection
Wipe away road grime from the ball joint housing and visually inspect the rubber dust boot for compromises.
Take a clean shop rag and thoroughly wipe down the metal housing and the rubber boot of the ball joint. Shine your 500-lumen flashlight directly onto the rubber. You are looking for dry rot cracking, vertical tears, pinhole punctures, or fresh grease splattered onto the inside of the wheel rim. Check the base of the boot where it meets the metal housing. Look for shiny metal wear bands, which indicate the stud has been grinding against the edge of the socket. If the joint has a grease zerk fitting on the bottom, check to see if it is missing or snapped off.
Success Checkpoint: You will know this step is complete when you have visually verified the sealed integrity of the boot. A perfectly intact boot means the joint might still be good.
Common Mistake: Assuming a good boot means a good ball joint. While a torn boot guarantees the joint will fail soon due to dirt intrusion, internal plastic bearings can completely wear out even inside a perfectly sealed, pristine-looking rubber boot.
Step 4: Execute the 12 and 6 O’Clock Rock Test
Grip the suspended tire firmly at the top and bottom edges and rock it inward and outward to feel for internal joint looseness.
With the vehicle safely secured on jack stands and the suspension unloaded, sit facing the tire. Place your left hand firmly at the exact 12 o’clock position (top dead center) and your right hand at the exactly 6 o’clock position (bottom dead center). Push hard with your top hand while pulling with your bottom hand, then rapidly reverse the motion. Apply at least 50 pounds of force. You must listen and feel carefully. You are feeling for a distinct metallic clicking, a dull clunk, or a physical shifting sensation.
Success Checkpoint: You will know this test is effective if you can isolate the movement. If the top of the tire shifts, the upper ball joint is suspect. If the bottom of the tire shifts, the lower ball joint is suspect.
Common Mistake: Testing at the 9 and 3 o’clock positions. Rocking the tire from the sides tests the inner and outer tie rods in the steering system. It will not accurately diagnose a lower or upper ball joint.
Step 5: Test Vertical Movement with a Pry Bar
Insert a long pry bar beneath the tire and apply upward leverage to reveal vertical play inside the ball joint socket.
Slide your 24-inch to 36-inch pry bar flat on the ground so the tip wedges directly underneath the center of the suspended tire. Use the concrete floor as your fulcrum. Press down firmly on the handle of the pry bar to lift the tire upward. Apply and release the pressure rhythmically. While doing this, keep your eyes locked directly on the lower ball joint. You are watching the gap between the steering knuckle and the control arm. The steering knuckle should not move up and down independently of the control arm.
Success Checkpoint: You will know this step worked when you apply 100 pounds of upward force to the tire and clearly observe whether the ball joint stud slides vertically in and out of its metal housing.
Common Mistake: Jamming the pry bar directly into the suspension components instead of using the tire. Wedging a sharp steel pry bar between the control arm and the steering knuckle often punctures the rubber dust boot, destroying a ball joint that was otherwise perfectly healthy.
Step 6: Measure Play with a Dial Indicator
Secure a magnetic dial indicator to the suspension and measure the exact thousands of an inch of vertical and radial movement.
Visual checks are subjective, but dial indicators provide undeniable data. Clean a flat spot on the lower control arm with your wire brush. Attach the magnetic base of your dial indicator firmly to this clean spot. Bend the flex arm so the plunger tip presses perfectly straight up against the flat bottom of the steering knuckle. Pre-load the plunger by compressing it about 0.100 inches, then rotate the outer bezel of the gauge until the needle points exactly to zero. Use your pry bar under the tire to lift the assembly again. Read the dial. Cars generally allow 0.020 to 0.050 inches of maximum vertical movement. Trucks generally allow 0.030 to 0.080 inches. Reposition the gauge horizontally against the side of the knuckle to measure side-to-side radial play while pulling the wheel outward.
Success Checkpoint: You will know this step worked when the dial needle returns exactly to the zero mark every time you release the pressure on the pry bar.
Common Mistake: Clamping the dial indicator base to a part that moves independently of the control arm, such as the brake dust shield or a plastic fender liner. The base must be mounted to a rigid, structural component to measure true relative movement.
Common Mistakes and How to Fix Them
Misinterpreting Wheel Bearing Play as Ball Joint Play Movement during the 12-and-6 rock test can easily be caused by a failed wheel hub bearing. The Fix: Have an assistant perform the rock test while you watch the back of the wheel assembly. If the steering knuckle moves relative to the control arm, you have a bad ball joint. If the brake rotor and wheel move but the steering knuckle remains completely stationary, you have a bad wheel bearing.
Testing on Uneven Ground resulting in Slipped Jack Stands Attempting to unload the suspension on a sloped driveway changes the geometry of the lift, sometimes causing the jack stand to tilt on two legs. The Fix: Lower the vehicle immediately. Move the vehicle to a flat garage floor or level concrete pad. If flat concrete is completely unavailable, you must use heavy-duty leveling blocks and sink the jack stand bases into thick plywood to distribute the load perfectly flat.
Ignoring the Built-in Wear Indicator Pin Many mechanics spend time setting up a dial indicator on older trucks without checking if the joint has a visual wear indicator. The Fix: Look at the grease fitting (zerk) on the bottom of the joint. On many heavy-duty joints, the base of the zerk fitting protrudes outward. As the internal socket wears down, the housing drops, and the fitting sinks inward. If the collar of the grease fitting is flush with or recessed inside the housing, the joint has failed. Replace it immediately without bothering with dial measurements.
Erratic or Bouncing Dial Indicator Readings You set up the gauge, apply pressure, and the needle jumps wildly or refuses to return to zero. The Fix: The contact surface is likely covered in thick rust scale or grease, causing the tiny plunger tip to slide off its mark. Wipe the contact point on the steering knuckle with brake parts cleaner and scrub it down to bare metal with your wire brush. Ensure the locking knobs on your dial indicator’s flex arm are tightened down with pliers.
Variations for Different Vehicle Types
Solid Front Axle Trucks (e.g., Jeep Wrangler, Ford F-250) Solid axles do not have lower control arms. To test the ball joints on a solid front axle, place your floor jack directly under the axle tube, as close to the steering knuckle as possible. Lift the tire off the ground and place your jack stand under the axle tube. You will test the upper and lower ball joints simultaneously using the pry bar method. Because solid axles use heavy forged knuckles, you may need a much longer 48-inch pry bar to generate enough upward force to reveal play.
Vehicles with Press-In vs. Bolt-In Ball Joints While diagnosing the play remains the same, your repair path changes drastically. If you diagnose a bad bolt-in ball joint, you can replace it in your driveway with basic hand tools by removing three or four hardened bolts. If you diagnose a bad press-in ball joint, you will need to rent a heavy-duty C-clamp ball joint press tool from an auto parts store to force the old joint out of the lower control arm.
MacPherson Struts with Aluminum Control Arms Modern luxury cars and sports cars frequently use cast aluminum lower control arms. Never place a steel floor jack cup directly against an aluminum control arm, as it can gouge the metal and create stress fractures. Always lift these vehicles from the reinforced steel frame rails or designated pinch-weld jacking points.
Time and Cost to Diagnose and Repair
Diagnosing a bad ball joint costs absolutely nothing if you already own a floor jack and a pry bar. If you need to purchase a magnetic dial indicator to confirm factory specifications, expect to spend between $30 and $60.
If your diagnosis confirms a bad joint, the repair costs vary widely based on your vehicle model. Purchasing a single aftermarket replacement ball joint usually costs between $20 and $70. However, many modern vehicles (like late-model Hondas and BMWs) do not allow you to replace the ball joint by itself. The joint is permanently integrated into the lower control arm. In these cases, you must purchase the entire lower control arm assembly, which increases the parts cost to a range of $150 to $400 per side. Paying a professional mechanic to replace a ball joint typically adds $150 to $300 in labor charges, plus the mandatory cost of a front-end alignment (roughly $100) after the new part is installed.
Frequently Asked Questions
Can I drive my car with a bad ball joint? You should not drive with a worn ball joint. If the ball pulls completely out of its socket while driving, the wheel will collapse outward, causing an immediate loss of steering control, severe fender damage, and a potential high-speed accident.
Should I replace both ball joints at the same time? Yes, it is highly recommended to replace front suspension components in pairs. If the driver-side ball joint has reached the end of its lifespan due to mileage and road wear, the passenger-side ball joint is likely on the verge of failing as well.
Does a bad ball joint make a specific noise? A failing ball joint typically produces a sharp, metallic clanking or knocking sound when you drive over speed bumps, potholes, or uneven pavement. You may also hear a high-pitched squeaking noise when turning the steering wheel at low speeds in parking lots.
Will an alignment fix a bad ball joint? No. An alignment only adjusts the angles of the steering components. It cannot fix physical metal wear inside a ball joint socket. In fact, a reputable alignment shop will refuse to align a vehicle with a bad ball joint because the loose joint makes it impossible to hold the correct geometry.
How long do ball joints typically last? Factory ball joints generally last between 70,000 and 150,000 miles depending on driving conditions. Vehicles driven frequently on rough dirt roads, or trucks that carry heavy payloads, will wear out their ball joints much faster than cars driven purely on smooth highways.
To ensure you get the exact specifications for your project, always consult your vehicle’s factory service manual for the precise torque specs and allowable dial indicator tolerances for your specific suspension type.