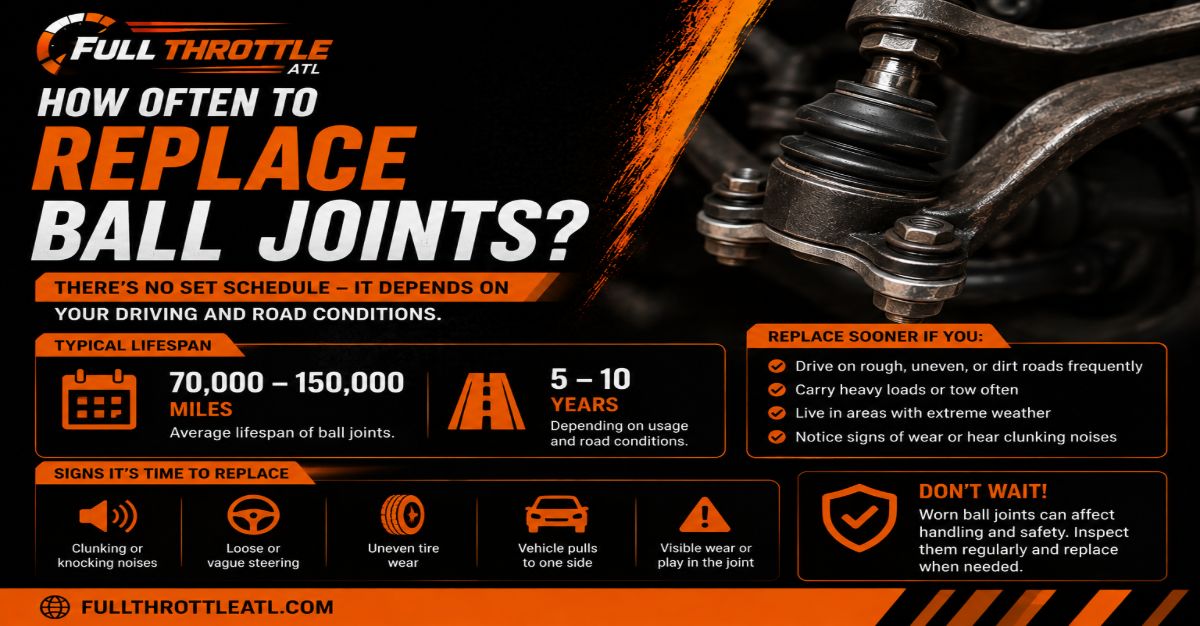
Replacing your vehicle’s ball joints restores steering precision and safety. Ball joints generally last between 70,000 and 150,000 miles, but failing components demand immediate replacement. This comprehensive, 7-step guide takes you through lifting, pressing, and torquing in 2 to 4 hours per side. Precision in press alignment and exact torque specifications are the two factors that most determine your success.
Before You Start
- Time Required: 2 to 4 hours per side
- Difficulty Level: Advanced DIY / Intermediate Mechanical
- Cost Range: $50 to $200 for parts and specialty tool rentals
- Required Tools & Materials: Floor jack, heavy-duty jack stands, ball joint press kit with C-frame, ball joint separator or pickle fork, torque wrench (30 to 150 lb-ft), breaker bar, socket set, needle-nose pliers, 3-lb sledgehammer, wire brush, penetrating fluid, replacement ball joints (replace in pairs), cotter pins, and chassis grease.
- Prerequisite Conditions: Park on a flat, stable concrete surface with the parking brake firmly engaged.
Step 1: Preparation and Safe Vehicle Lifting
Park your vehicle on a level concrete surface, engage the parking brake, and loosen the front wheel lug nuts by one-quarter turn using a breaker bar. Slide your floor jack under the manufacturer-approved lifting point and elevate the front end of the vehicle securely. Place heavy-duty jack stands under the designated frame pinch welds or subframe rails, lower the vehicle weight onto the stands, and completely remove the front wheels to expose the steering and suspension assemblies.
- Success Check: You will know this step worked when the vehicle rests completely stable on solid steel jack stands with zero front-to-back or side-to-side rocking motion.
- Common Mistake: Lifting the car on asphalt using a cheap hydraulic jack without jack stands. Always use rated steel jack stands to prevent catastrophic collapse.
Step 2: Component Disassembly and Clearing Clearance
Remove the cotter pin from the ball joint castle nut using needle-nose pliers, then loosen the castle nut by hand until it remains threaded on by three full turns. Disconnect any obstructing components such as the sway bar end link or brake caliper bracket to gain clear workspace. Secure the dangling brake caliper firmly to the coil spring or frame using a heavy wire coat hanger or bungee cord.
- Success Check: You will know this step worked when the steering knuckle and control arm are fully accessible and the flexible brake line experiences zero tension or twisting.
- Common Mistake: Letting the heavy brake caliper hang freely by its rubber hydraulic hose. This internal lining damage can lead to sudden brake failure.
Step 3: Separating the Ball Joint from the Steering Knuckle
Insert a mechanical ball joint separator tool or a pickle fork between the steering knuckle and the control arm, or strike the side of the steering knuckle casting boss firmly with a 3-lb sledgehammer to shock the tapered stud free. Once the tapered stud breaks loose with a sharp pop, unscrew the castle nut completely and pull the steering knuckle away from the ball joint stud.
- Success Check: You will know this step worked when the steering knuckle drops free from the ball joint stud and moves independently of the lower control arm.
- Common Mistake: Striking the threaded tip of the ball joint stud directly with a hammer, which mushrooms the threads and makes nut removal impossible.
Step 4: Applying Penetrating Fluid and Removing the Old Ball Joint
Spray a generous amount of penetrating fluid around the perimeter of the old ball joint flange where it seats into the control arm, and let it soak for 15 minutes. Remove the metal snap ring from the top of the ball joint using snap-ring pliers, then assemble your ball joint press tool with the correct receiving tube cup on the bottom and the driving adapter on top. Tighten the C-frame forcing screw using a breaker bar or impact wrench until the old ball joint pops completely out of the control arm housing.
- Success Check: You will know this step worked when the old ball joint drops out into the bottom receiving tube cup with a sudden drop in press resistance.
- Common Mistake: Forcing the press without ensuring the receiving tube is large enough to swallow the exiting joint body, which locks up the tool threads.
Step 5: Cleaning the Control Arm and Pressing In the New Ball Joint
Scrub the interior of the control arm receiving hole thoroughly with a wire brush and emery cloth until all rust and scale are completely gone, wiping the surface clean with a shop towel. Position the new ball joint straight into the control arm opening by hand, then reverse your press setup by placing the large receiving tube on top and the flat driving adapter on the bottom. Turn the forcing screw smoothly until the new ball joint flange seats 100 percent flush against the control arm surface, and install the new snap ring securely into its groove using snap-ring pliers.
- Success Check: You will know this step worked when you can pass a thin feeler gauge or fingernail around the entire mating surface with zero gaps between the ball joint flange and the control arm.
- Common Mistake: Pressing the new ball joint in at a slight angle. Forcing a misaligned press deforms the soft control arm opening permanently, ruining the entire arm.
Step 6: Reassembly and Final Torquing
Guide the new ball joint tapered stud back into the steering knuckle opening, thread the new castle nut on by hand, and torque it down to your vehicle’s exact factory specification using a torque wrench. If the cotter pin hole in the stud does not align with the castle nut windows, tighten the nut slightly further until it aligns, and slide the new cotter pin through, bending the legs flat against the nut. Install the grease zerk fitting if your joint is serviceable, and pump high-quality chassis grease into it using a grease gun until the rubber boot expands slightly.
- Success Check: You will know this step worked when all fasteners meet factory torque specs, the cotter pin is locked securely, and the grease boot holds pressure without leaking.
- Common Mistake: Backing a torqued castle nut off to align the cotter pin hole. Always tighten forward to the next window to maintain proper clamping preload.
Step 7: Reinstalling Wheels and Performing a Post-Repair Check
Reinstall your front wheels, lower the vehicle carefully off the jack stands using your floor jack, and torque the wheel lug nuts in a star pattern to the manufacturer specification of 80 to 120 lb-ft. Pump your brake pedal five times to reset the caliper pistons before moving the vehicle, and schedule a professional four-wheel alignment immediately to correct steering geometry shifts.
- Success Check: You will know this step worked when the vehicle tracks straight during a low-speed test drive and the steering wheel returns smoothly to center after a turn.
- Common Mistake: Skipping the post-repair professional wheel alignment, which results in rapid, uneven tire tread wear and poor steering tracking.
Common Mistakes and How to Fix Them
- The Ball Joint Stud Spins Continuously: When tightening the castle nut, the tapered stud rotates with the nut instead of drawing tight. Fix this by placing a floor jack under the lower control arm and raising it slightly to apply upward pressure, forcing the taper together.
- Clunking Noises Over Bumps After Repair: A clunking sound indicates loose hardware or an improperly seated press fit. Re-verify torque settings on all suspension fasteners and inspect the control arm bore for enlargement.
- Stiff Steering or Failure to Return to Center: The internal joint is bound up or installed dry. Lubricate the joint via its zerk fitting; if it remains stiff, replace the defective component immediately.
- Torn Rubber Dust Boot: The boot was pinched and torn during the press installation process. Replace the dust boot immediately to prevent road grit from destroying the internal bearings within weeks.
Variations Based on Vehicle Design and Tools
- Press-In vs. Bolted-In Ball Joints: While most trucks and rear-wheel-drive cars use press-in joints requiring a C-frame press, many modern front-wheel-drive vehicles feature bolt-on ball joints attached to the control arm with two or three heavy fasteners. For bolt-on designs, simply remove the retaining bolts, tap the joint free, and bolt the new unit straight in without a press tool.
- Control Arm Assembly Replacement: On vehicles where the ball joint is permanently integrated into a stamped steel or aluminum control arm, pressing out the joint is impossible. In these cases, replace the entire lower control arm assembly as a single unit.
- Using Hand Tools vs. Impact Wrenches: While an electric impact wrench speeds up C-frame pressing significantly, a long breaker bar and a deep socket can accomplish the exact same task using manual leverage if pneumatic or cordless power tools are unavailable.
How Long Does It Take and What Does It Cost?
A DIY replacement typically requires 2 to 4 hours per side depending on rust accumulation and suspension complexity. First-timers should allocate a full weekend day to complete both sides safely. Parts cost between $30 and $100 per joint, while specialty tool rental kits are often available through local auto parts stores with a fully refundable deposit.
Frequently Asked Questions
Can I replace just one ball joint at a time?
You should always replace ball joints in pairs across the same axle. If one side has worn out from mileage and road stress, the opposite side has experienced identical wear and will likely fail shortly after. Replacing both ensures balanced steering geometry and predictable handling performance.
How do I know when my ball joints actually need replacement?
Common symptoms of a failing ball joint include a rhythmic clunking or popping noise when driving over bumps or turning corners, a loose or wandering steering wheel feel, excessive vibration at highway speeds, and rapid or uneven tire tread wear along the inner or outer edges.
Is a wheel alignment mandatory after replacing a ball joint?
A professional four-wheel alignment is mandatory after any suspension teardown. Removing the steering knuckle and control arm shifts the camber and toe angles. Failing to align the vehicle will cause severe, rapid tire wear and degrade handling stability.
What happens if a ball joint fails completely while driving?
Complete structural separation of a ball joint causes the wheel to detach from the steering control assembly. This results in an immediate loss of vehicle control, allowing the corner of the car to drop onto the pavement or wheel rim, which can trigger a severe accident.
Can I grease a non-serviceable sealed ball joint?
Sealed, non-serviceable ball joints come pre-greased from the factory and feature a permanent rubber boot with no zerk fitting. You cannot add grease to these units. Attempting to puncture or force grease into a sealed boot ruins the environmental seal and destroys the joint prematurely.