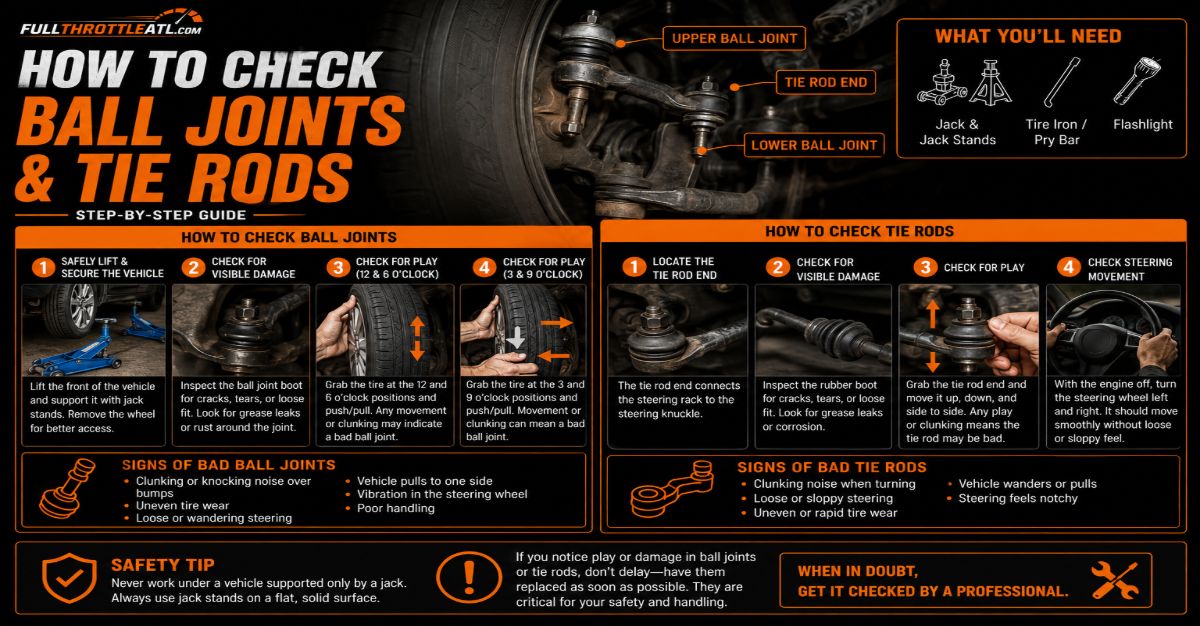
Checking your ball joints and tie rods requires lifting the vehicle securely on jack stands and performing specific manual push-and-pull tests alongside detailed visual inspections of the rubber boots. By following this 6-step process taking 30 to 45 minutes at an intermediate skill level, you can accurately identify failing steering and suspension components before they compromise your vehicle handling or cause uneven tire wear.
Before You Start
- Time Required: 30 to 45 minutes total
- Difficulty Level: Intermediate
- Typical Cost: $0 (if you already own the tools) to $30 for inspection gear
- Tools and Materials: Floor jack (1 unit, rated for vehicle weight), jack stands (2 units, minimum 2-ton capacity), wheel chocks (2 units), pry bar or large screwdriver (1 unit, 12 to 24 inches long), flashlight or headlamp (1 unit), mechanic gloves, and safety glasses.
- Prerequisite Conditions: Park on a flat, level concrete surface with the engine off and the steering wheel unlocked.
Step 1: Secure and Chock the Vehicle
Park your vehicle on a flat, solid concrete surface, engage the emergency parking brake firmly, and place two wheel chocks securely behind and in front of the rear tires.
- Action: Turn your steering wheel to the center position and leave the ignition key in the accessory position to keep the steering wheel unlocked.
- Success Check: You will know this step is complete when the vehicle cannot roll forward or backward even if pushed manually, and the steering wheel turns freely from lock to lock without resistance.
- Common Mistake: Chocking only one side of a single tire or working on an asphalt driveway on a hot day, where jack stands can sink into the pavement. Always use a small scrap piece of plywood under each jack stand if working on soft asphalt.
Step 2: Lift and Support the Front End
Identify your vehicle manufacturer’s designated front jacking points using your owner manual and lift the front end until both front tires clear the ground by 3 inches.
- Action: Position your hydraulic floor jack under the center subframe or pinch weld, raise the vehicle, and slide your 2-ton jack stands under the frame support rails. Lower the floor jack slowly until the vehicle weight rests completely on the jack stands. Push and pull firmly on the front bumper to verify the vehicle is stable before proceeding.
- Success Check: You will know this step is successful when the vehicle rests solidly on both jack stands with no rocking, and both front tires hang completely free in the air.
- Common Mistake: Relying on the hydraulic floor jack to hold the vehicle during the inspection. Never place any part of your body under a vehicle that is not fully supported by rated jack stands.
Step 3: Perform the Tie Rod Wiggle Test
Place your hands at the 9 o’clock and 3 o’clock positions on the front driver-side tire and push and pull rapidly with firm alternating pressure.
- Action: Shove the front edge inward while pulling the rear edge outward in a rapid push-pull motion. Listen closely for any clicking sounds and watch the steering wheel to see if it responds immediately or exhibits dead play. Have an assistant shine a flashlight behind the wheel to watch the outer tie rod end where the threaded stud connects to the steering knuckle.
- Success Check: You will know the tie rods are healthy if the steering wheel moves instantly with the tire with zero free play, and the outer tie rod joint shows no vertical or horizontal stud movement.
- Common Mistake: Confusing steering rack lash with outer tie rod failure. If the entire inner steering rod moves sideways inside the rubber bellows boot while the outer joint stays rigid, the inner tie rod is worn out.
Step 4: Perform the Ball Joint Wiggle Test
Move your hands to the 12 o’clock and 6 o’clock positions on the exact same tire and rock the wheel by pushing inward at the top while pulling outward at the bottom.
- Action: Rock the tire back and forth firmly along the vertical axis. To test lower load-bearing ball joints, wedge your 12 to 24-inch pry bar underneath the bottom tire tread using the concrete floor as a fulcrum, and gently pry upward while watching the lower control arm and steering knuckle.
- Success Check: You will know the ball joints are in good condition if the tire moves smoothly against the suspension springs without any metallic knocking sounds, clunking, or visible separation between the control arm and the steering knuckle.
- Common Mistake: Forgetting to place a floor jack under the lower control arm on vehicles equipped with Short-Long Arm (SLA) suspensions. On those specific designs, letting the suspension hang fully extended puts heavy tension on the spring, masking loose ball joints unless the control arm is preloaded with a jack.
Step 5: Conduct a Visual Inspection of Boots and Seals
Wipe away heavy road grime and old grease from the rubber dust boots covering both the ball joints and the tie rod ends using a clean shop rag.
- Action: Shine your headlamp or flashlight directly onto the rubber boots of every ball joint and tie rod end on both the left and right front wheels. Inspect every fold of the rubber for deep dry-rot cracks, tears, punctures, or fresh grease oozing out of seams.
- Success Check: You will know the boots pass inspection if the rubber remains pliable, unbroken, and completely sealed without any grease leaks or exposed metal joints.
- Common Mistake: Assuming a joint is fine just because it passed the physical wiggle test. A torn rubber boot lets abrasive road grit and water destroy the internal socket within a few hundred miles, meaning incipient failure is already underway.
Step 6: Isolate Joint Play from Wheel Bearing Wear
Check for ambiguous looseness by placing your fingertips across the upper coil spring while an assistant rocks the tire at the 12 and 6 o’clock positions.
- Action: If you felt looseness during the vertical wiggle test, feel the coil spring for vibrations while the wheel is rocked. Simultaneously, watch the rear edge of the brake rotor relative to the brake caliper bracket.
- Success Check: You will know the issue is a wheel bearing rather than a ball joint if you feel distinct buzzing vibrations through the coil spring and see the brake rotor shifting independently from the steering knuckle.
- Common Mistake: Misdiagnosing a loose wheel bearing as a blown ball joint. If the play originates at the center wheel hub rather than the control arm pivot point, replace the wheel bearing assembly instead of the ball joint.
Common Mistakes and How to Fix Them
- Skipping the Alignment After Tie Rod Replacement: Replacing an outer or inner tie rod changes your toe alignment settings instantly. Fix: Schedule a professional four-wheel alignment immediately after installation to prevent rapid, destructive tire wear.
- Using Incorrect Pry Bar Leverage Points: Prying against delicate aluminum components or brake dust shields can bend them permanently. Fix: Always leverage your pry bar solely against solid steel structural elements like the lower control arm or solid tread blocks.
- Ignoring Passenger Side Inspection: Mechanics often check the driver side and assume the passenger side is fine. Fix: Always repeat steps 3 through 5 meticulously on both sides of the vehicle, as road conditions impact each side differently.
Variations: How the Process Changes by Suspension Type
- MacPherson Strut Suspensions: These popular setups hang freely when the vehicle is lifted on jack stands, making ball joint and tie rod play immediately obvious during standard 12/6 and 9/3 wiggle tests without extra tools.
- Double Wishbone and Multilink Suspensions: These systems feature upper and lower control arms. When checking lower ball joints on these vehicles, you must place a floor jack directly under the lower control arm to simulate ride-height load before checking for vertical play with a pry bar.
How Long Does It Take and What Does It Cost
- Time Investment: Expect to spend 30 to 45 minutes for a complete, thorough front-end inspection of both sides. Rushing through the visual boot inspection is the primary reason failing parts get missed.
- Financial Cost: Inspecting the components yourself costs nothing if you own basic garage tools. Purchasing a quality pry bar and headlamp runs between $20 and $40 total. Replacing faulty parts later ranges from $50 for DIY parts to $300 at a professional repair shop.
Frequently Asked Questions
Can I drive with a worn tie rod end?
Driving with a worn tie rod end is extremely dangerous and not recommended. If the internal socket separates completely while driving, you will lose complete steering control of that wheel, leading to a sudden loss of vehicle direction and potential accidents.
How do I know if my inner or outer tie rod is bad?
Outer tie rod failure creates distinct play and clicking at the 9 and 3 o’clock positions right at the steering knuckle. Inner tie rod failure typically exhibits the same 9 and 3 play, but when you look under the rubber steering bellows boot near the center of the car, you will see the inner joint moving independently of the steering rack housing.
Do I need special tools to check ball joints?
You do not need special tools for a basic inspection beyond a standard floor jack, jack stands, and a sturdy 12 to 24-inch pry bar. However, if you discover a bad ball joint and plan to replace it yourself, you will need a dedicated ball joint press kit and a torque wrench.
What causes ball joints and tie rods to fail prematurely?
Premature failure is typically caused by torn rubber grease boots that allow road salt, water, and grit to wash away internal lubrication. Driving over deep potholes, hitting curbs at high speeds, and running oversized, heavy aftermarket wheels also accelerate mechanical wear.