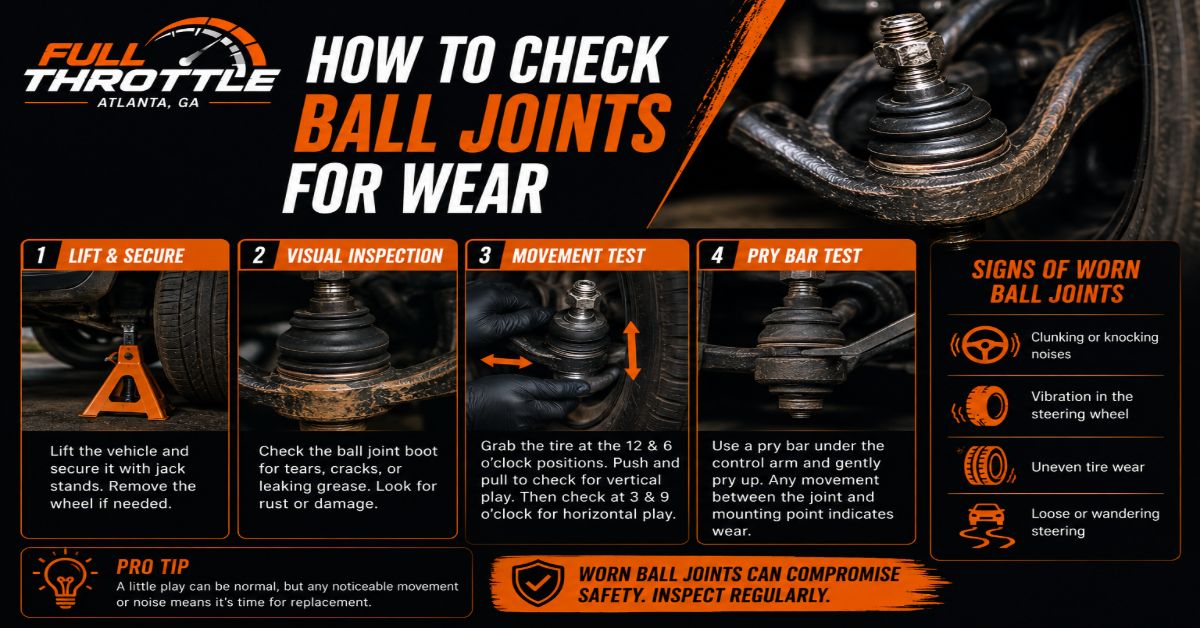
Inspecting your ball joints ensures your vehicle remains safe and controllable, preventing catastrophic suspension collapse. This comprehensive guide covers the complete 6-step inspection process, requiring 45 to 60 minutes using standard garage tools, delivering professional diagnostic accuracy on your first attempt.
Before You Start
- Total Time Required: 45 to 60 minutes
- Difficulty Level: Intermediate
- Estimated Cost: Zero (if you own tools) to 30 dollars (if purchasing a pry bar)
- Prerequisite Skills: Basic hydraulic jack safety and wheel removal
Tools and Materials Checklist
- Floor jack: 1 unit, rated for your specific vehicle weight
- Jack stands: 2 units, matching or exceeding jack capacity
- Wheel chocks: 2 units
- Pry bar: 1 unit, large, 12 to 24 inches
- Channel lock pliers: 1 pair, large
- Dial indicator with magnetic base: 1 unit (optional, for precise measurements)
- Flashlight or headlamp: 1 unit
- Safety glasses and mechanics gloves: 1 pair each
Step 1: Secure Vehicle and Set Chocks
Park your vehicle on a flat, level concrete surface, engage the parking brake firmly, and place wheel chocks behind the rear tires.
- How to do it: Drive your vehicle onto a completely flat concrete workspace. Pull the emergency brake lever or engage the electronic parking brake switch. Wedge your two wheel chocks tightly against the rear-facing side of both rear tires to prevent any rolling motion once the front end lifts.
- Success Check: You will know this step worked when the vehicle is completely immobilized and cannot roll forward or backward even when pushed firmly.
- Common Mistake: Parking on an asphalt driveway on a hot day or on a sloped incline, which can cause jack stands to shift or slip. Always use a rigid concrete slab.
Step 2: Elevate and Unload Suspension Correctly
Lift the vehicle using the correct jacking point based on your suspension type to completely unload internal spring tension from the ball joints.
- How to do it: Identify your suspension design. For MacPherson strut suspensions found on most modern cars, place your floor jack under the factory frame pinch weld and lift until the front wheel hangs completely free, then slide a jack stand under the frame reinforcement. For SLA or double-wishbone suspensions with coil springs resting on the lower control arm common on trucks and heavy SUVs, place the floor jack directly under the lower control arm as close to the lower ball joint as possible. Lift until the tire clears the ground by 3 inches, then position a safety jack stand under the frame as a backup without transferring the primary vehicle weight off the control arm jack.
- Success Check: You will know this step worked when the targeted suspension corner is elevated, the wheel spins freely, and the ball joint is correctly loaded or unloaded according to your specific suspension geometry.
- Common Mistake: Lifting a truck by the frame when the coil spring rests on the lower control arm. Doing this keeps the ball joint compressed under thousands of pounds of spring force, masking severe wear during physical testing.
Step 3: Perform the 12-and-6 Vertical Wheel Shake Test
Grip the tire firmly at opposite vertical points and rock it aggressively to isolate potential vertical looseness.
- How to do it: Position yourself directly in front of the elevated wheel. Reach out and grab the outer rubber tread firmly with your hands positioned at the 12 o’clock and 6 o’clock positions. Push inward with your top hand while pulling outward with your bottom hand, then reverse the motion in a rapid push-pull rocking cadence. Listen intently for metallic clicking, popping, or clunking sounds, and watch for independent play between the wheel rim and the lower control arm.
- Success Check: You will know this step worked when you can definitively feel whether the entire assembly moves solidly with the steering knuckle or if the top of the tire flaps independently with loose play.
- Common Mistake: Confusing wheel bearing play with ball joint wear. Have an assistant press and hold the brake pedal firmly while you repeat the 12-and-6 shake. If the play vanishes entirely, the issue is a failing wheel bearing hub rather than the ball joint.
Step 4: Execute the Pry Bar Axial and Lateral Play Test
Apply mechanical leverage underneath the tire and directly at the joint interface to expose hidden vertical and horizontal displacement.
- How to do it: Slide your 12 to 24-inch pry bar underneath the bottom tread of the front tire. Rest the shaft of the bar on a small wood block on the concrete and use downward leverage on the handle to lift the tire upward by 1 inch. Shine your flashlight directly at the lower ball joint, watching for any vertical movement or gap opening between the steering knuckle and the control arm. Next, insert the tip of the pry bar directly into the gap between the control arm and the steering knuckle housing, and pry gently side to side to check for lateral play.
- Success Check: You will know this step worked when you have visually verified that the joint stud remains completely stationary inside its socket without any vertical or horizontal separation.
- Common Mistake: Prying against aluminum control arms or delicate dust shields with excessive force, which can puncture components or bend thin sheet metal brackets. Apply controlled, steady leverage.
Step 5: Measure Play with a Dial Indicator
Quantify exact movement values using a magnetic base dial indicator to verify whether play exceeds manufacturer engineering tolerances.
- How to do it: Attach the magnetic base of your dial indicator firmly to the lower control arm, positioning the plunger tip so it rests squarely against the bottom of the steering knuckle or the ball joint housing plate. Zero out the dial face. Have an assistant use a pry bar to apply vertical lifting pressure to the tire as performed in the previous step. Read the total millimetric or thousandths-of-an-inch deflection shown on the gauge needle.
- Success Check: You will know this step worked when you obtain an exact numerical measurement of total travel to compare against the maximum allowable limit of 0.050 inches or 1.27 millimeters.
- Common Mistake: Mounting the magnetic base onto a flexible surface like a plastic splash guard or a thin brake dust shield, which results in false readings as the mounting base shifts along with the plunger.
Step 6: Conduct Visual and Tactile Inspection of the Dust Boot
Examine the rubber protective boot and grease fittings for tears, dry rot, leaks, and internal contamination.
- How to do it: Take a clean shop rag and wipe away accumulated road grime, brake dust, and old grease from around the rubber ball joint dust boot. Shine your flashlight closely across the entire surface of the rubber. Look for hairline cracks, deep splits, punctures from road debris, or grease leaking out of clamped seams. If your vehicle uses grease fittings or built-in wear indicators, inspect whether the grease nipple collar sits flush with or recessed below the outer housing cover.
- Success Check: You will know this step worked when you have confirmed that the rubber boot is supple, fully sealed, and retaining clean grease without any metal-on-metal exposure.
- Common Mistake: Assuming a joint is healthy just because the boot looks intact from a distance. Tiny pinhole tears allow moisture inside, washing away internal lubrication and destroying the joint from the inside out within weeks.
Common Mistakes and How to Fix Them
Even experienced DIY mechanics occasionally run into diagnostic traps when inspecting suspension linkages. Review these common errors to ensure accurate results:
- Testing Tie Rods Instead of Ball Joints: Rocking the tire horizontally at the 9 o’clock and 3 o’clock positions tests your outer and inner tie rod ends, not your ball joints. Stick strictly to the 12 and 6 positions for ball joint checks.
- Ignoring Seized Joints: Assuming a tight joint is always healthy. If a ball joint has suffered total internal corrosion and grease starvation, it can seize solid. A seized joint causes binding, heavy steering return, and snapping risks just as a loose joint does. If the steering pops violently during low-speed turns while all play tests show zero movement, replace the dry joint immediately.
- Replacing Only the Dust Boot: Attempting to slip a new rubber boot onto a joint that has already run dry with internal grit contamination. Once dirt enters the socket, the metal bearing surfaces are scored. Always replace the entire ball joint assembly if the boot fails.
Variations Based on Vehicle Design and Setup
Suspension architectures dictate slight adjustments to your inspection methodology:
- Vehicles with Upper and Lower Ball Joints: Double-wishbone and SLA front suspensions feature both an upper and a lower ball joint. Repeat steps 4 and 5 on the upper control arm as well, placing your pry bar between the upper arm and knuckle to check for horizontal and vertical play.
- Sealed Versus Greasable Joints: Factory original equipment ball joints are often permanently sealed units without grease zerks, requiring total replacement upon failure. Aftermarket replacement joints often include grease fittings (zerks). When servicing greasable joints, pump fresh high-temp chassis grease into the zerk using a grease gun until the rubber boot swells slightly, purging old contaminated black grease.
- Pressed-In Versus Bolt-On Ball Joints: When your inspection fails, identify your joint attachment style. Many trucks and older cars use bolt-on or riveted joints that require grinding out rivets and bolting in replacements. Modern front-wheel-drive passenger cars typically feature pressed-in ball joints that require a heavy-duty C-clamp ball joint press tool kit to remove and install.
How Long Does It Take and What Does It Cost
- Time Investment: Expect to spend 45 to 60 minutes for a thorough inspection of both front wheels. If you have never jacked up your vehicle or removed front wheels before, budget up to 90 minutes.
- Financial Cost: A visual and physical inspection costs nothing if you already own basic garage tools. Purchasing a quality pry bar and a floor jack kit runs between 50 and 150 dollars if starting from scratch. Replacing a failed ball joint ranges from 20 to 80 dollars per part for DIYers, whereas professional shop labor runs between 250 and 600 dollars including a mandatory post-repair wheel alignment.
Frequently Asked Questions
Can I drive with a worn ball joint?
Driving with a worn ball joint is dangerous and strongly discouraged. Once internal play exceeds manufacturer limits, the ball can pull completely out of its socket under load, causing the wheel to tuck under the fender, resulting in an immediate loss of steering control and a severe accident.
How often should ball joints be inspected?
You should inspect your ball joints at every oil change or tire rotation interval, which is roughly every 5,000 to 7,500 miles. At a minimum, perform a rigorous physical inspection once a year, especially if you frequently drive over rough potholes, unpaved gravel roads, or construction zones.
Do I need a wheel alignment after checking ball joints?
Simply inspecting your ball joints does not alter your vehicle alignment angles. However, if your inspection reveals excessive wear and you proceed to replace the ball joints or control arms, a professional four-wheel alignment is mandatory immediately afterward to prevent rapid tire wear and steering pull.
What are the main symptoms of bad ball joints?
Common symptoms include a dull clunking or popping noise originating from the front suspension when driving over bumps or turning the steering wheel, a vague or wandering steering feel that requires constant correction on the highway, and uneven cupping wear along the inner edges of your front tires.
Are upper and lower ball joints equally likely to fail?
Lower ball joints typically fail much faster than upper ball joints on most vehicles. This occurs because the lower joint bears the primary vertical load of the vehicle weight and absorbs direct impact shocks from road bumps, whereas upper ball joints primarily act as stabilizing pivot points.