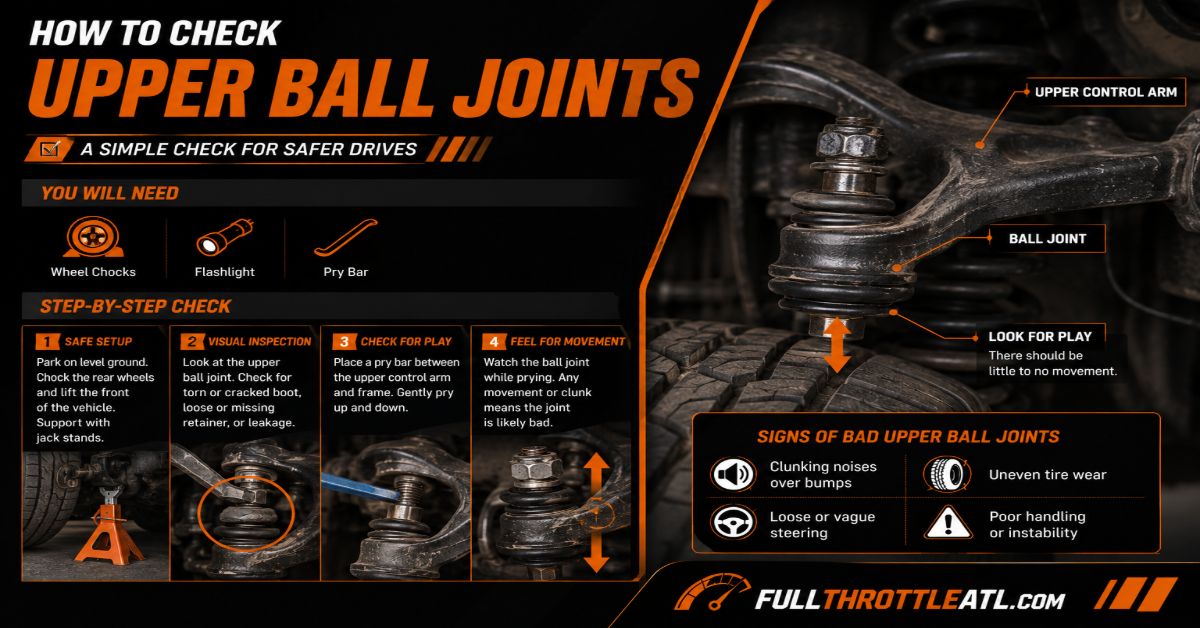
Checking upper ball joints safely and accurately requires isolating the upper suspension arm from spring tension to measure physical play. This comprehensive guide covers the exact 5-step process, tools, and measurements needed to diagnose steering instability and prevent catastrophic failure in 30 to 45 minutes.
Before You Start
- Time Required: 30 to 45 minutes
- Difficulty Level: Intermediate (Mechanical aptitude required)
- Estimated Cost: $0 (if you already own basic hand tools) to $50 (if purchasing a pry bar and dial indicator)
- Required Tools & Materials:
- Hydraulic Floor Jack (1 unit, rated for 2 to 3 tons)
- Jack Stands (2 units, matching weight rating)
- Wheel Chocks (2 units)
- Heavy-Duty Pry Bar (1 unit, 24-inch to 36-inch length)
- Magnetic Base Dial Indicator (1 unit, optional, 0.001-inch increments)
- Flashlight or Work Light (1 unit)
- Torque Wrench and Socket Set (1 unit)
- Wire brush and clean rags
- Prerequisite Conditions: Park on solid, perfectly flat concrete. Never perform suspension checks on asphalt or sloped surfaces where a vehicle can slip off jack stands.
Step 1: Secure and Prep the Vehicle
Park on flat, level ground, engage the emergency parking brake firmly, and place wheel chocks tightly behind both rear tires.
- Execution: Turn off the engine and remove the keys. Grab your wire brush and clean any loose mud, salt, or debris away from the upper control arm, steering knuckle, and ball joint area so you can see microscopic movement clearly later.
- Success Check: You will know this step is complete when the vehicle is immobilized against rolling in either direction, and the front wheel wells are free of loose surface debris.
- Common Mistake: Failing to choke the rear wheels securely. When the front end lifts, the vehicle can shift slightly on its suspension, causing a jack stand to kick out.
Step 2: Unload the Upper Ball Joint Tension
Raise the front of the vehicle using your hydraulic floor jack and support it with jack stands based strictly on your suspension type.
- Execution:
- If your vehicle has Short-Long Arm (SLA) suspension with a coil spring sitting on the lower control arm, place the floor jack directly under the lower control arm as close to the wheel as possible. Lift until the tire clears the ground by 2 to 3 inches. This compresses the lower spring and completely unloads the upper joint.
- If your vehicle features MacPherson struts or an SLA suspension with a spring mounted on the upper arm, place the floor jack under the designated factory frame lift point. Lift the vehicle until the front suspension hangs completely free.
- Slide your heavy-duty jack stands under the factory-reinforced frame pinch welds or crossmember supports, then slowly lower the hydraulic jack until the vehicle rests securely on the stands. Leave the hydraulic floor jack lightly touching the frame as a secondary safety backup.
- Success Check: You will know this step is correct when you can grab the top and bottom of the front tire and feel zero binding or spring tension fighting your movement.
- Common Mistake: Jacking up an SLA lower-spring suspension by the frame. This leaves the lower control arm hanging, keeping extreme spring tension locked against the upper ball joint and hiding dangerous internal wear.
Step 3: Perform the 12 and 6 O’Clock Push-Pull Test
Place one hand at the very top (12 o’clock) of the front tire and your other hand at the bottom (6 o’clock), then aggressively push and pull to check for mechanical play.
- Execution: Push hard inward with your top hand while pulling outward with your bottom hand, then rapidly reverse the motion in a pumping action for 10 to 15 seconds per wheel. Shine your work light directly onto the upper ball joint stud where it enters the steering knuckle. Listen closely for sharp metal-on-metal clicking, and watch to see if the upper ball stud shifts independently inside its housing socket.
- Success Check: You will know the joint is healthy if the tire assembly moves smoothly as an integrated unit with the entire suspension without any independent slack, clunking noises, or visible separation at the upper joint.
- Common Mistake: Confusing wheel bearing play with ball joint wear. If the tire rocks at 12 and 6 o’clock, you must watch the ball joint boot directly. If the hub moves while the upper stud remains dead still, the issue is a loose wheel bearing rather than the ball joint.
Step 4: Execute Leverage Testing with a Pry Bar
Insert your heavy-duty pry bar horizontally between the top of the steering knuckle and the upper control arm to measure vertical and radial play.
- Execution: Wedge the tip of your 24-inch to 36-inch pry bar securely between the upper control arm and the steering knuckle casting. Forcefully pry downward on the control arm while using the knuckle as a fulcrum to test for vertical separation. For precision measurement, mount your magnetic dial indicator base onto the upper control arm, position the plunger needle flat against the top of the steering knuckle, and zero the dial. Pry downward again and read the deflection.
- Success Check: You will know the measurement is accurate when the dial indicator records total vertical play below 1.0 mm (0.04 inches) and radial play below 0.8 mm (0.03 inches). Any vertical movement exceeding 3.0 mm (0.12 inches) means the joint is completely worn out.
- Common Mistake: Prying against rubber bushings instead of solid metal points. Prying against control arm bushings will give you a false sense of loose ball joint play because the rubber bushings flex naturally under leverage.
Step 5: Conduct the Rubber Boot Visual Inspection
Wipe down the ball joint rubber dust boot with a clean, dry rag and inspect it under bright flashlight illumination for structural degradation.
- Execution: Examine every millimeter of the rubber boot surrounding the ball joint stud. Look closely for hairline dry-rot cracks, pinhole punctures, tears, or grease weeping out of the upper and lower metal crimp seams.
- Success Check: You will know the boot passes inspection if the rubber remains pliable, unbroken, completely sealed, and free of foreign grit or moisture contamination.
- Common Mistake: Dismissing a small tear because the joint passed the physical play tests in Steps 3 and 4. A torn boot introduces abrasive road salt, water, and dirt that destroys internal bearing surfaces within weeks.
Step 6: Reassemble and Torque Wheel Lug Nuts
Lower the vehicle back to the ground and secure all wheel hardware to exact factory specifications.
- Execution: Raise the vehicle slightly off the jack stands using your floor jack, pull the jack stands out from underneath, and lower the vehicle completely to the ground. Use a torque wrench to tighten your wheel lug nuts in a star pattern to the manufacturer’s specified torque rating (typically 80 to 100 lb-ft for passenger cars and 130 to 150 lb-ft for heavy trucks).
- Success Check: You will know this step is finished when every lug nut is torqued evenly and the vehicle sits level on flat pavement ready for a test drive.
- Common Mistake: Tightening lug nuts with an uncalibrated impact wrench without finishing with a manual torque wrench, which can warp brake rotors or cause wheel detachment.
Common Mistakes and How to Fix Them
- Failing to account for control arm bushing deflection: When prying with a bar, technicians often mistake flexing rubber control arm bushings for a failing ball joint. Fix: Always mount your dial indicator directly between the steering knuckle and the upper control arm housing to measure true metal stud separation rather than bushing flex.
- Ignoring dry squeaks during steering: A joint can feel tight during a push-pull test while emitting a loud squeak when turning the steering wheel due to internal lack of grease. Fix: Check if the joint has a grease zerk fitting. If present, pump fresh chassis grease until the old contaminated grease purges out. If it is a sealed non-greasable joint, replace it immediately.
- Skipping alignment checks after replacement: Replacing a worn upper ball joint alters camber and toe alignment angles instantly. Fix: Schedule a professional four-wheel alignment immediately after installing a new upper ball joint to prevent rapid tire wear.
Variations: How the Process Changes by Vehicle Type
- Double Wishbone and Multilink Suspensions: Vehicles with double wishbone setups often place heavy load on the upper ball joint during static rest. For these platforms, you must place your floor jack directly under the lower control arm to compress the spring assembly properly before attempting any leverage tests.
- Integrated Control Arm Assemblies: On many modern trucks and SUVs, the upper ball joint cannot be pressed out separately because it is permanently welded or forged into the aluminum or stamped steel upper control arm. In these cases, you must replace the entire upper control arm assembly rather than just the individual joint.
- Sealed vs. Greaseable Joints: Aftermarket upper ball joints often include grease zerk fittings, requiring annual lubrication maintenance. Factory original equipment manufacturer joints are typically permanently sealed and require no maintenance until failure.
How Long Does It Take and What Does It Cost?
- Time Investment: Inspecting both front upper ball joints takes approximately 30 to 45 minutes for a DIY mechanic working methodically. If you need to replace a failed upper ball joint, budget 2 to 3 hours per side.
- Financial Cost: A diagnostic inspection costs nothing if you perform it yourself with standard garage tools. If replacement parts are necessary, upper ball joints or complete upper control arm assemblies typically range from $40 to $150 per side, while professional shop replacement runs between $250 and $600 including alignment.
Frequently Asked Questions
Can I drive with a bad upper ball joint?
Driving with a failing upper ball joint is extremely dangerous and not recommended. If the ball stud separates completely from its socket while driving, the steering knuckle will disconnect from the control arm, causing an immediate loss of vehicle control and a severe wheel-collapse accident.
How often should upper ball joints be inspected?
You should inspect your upper ball joints at every routine oil change or tire rotation interval, which is roughly every 6,000 to 7,500 miles. Suspension components undergo constant dynamic stress from potholes and rough roads, making early detection vital for safety.
What are the main symptoms of a failing upper ball joint?
Common warning signs include a distinct clunking or popping noise when driving over bumps, erratic steering wander that requires constant corrections on the highway, uneven front tire wear on the inner or outer edges, and a steering wheel that pulls to one side.
Do upper ball joints wear out faster than lower ball joints?
In most vehicle suspension designs, lower ball joints carry the majority of the vehicle’s dead weight and tend to wear out faster. However, vehicles with upper-spring SLA suspensions place heavy loads on the upper joints, making them prone to accelerated wear depending on road conditions.
Should I replace upper ball joints in pairs?
Yes, it is best practice to replace upper ball joints in pairs (both driver and passenger sides simultaneously). Since both components experience identical mileage, road salt exposure, and stress loads, if one side has failed due to wear, the opposing side is typically close behind.