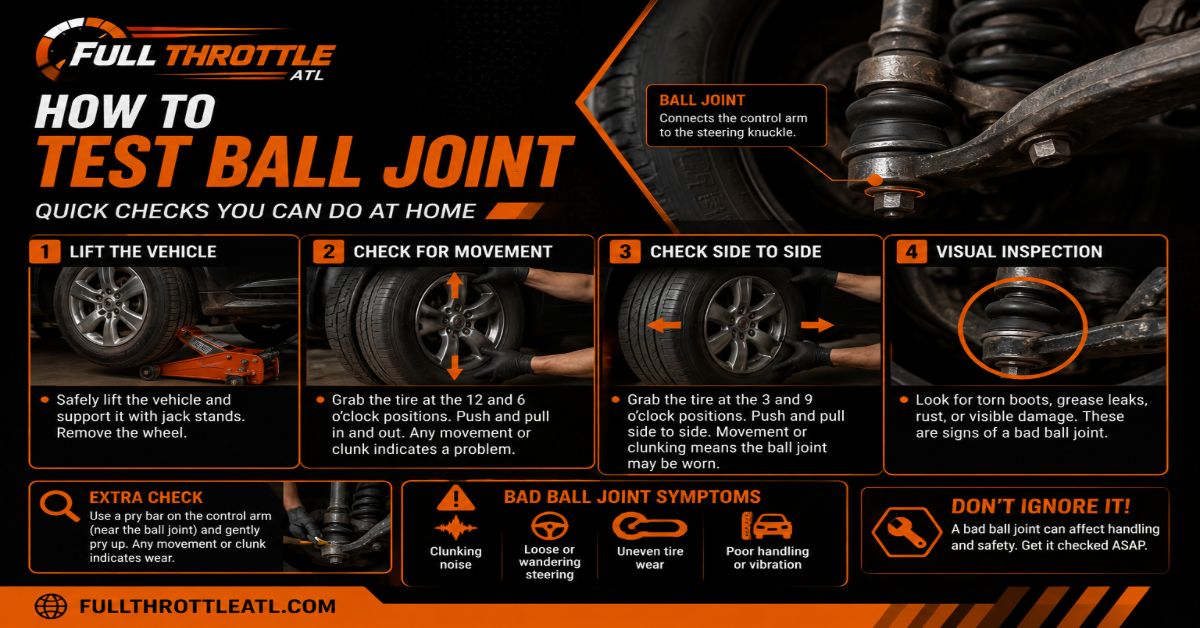
Testing a ball joint accurately prevents catastrophic suspension failure, uneven tire wear, and dangerous steering wander by identifying excessive vertical play, internal binding, or boot tears. This comprehensive procedure outlines eight sequential steps, taking roughly 20 to 30 minutes per side at an intermediate difficulty level. Success depends entirely on correctly understanding your specific suspension geometry before lifting the vehicle.
Before You Start
- Time Required: 20 to 30 minutes per side
- Difficulty Level: Intermediate
- Estimated Cost: $0 if you already own tools; $40 to $70 if you need a pry bar and dial indicator set
- Tools and Materials:
- Floor jack: 1 unit rated for your vehicle weight
- Jack stands: 2 units rated for your vehicle weight
- Wheel chocks: 2 units
- Pry bar: 1 unit, 12 to 24 inches long
- Large slip-joint pliers or Channel locks: 1 unit
- Dial indicator with magnetic base: 1 unit optional for exact limits
- Flashlight: 1 unit
- Safety glasses and mechanics gloves: 1 set
- Prerequisite Conditions: Perform this test on a flat, hard concrete surface. Never attempt suspension diagnostics on gravel or an inclined driveway.
Step 1: Secure and Chock the Vehicle
Park on a level surface, engage the parking brake firmly, and place wheel chocks tightly behind both rear tires. For automatic transmissions, shift the gear selector into Park. For manual transmissions, leave the vehicle in First Gear to prevent any rolling motion while the front end is elevated.
- You’ll know it worked when: The vehicle is completely immobilized against forward or backward movement when you attempt to push it by hand.
- Common Mistake: Chocking the front tires instead of the rear. Always chock the tires that will remain on the ground.
Step 2: Identify Your Suspension Type
Inspect your front suspension layout behind the front wheel to determine if you have a MacPherson strut or a double wishbone setup. A MacPherson strut features a single control arm at the bottom and a strut assembly mounted directly to the steering knuckle. A double wishbone setup features both an upper and a lower control arm.
- You’ll know it worked when: You can visually confirm whether your lower control arm bears the direct spring load or hangs suspended.
- Common Mistake: Treating all front suspensions the same. Lifting a double wishbone setup incorrectly will mask loose ball joints entirely.
Step 3: Raise and Support the Vehicle Safely
Lift the front of the vehicle using the floor jack positioned at the factory designated subframe lifting point, then place jack stands under the approved frame rails and lower the car onto them. Adhere strictly to suspension loading rules based on your Step 2 findings: lift MacPherson strut suspensions by the frame so the wheel hangs completely free, but place a secondary jack or jack stand directly under the lower control arm of a double wishbone setup to keep the internal spring loaded.
- You’ll know is worked when: The vehicle’s weight rests securely on the jack stands, and the suspension components are loaded or unloaded precisely as required for your specific vehicle design.
- Common Mistake: Relying solely on a hydraulic floor jack while working under the vehicle. Always transfer weight to rated jack stands.
Step 4: Perform the 12 and 6 O’Clock Wheel Wiggle Test
Grip the front tire firmly with your hands placed at the 12 o’clock and 6 o’clock positions, then push inward with one hand while pulling outward with the other in a rapid alternating rocking motion. Listen and feel closely for any clunking sounds, structural shifting, or metallic clicking sensations.
- You’ll know it worked when: You can isolate whether the wheel assembly exhibits any vertical rocking motion or if it remains completely firm along that vertical axis.
- Common Mistake: Shaking the wheel horizontally at the 3 and 9 o’clock positions during this test, which actually diagnoses tie rod ends and wheel bearings rather than ball joints.
Step 5: Execute the Pry Bar and Channel Lock Test
Place the pry bar between the lower control arm and the steering knuckle right next to the ball joint housing, then pry upward firmly while an assistant watches the joint structure. Next, take your large Channel lock pliers and squeeze the bottom of the steering knuckle and the control arm together.
- You’ll know it worked when: You observe the metal pin and rubber boot simultaneously, confirming whether there is any independent vertical gap opening up between the two connected components.
- Common Mistake: Prying against thin sheet metal suspension components instead of solid structural casting points, which yields false readings.
Step 6: Take Precision Measurements with a Dial Indicator
Attach the magnetic base of your dial indicator securely to the lower control arm, position the indicator tip against the bottom of the steering knuckle, and zero out the gauge. Repeat the upward pry bar test from Step 5 while watching the gauge needle travel.
- You’ll know it worked when: You obtain an exact numeric measurement of vertical play in millimeters or inches. Compare this reading against your factory service manual limits, which typically dictate immediate replacement if play exceeds 0.5 mm to 1.5 mm or 0.02 to 0.06 inches.
- Common Mistake: Failing to mount the magnetic base to a completely rigid, unmoving part of the control arm, which causes the gauge to misread flex as joint play.
Step 7: Conduct the Visual Boot and Grease Inspection
Shine your flashlight directly onto the rubber dust boot encasing the ball joint to thoroughly inspect its structural integrity. Look closely for deep surface cracks, complete rubber tears, missing retention rings, or active grease seepage around the perimeter.
- You’ll know it worked when: You have visually verified that the rubber protective barrier is completely sealed and holding internal lubricant without any contamination.
- Common Mistake: Assuming a ball joint is healthy just because it passed the physical play tests. A torn boot introduces abrasive dirt that destroys the joint internally within weeks.
Step 8: Diagnose Binding or Squeaking Symptoms
Disconnect the outer tie rod end from the steering knuckle if your steering wheel binds during turns despite passing the physical play tests, and rotate the steering knuckle assembly back and forth by hand. If you hear a loud squeaking noise resembling an old mattress over bumps, inspect the joint for a Zerk grease fitting to lubricate it.
- You’ll know it worked when: You can distinguish whether internal lubrication has failed, causing the joint to seize, or if dry metal friction is generating noise.
- Common Mistake: Ignoring a squeaking joint on the assumption that only loose joints require attention. Dry, seized ball joints can snap suddenly during hard turns.
Common Mistakes and How to Fix Them
- Unloading Double Wishbone Suspensions Incorrectly: If you lift a double wishbone setup by the frame without supporting the lower control arm, the internal spring tension locks the ball joint tight and masks loose play. Fix: Lower the vehicle frame back down, place a floor jack directly under the lower control arm, and lift it until the spring compresses before re-testing.
- Confusing Wheel Bearing Play with Ball Joint Play: When shaking the wheel at 12 and 6 o’clock, you might feel movement, but the issue could be a loose wheel bearing rather than the ball joint. Fix: Have an assistant look closely at the backside of the wheel assembly. If the entire brake rotor and hub shift independently from the steering knuckle, replace the wheel bearing instead.
- Misinterpreting Minor Boot Cracks: Surface weather cracking on old rubber boots can look like structural tears at a glance. Fix: Gently pry open the crack with a non-sharp plastic pick. If the crack does not penetrate through to expose internal metal components or grease, the boot may still be serviceable.
Variations of the Testing Process
- Testing Sealed Lifetime Ball Joints: Many modern vehicles feature factory-sealed ball joints with no grease fittings or adjustment points. For these units, visual boot inspection and the dial indicator test are your only definitive diagnostic methods, as you cannot inject fresh grease to quiet down internal wear.
- Testing Upper Ball Joints on Trucks and SUVs: Larger trucks often feature both upper and lower ball joints. To test an upper ball joint, place your floor jack directly underneath the lower control arm to load the suspension, then position your pry bar between the upper control arm and the frame or spindle to check for vertical separation.
Frequently Asked Questions
Can I drive with a bad ball joint?
Driving with a compromised ball joint is extremely dangerous and not recommended. If a worn ball joint separates completely while driving, the wheel will tuck inward or break away from the vehicle, causing an immediate and total loss of steering control. Replace failing ball joints immediately upon detection.
How much does professional ball joint replacement cost?
Professional replacement typically ranges from $250 to $650 per side, depending heavily on your vehicle make, model, and whether the ball joint is bolted, riveted, or pressed into the control arm. Riveted or pressed units require specialized press tools and additional labor hours, increasing overall repair bills.
Do I need a wheel alignment after replacing a ball joint?
Yes, a professional front-end wheel alignment is mandatory immediately after replacing any ball joint. Removing and installing suspension components alters your steering geometry, camber, and toe settings. Skipping an alignment will cause rapid, severe tire wear and poor handling.
How long do ball joints typically last?
Most factory ball joints last anywhere from 70,000 to 150,000 miles under normal driving conditions. However, vehicle lifespan varies significantly based on regional road salt exposure, deep potholes, aggressive driving habits, and whether the vehicle is lifted or running oversized off-road tires.