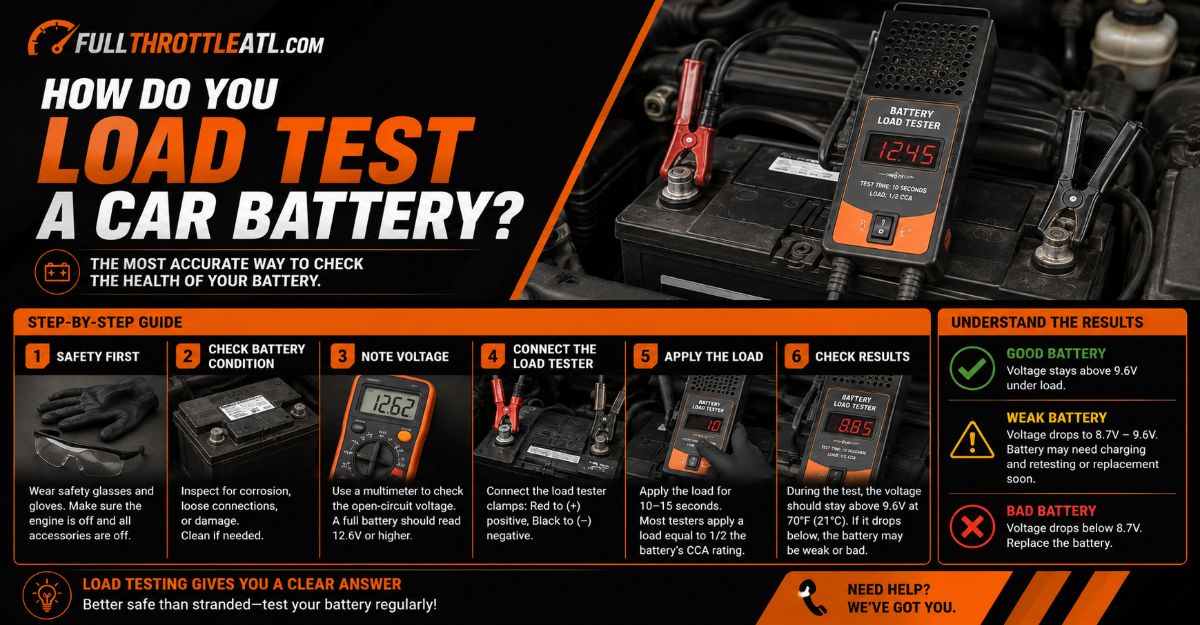
To load test a car battery, you must verify it is at 100% state of charge ($\ge 12.6\text{V}$), apply an electrical load equal to 50% of its Cold Cranking Amps (CCA) rating for 15 seconds, and measure if the voltage remains above $9.6\text{V}$ at $21^\circ\text{C}$ ($70^\circ\text{F}$). The entire process takes approximately 15 minutes, requires basic electrical safety gear, and depends heavily on testing a fully charged battery to prevent false failure readings.
Before You Start
- Time Required: 15–20 minutes (excludes charging time if battery is below $12.4\text{V}$).
- Difficulty Level: Beginner to Intermediate.
- Estimated Cost: $0 (using existing tools) to $40–$150 (purchasing a digital conductance or carbon pile tester).
- Prerequisites: Battery must be fully charged ($\ge 12.4\text{V}$ minimum, ideal $\ge 12.6\text{V}$) with clean, uncorroded lead posts.
Required Tools and Materials Checklist
- Safety Equipment: 1 pair of ANSI Z87.1 safety glasses, 1 pair of nitrile or chemical-resistant rubber gloves.
- Testing Hardware (Choose One):
- Option A (Recommended): Digital Conductance Battery Tester (Quantity 1).
- Option B (Professional): 500A Carbon Pile Load Tester (Quantity 1).
- Option C (Budget): Digital Multimeter with min/max recording (Quantity 1).
- Maintenance Tools: 1 wire terminal brush, $1/2\text{-inch}$ or $10\text{mm}$ box wrench (for post removal), smart battery charger ($4\text{A}$–$10\text{A}$ output), baking soda and water solution ($1:10$ ratio for neutralize cleaning).
Step-by-Step Load Testing Process
1.Step 1: Inspect Safety Hazards and Clean Battery Terminals:Safety Check & Terminal Prep.
Put on your safety glasses and gloves before touching the battery. Visually inspect the polypropylene case for cracks, bulging sides, top leaks, or loose terminal posts. Neutralize surface corrosion by scrubbing top terminals with a wire brush dipped in a baking soda-water solution until clean lead metal is exposed, then wipe dry with paper towels.
- Target Settings/Quantity: Ensure vehicle ignition, lights, and accessories are switched OFF. If testing out of the vehicle, place the battery on a level, non-conductive wooden or concrete surface.
- Success Checkpoint: You’ll know it worked when the battery terminal posts shine with silver-grey bare metal and no green/white powdery copper-sulfate oxidation remains.
- Common Mistake & Avoidance: Clamping test leads directly onto oxidized posts creates high contact resistance, causing artificial voltage drops. Always scrub posts down to raw metal before connecting clamps.
2.Step 2: Measure Baseline Open-Circuit Voltage and Remove Surface Charge:State of Charge (SoC) Verification.
Set your Digital Multimeter to DC Volts ($20\text{V}$ scale) and place the red probe on the positive terminal ($+$) and black probe on the negative terminal ($-$). If the battery was charged within the last 4 hours or the car was recently driven, remove the surface charge by turning on the vehicle high-beam headlights for 15 seconds, turning them off, and letting the battery rest for 5 minutes.
- Target Settings/Quantity: Baseline open-circuit voltage must read $12.6\text{V}$ or higher ($100\%$ charge) for standard flooded lead-acid, or $12.8\text{V}$ for AGM batteries.
- Success Checkpoint: You’ll know it worked when the stabilized resting voltage holds steady above $12.4\text{V}$ ($75\%$ minimum state of charge). If voltage is below $12.4\text{V}$, charge the battery fully on a smart charger before load testing.
- Common Mistake & Avoidance: Load testing a discharged battery ($<12.4\text{V}$) will yield a false “Bad Cell” reading and can permanently damage a discharged plate structure. Never skip the charging step.
3.Step 3: Calculate Target Test Parameters:Parameter Verification.
Locate the manufacturer label on top or side of the battery casing and record the Cold Cranking Amps (CCA) rating (e.g., $600\text{ CCA}$). For carbon pile testing, calculate your target load current by dividing the CCA rating by 2 ($600\text{ CCA} \div 2 = 300\text{ Amps}$ load).
- Target Settings/Quantity: Measure ambient room or outdoor temperature. Standard passing thresholds assume $21^\circ\text{C}$ ($70^\circ\text{F}$). If testing in cold conditions, reduce the passing voltage threshold according to the temperature scale ($8.5\text{V}$ minimum limit at $0^\circ\text{C} / 32^\circ\text{F}$).
- Success Checkpoint: You’ll know it worked when you have an exact numeric load target (half-CCA value) and an adjusted passing voltage baseline based on ambient air temperature.
- Common Mistake & Avoidance: Confusing CCA (Cold Cranking Amps) with CA (Cranking Amps) or MCA (Marine Cranking Amps). CA is measured at $0^\circ\text{C}$ and is roughly $20\%$ higher than CCA. Always use the rated CCA number.
4.Step 4: Connect the Load Tester and Execute the Stress Cycle:Stress Cycle Execution.
Connect the load tester clamps directly to the battery posts: Red clamp to Positive ($+$) post first, Black clamp to Negative ($-$) post second. Select your testing procedure based on your equipment:
- Method A — Digital Conductance Tester: Select battery type (Standard Flooded or AGM), enter exact label CCA using arrow buttons, and press TEST. The tool automatically applies a micro-load and measures AC conductance within 5 seconds.
- Method B — Carbon Pile Load Tester: Turn the rotary load knob clockwise until the ammeter needle reaches your calculated half-CCA target (e.g., $300\text{A}$). Hold this exact current for 15 seconds max, observing the real-time voltage gauge, then immediately rotate the knob counter-clockwise to zero.
- Success Checkpoint: You’ll know it worked when the tester completes its cycle without sparking, emitting smoke, or exceeding the 15-second carbon pile limit.
- Common Mistake & Avoidance: Leaving a carbon pile load active for more than 15 seconds will overheat the carbon discs and severely warp battery plates. Use a stopwatch or count out loud.
5.Step 5: Record Minimum Voltage Drop and Evaluate Recovery Rate:Result Interpretation.
Read the final voltage displayed during the 15th second of the carbon pile test, or observe the final printout/display on your digital tester. Immediately after releasing the load, leave probes connected for an additional 60 seconds to observe voltage bounce-back.
- Target Settings/Quantity: Under load, voltage must remain at or above $9.6\text{V}$ (at $21^\circ\text{C} / 70^\circ\text{F}$). After releasing the load, the battery should rapidly recover to $12.4\text{V}$ or higher within 60 seconds.
- Success Checkpoint: You’ll know it worked when you have confirmed both a passing loaded voltage state ($\ge 9.6\text{V}$) and a rapid open-circuit recovery slope.
- Common Mistake & Avoidance: Misinterpreting a slow voltage bounce-back. If a battery holds $9.7\text{V}$ under load but fails to rebound above $12.0\text{V}$ within one minute, high internal resistance/sulfation is present; replace the battery.
Temperature Correction Matrix for Carbon Pile Testing
Temperature significantly affects electrochemical activity inside lead-acid batteries. As internal battery temperature drops, chemical reaction speeds slow down, reducing available voltage during load exertion. Use this standard table to adjust your minimum acceptable passing voltage during Step 5.
| Ambient Temperature (°F) | Ambient Temperature (°C) | Minimum Voltage Under Load (15 sec) | Battery Health Status |
| $70^\circ\text{F}$ or higher | $21^\circ\text{C}$ or higher | $9.6\text{V}$ | $100\%$ Capacity Target |
| $60^\circ\text{F}$ | $16^\circ\text{C}$ | $9.5\text{V}$ | Normal Operating Range |
| $50^\circ\text{F}$ | $10^\circ\text{C}$ | $9.4\text{V}$ | Cold Weather Compensated |
| $40^\circ\text{F}$ | $4^\circ\text{C}$ | $9.3\text{V}$ | Near Freezing Threshold |
| $32^\circ\text{F}$ | $0^\circ\text{C}$ | $9.1\text{V}$ | Freezing Point Limit |
| $20^\circ\text{F}$ | $-7^\circ\text{C}$ | $8.9\text{V}$ | Sub-Zero Performance |
| $10^\circ\text{F}$ | $-12^\circ\text{C}$ | $8.7\text{V}$ | Extreme Cold Scale |
| $0^\circ\text{F}$ | $-18^\circ\text{C}$ | $8.5\text{V}$ | Absolute Minimum Threshold |
Common Mistakes and How to Fix Them
1. Testing a Discharged Battery ($<12.4\text{V}$)
- The Failure: Connecting a load tester to a battery reading $12.1\text{V}$ drops voltage below $8.0\text{V}$ instantly, leading you to diagnose a broken battery when it was simply uncharged.
- How to Fix: Disconnect the tester. Connect a 3-stage smart charger at $4\text{A}$–$10\text{A}$ until open-circuit voltage reads $12.6\text{V}+$. Allow the battery to sit idle for 2 hours to stabilize before re-testing.
2. Testing AGM Batteries on “Standard Flooded” Settings
- The Failure: Digital conductance testers use different internal algorithms for Absorbed Glass Mat (AGM) batteries because AGM units possess lower internal resistance ($R_i$). Testing AGM on Flooded mode reports false “Replace” codes.
- How to Fix: On your digital tester main screen, explicitly scroll down and select AGM Flat Plate or AGM Spiral prior to entering the CCA numerical rating.
3. Overheating the Carbon Pile Tester
- The Failure: Holding the load knob at high amperage past 15 seconds heats internal carbon discs beyond thermal limits, causing smoke, knob melt, or shorting out battery cell separators.
- How to Fix: If smoke appears, quickly turn the load knob counter-clockwise to zero, disconnect the negative clamp, and allow the unit to cool outdoors for 20 minutes. Inspect test leads for insulation melt before reuse.
4. Poor Contact on Side-Post Batteries
- The Failure: GM side-post batteries feature deep threaded lead sockets. Standard clamp jaws only contact the outer steel bolt threads, introducing massive electrical resistance.
- How to Fix: Thread solid brass side-post adapter studs into the sockets hand-tight. Connect load clamps directly onto the smooth lead surface of the adapters, not the steel bolts.
Method Variations: Alternate Testing Techniques
Depending on the tools at your disposal, you can load test a car battery using three primary techniques:
Variation 1: In-Car Crank Test (Multimeter Only — No Load Tester)
If you do not own a carbon pile or digital battery tester, you can use your vehicle’s starter motor as a natural load resistor:
- Disable ignition by pulling the Fuel Pump Relay or Ignition Coil fuse (prevents engine from starting).
- Attach a Digital Multimeter (set to DC Volts, Min/Max record mode) to the battery terminals.
- Crank the engine starter for 15 continuous seconds.
- Check the minimum recorded voltage on your DMM display. If voltage drops below $9.6\text{V}$ (at room temperature), the battery fails the load test.
Variation 2: Digital Conductance Testers vs. Carbon Pile Load Testers
- Digital Conductance Testers (e.g., Midtronics, TOPDON): Send a high-frequency AC frequency signal through the battery to measure plate surface area without drawing high current. Safe, creates zero sparks, can test completely inside vehicle, ideal for AGM/Gel cells.
- Carbon Pile Testers (e.g., Schumacher, Harbor Freight): Draw true heavy DC amperage across variable carbon plates. Excellent for traditional flooded lead-acid batteries, but generates significant thermal heat and requires strict 15-second operating limits.
How Long Does It Take and What Does It Cost?
- Total Active Time: 15 minutes.
- Total Elapsed Time: 2 hours (if charging and surface-charge removal periods are required).
- DIY Cost: $0 (if using existing multimeter crank method) to $35–$60 (entry-level digital or carbon pile load testers).
- Professional Shop Cost: $0–$30. (Most auto parts retailers will perform a digital conductance load test free of charge).
Frequently Asked Questions
Can I load test a car battery while it is connected to the car?
Yes, provided the ignition switch and all vehicle electronics are turned completely off. However, for carbon pile testing drawing $300\text{A}+$, disconnecting the ground cable removes any risk of voltage spikes damaging sensitive vehicle ECU circuits.
What is the difference between open-circuit voltage testing and load testing?
Open-circuit voltage measures static chemical potential (state of charge), whereas load testing measures dynamic current delivery across internal plate resistance. A bad battery can hold $12.6\text{V}$ sitting still, yet drop to $4.0\text{V}$ the second a load is introduced.
Why does a battery need to be fully charged before a load test?
A load test draws massive amperage. If a battery is partially depleted ($<12.4\text{V}$), its chemical reaction speed is already suppressed. Testing it in this state causes voltage to plunge prematurely, producing an inaccurate failure result.
How do I interpret digital battery tester diagnostic results?
- GOOD BATTERY: Capacity exceeds $80\%$ of rated CCA; voltage remains stable.
- GOOD, CHARGE: Battery health is fine, but state of charge is low. Recharge and put back in service.
- CHARGE & RETEST: State of charge is too low to yield a accurate health determination. Charge fully, then re-test.
- REPLACE / BAD CELL: Internal short circuit, heavy sulfation, or capacity below $50\%$ CCA rating. Replace immediately.